Table of Contents
Advertisement
Owner's Manual
Before using this unit, carefully read the sections entitled: "USING THE UNIT SAFELY"
and "IMPORTANT NOTES" (p. 2–5). These sections provide important information
concerning the proper operation of the unit. Additionally, in order to feel assured that
you have gained a good grasp of every feature provided by your new unit, Owner's
Manual should be read in its entirety. The manual should be saved and kept on hand
as a convenient reference.
Copyright © 2004 ROLAND CORPORATION
All rights reserved. No part of this publication may be reproduced in any form without
the written permission of ROLAND CORPORATION.
Advertisement
Table of Contents

Related Manuals for Roland Edirol UA-25


Summary of Contents for Roland Edirol UA-25
- Page 1 Manual should be read in its entirety. The manual should be saved and kept on hand as a convenient reference. Copyright © 2004 ROLAND CORPORATION All rights reserved. No part of this publication may be reproduced in any form without the written permission of ROLAND CORPORATION.
- Page 2 Cet appareil numérique de la classe B respecte toutes les exigences du Règlement sur le matériel brouilleur du Canada. Model Name : UA-25 Type of Equipment : USB Audio Interface Responsible Party : Roland Corporation U.S. Address : 5100 S. Eastern Avenue, Los Angeles, CA 90040-2938 Telephone : (323) 890 3700 NOTICE...
- Page 3 Refer all servicing to your retailer, the nearest EDIROL/Roland Service Center, or an autho- rized EDIROL/Roland distributor, as listed on the “Information” page. • Never use or store the unit in places...
- Page 4 012d • Immediately turn the power off, and request servicing by your retailer, the nearest Roland Service Center, or an autho- rized EDIROL/Roland distributor, as listed on the “Information” page when: - If smoke or unusual odor occurs - Objects have fallen into, or liquid has been spilled onto the unit;...
-
Page 5: Important Notes
(including padding) that it came in, if possible. Otherwise, you will need to use equivalent packaging materials. • Use a cable from Roland to make the connection. If using some other make of connection cable, please note the following precautions. - Page 6 IMPORTANT NOTES Handling CD-ROMs • Avoid touching or scratching the shiny underside (encoded surface) of the disc. Damaged or dirty CD-ROM discs may not be read properly. Keep your discs clean using a commercially available CD cleaner. Copyright • Unauthorized recording, distribution, sale, lending, public performance, broadcasting, or the like, in whole or in part, of a work (musical composition, video, broadcast, public...
-
Page 7: Table Of Contents
Contents Contents of the package... 8 Front and rear panel... 9 Front panel... 9 Rear Panel ... 12 Driver installation and settings (Windows)... 14 About the driver modes... 14 Installing the driver ... 15 Driver settings ... 26 Driver installation and settings (Macintosh)... 32 About the driver modes... -
Page 8: Contents Of The Package
Contents of the package The box in which the UA-25 was shipped should contain the following items. After opening the box, first check to make sure that all the items are included. If any items are missing, please contact the store where you purchased the UA-25. -
Page 9: Front And Rear Panel
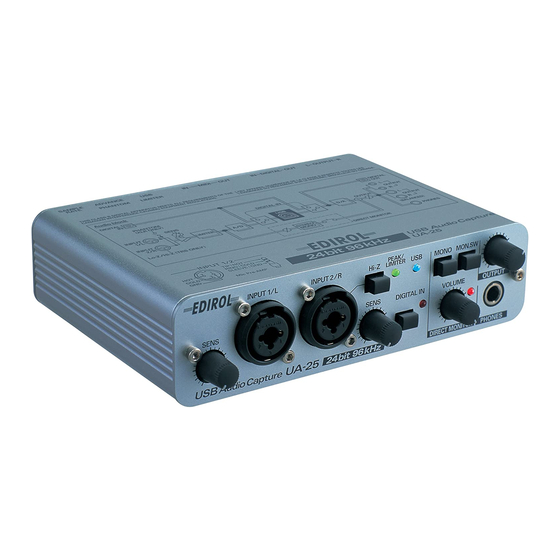
Front and rear panel Front panel fig.front fig.jack-type Combo input jacks These are analog audio input jacks with mic preamps. They accommodate either XLR or phone plugs, allowing you to connect a variety of equipment. Either balanced or unbalanced signals may be connected. -
Page 10: Peak/Limiter Indicator
Limiter on Limiter off USB indicator This will light blue when the UA-25 is connected to your computer via a USB cable and the computer has correctly detected the UA-25. Digital input switch If you want to record the digital input, turn this on ( inward position). -
Page 11: Digital Input Indicator
Digital input indicator This indicator will blink when you turn on the digital input switch. When an external digital signal device is connected to the digital input connector, the indicator will change to steadily lit. STEREO/MONO select switch (Direct Monitor section) This selects whether the signal input via the combo input jacks (1) is to be monitored in stereo (STEREO) or in monaural (MONO). -
Page 12: Rear Panel
* The MIDI IN/OUT connectors are not available if you are using Standard driver mode (p. 13). Limiter switch This turns the UA-25’s hardware limiter on/off. If a sudden, high-volume sound is input to the combo input jacks (1), the limiter applies mild compression to prevent clipping from occurring at the AD converter. -
Page 13: Phantom Power Switch
Choose this mode if you are using software that uses the standard audio driver included with your operating system. * The sample rate will be fixed at 44.1 kHz/16 bit regardless of the setting of the UA-25’s sample rate select switch. -
Page 14: Driver Installation And Settings (Windows)
This is the operating mode when the rear panel ADVANCE (mode select) switch is ON. You can use the native driver included on the UA-25 Driver CD- ROM to record, play, and edit audio with high quality and stable timing. In Advanced mode, audio signals are transferred between the UA-25 and the computer at a bit depth of 24 bits and a sample rate of 44.1/48/96 kHz. -
Page 15: Installing The Driver
Installing the driver Windows XP users Disconnect all USB cables except for a USB keyboard and USB mouse (if used). Open the System Properties dialog box. Click the Windows start menu, and from the menu, select Control Panel. In “Pick a category”, click “Performance and Maintenance”. - Page 16 You are now ready to install the driver. Set the UA-25’s ADVANCE (mode select) switch to the ON position. Use the USB cable to connect the UA-25 to your computer. Near the task bar, your computer will indicate “Found New Hardware”. Please wait.
- Page 17 If the “What action do you want Windows to take?” (Step 4) setting was not set to “Ignore”, a “Hardware Installation” dialog box will appear. A dialog box with a “!” symbol will appear. Click [Continue Anyway]. Continue the installation. A dialog box with a “x”...
- Page 18 Driver installation and settings (Windows) If you changed the “Driver Signing Options” setting (p. 15, step 4), restore the setting to its previous state after restarting Windows. Log on to Windows using the same user account as the one used when the driver was installed.
-
Page 19: Giving Priority To Background Services
Giving priority to background services Crackling may occur in the sound if you omit making this setting. To ensure that audio and MIDI are processed smoothly, make the setting as follows. Open the System Properties dialog box. From the Windows start menu, choose Control Panel. -
Page 20: Windows 2000 Users
Driver installation and settings (Windows) Windows 2000 users Disconnect all USB cables except for a USB keyboard and USB mouse (if used). Open the System Properties dialog box. Click the Windows Start button, and from the menu that appears, select Settings | Control Panel. In Control Panel, double-click the System icon. - Page 21 You are now ready to install the driver. Set the UA-25’s ADVANCE (mode select) switch to the ON position. Use the USB cable to connect the UA-25 to your computer. If the “File signature verification” (Step 4) setting was not set to “Ignore”, a “Digital Signature Not Found”...
- Page 22 Driver installation and settings (Windows) The Insert Disk dialog box will appear. Click [OK]. The Files Needed dialog box will appear. Input the following into the “Copy files from” field, and click [OK]. (drive name) : \DRIVER\XP_2k * Specify the drive name of your CD-ROM drive. If the “File signature verification”...
- Page 23 Enabling background processing In Windows 2000, make settings to enable background processing. If you fail to make this setting, you may experience interruptions in the sound. To ensure that MIDI and audio processing occurs smoothly, use the following procedure to make settings. Click the Windows Start button, and from the menu that appears, select Settings | Control Panel.
- Page 24 Specify the drive name of your CD-ROM drive. Set the UA-25’s ADVANCE (mode select) switch to the ON position. Use the USB cable to connect the UA-25 to your computer. The driver will be installed automatically. To check the drive name...
- Page 25 Driver installation and settings (Windows) In the SetupInf dialog box, click [OK]. Next, make MIDI device and audio device settings. (➝“Driver settings” (p. 26)))
-
Page 26: Driver Settings
* For details on how to make settings for your software, you should also refer to the owner’s manual for your software. * If you are unable to select the UA-25 in the device settings of your software, it is possible that the UA-25 driver was not installed correctly. Please re-install the driver. -
Page 27: Windows Xp Users
Input/output device settings If you will be using the Windows Media Player application with the UA-25, specify the input/output devices as follows. The method in which you make device settings will depend on the software you are using. For details, refer to the owner’s manual for your software. - Page 28 This completes the audio and MIDI input/output settings. Proceed to “Checking that you hear sound” (p. 31). EDIROL UA-25 EDIROL UA-25 EDIROL UA-25 MIDI OUT If the Sound and Multimedia icon is not displayed, click “Show all control panel options” in the frame at the...
- Page 29 Click the MIDI tab. fig.2-29_30 Specify the “MIDI output”. Add a check mark to [Single instrument], click [EDIROL UA-25 MIDI OUT] in the list, and click [Apply]. Close the Multimedia Properties dialog box. Click [OK] to complete the settings. This completes the audio and MIDI input/output settings.
-
Page 30: Software Settings
Before you start up your software, use a USB cable to connect the UA-25 to your computer. If your software allows you to specify MIDI and audio input/output settings, choose EDIROL UA-25. For details, refer to the owner’s manual for your software. -
Page 31: Checking That You Hear Sound
From the SampleSong folder of the CD-ROM, drag Alright(.wav) onto your desktop. Set the UA-25’s sample rate select switch to 44.1 kHz. If you change the UA-25’s sample rate, you must disconnect the USB cable that connects the UA-25 to your computer, and then re-connect the USB cable in order for the new setting to take effect. -
Page 32: Driver Installation And Settings (Macintosh)
This is the operating mode when the rear panel ADVANCE (mode select) switch is ON. You can use the native driver included on the UA-25 Driver CD- ROM to record, play, and edit audio with high quality and stable timing. In Advanced mode, audio signals are transferred between the UA-25 and the computer at a bit depth of 24 bits and a sample rate of 44.1/48/96 kHz. -
Page 33: Mac Os X Users
Click [Continue Installation]. The display will indicate “The software was successfully installed”. Click [Restart] to restart your computer. This completes installation of the UA-25 driver. Next, make MIDI device and audio device settings. Driver installation and settings (Macintosh) If the “Authenticate” dialog... - Page 34 • Close your software before you unplug the UA-25’s USB cable. • Turn off the Sleep setting of your Macintosh. • The UA-25 will not work in the Classic environment of Mac OS X. Use it when the Classic environment is not running.
- Page 35 Click Add Device. New external device will appear. Connect the ▼ and ▲ symbols (which signify the outputs and inputs) of the EDIROL UA-25 icon to those of the New External Device icon by using the mouse to drag between them.
-
Page 36: Mac Os 9 Users
If you install OMS or FreeMIDI after installing the UA-25 driver, you must install the UA-25 driver once again. If a UA-25 is already connected to your Macintosh when you install the driver, a message like the following will appear when the Macintosh is started up. Perform the steps described below as appropriate for the message that is displayed. - Page 37 fig.05-20 If a message like the following is displayed, click [Continue]. The other currently running applications will exit, and installation will continue. A dialog box will indicate Installation was successful. Click [Restart] to restart your Macintosh. Driver installation and settings (Macintosh)
-
Page 38: Setting The Driver
Driver installation and settings (Macintosh) Setting the driver If you are using FreeMIDI, proceed to “FreeMIDI settings” (p. 41). OMS settings Set the UA-25 ADVANCE (mode select) switch to the ON position. Use the USB cable to connect the UA-25 to your computer. fig.oms-setting... - Page 39 Choose “Open” from the File menu. From the OMS Setting folder that you copied in step 3, select the UA-25 file, and click [Open]. A screen like the one shown here will appear. From the Edit menu, select OMS MIDI Setup.
- Page 40 If a MIDI sound module is connected to the UA-25’s MIDI OUT connector, click the MIDI connector icon shown in the diagram at the right. If you hear sound, the settings have been made correctly.
-
Page 41: Freemidi Settings
FreeMIDI settings Set the UA-25 ADVANCE (mode select) switch to the ON position. Use the USB cable to connect the UA-25 to your Macintosh. From the CD-ROM, drag the Driver E (Mac OS 9) - FreeMIDI Setting folder into the FreeMIDI Applications folder on the hard disk of your Macintosh to copy it there. - Page 42 If a MIDI sound module is connected to the UA-25’s MIDI OUT connector, click the MIDI connector icon shown in the diagram at the right. If you hear sound, the settings have been made correctly.
-
Page 43: Installing The Asio Driver
Installing the ASIO driver You must install the UA-25 driver even if you will be using only audio on the UA-25. Be sure to install the UA-25 driver before you install the ASIO driver. (p. 36) This section explains how to install the ASIO driver that allows the UA-25 to be used by your sequencer software or audio editing software. - Page 44 (e.g., Cubase VST, Logic Audio, Digital Performer, Metro, or SPARK LE). Start up your ASIO-compatible software. Open the Audio setting dialog box of your ASIO- compatible software, and select [UA-25 ASIO1.0 16bit] as the ASIO Device. The Audio setting dialog box will be named differently depending on your software.
-
Page 45: Basic Connections And Settings
Roland PCS series. Basic connections Use a USB cable to connect the UA-25 to your computer. MIDI data and audio data are transferred in both directions via the USB cable. By connecting headphones or monitor speakers as shown in the diagram below, you can monitor the playback from your software or the sound from an instrument or audio device connected to the UA-25. -
Page 46: Recording A Mic Or Guitar
Basic connections and settings Recording a mic or guitar Here’s how to make connections and settings to let you sing or play your guitar while listening to audio data on your computer, and record just the vocal or guitar into your sequencer. fig.mic-guitar Connect to INPUT 2... -
Page 47: Direct Monitor Soft Control Switch
Set this to the same sampling frequency as selected in your recording software. If you change the UA-25’s sample rate, you must disconnect the USB cable that connects the UA-25 to your computer, and then re-connect the USB cable in order for the new setting to take effect. -
Page 48: Recording A Digital Signal
96 kHz REC (record). Digital input switch Turn this on so that the UA-25 will synchronize to the digital signal being input to the digital input connector. When synchronized correctly, the sync indicator will light red. If this indicator is blinking red, synchronization has not been achieved. -
Page 49: Recording To An Md Or Other Digital Device
If you change the UA-25’s sample rate, you must disconnect the USB cable that connects the UA-25 to your computer, and then re-connect the USB cable in order for the new setting to take effect. -
Page 50: Adjusting The Audio Latency
Basic connections and settings Adjusting the audio latency When using the UA-25 in Advanced mode, you can change the driver settings to adjust the latency of the audio. To adjust the latency, change the Buffer Size in the driver settings dialog box. -
Page 51: Using Asio Direct Monitor
Using ASIO direct monitor If you are using the UA-25 from an ASIO2.0-compatible software in Advanced mode, the UA-25’s direct monitor switch can be controlled automatically from the software. Open the control panel. Windows XP Click the Windows start menu, and from the menu, select Control Panel. -
Page 52: Troubleshooting
Install the UA-25 driver once again as described in “Driver installation and settings (Windows)” (p. 14). Is the UA-25 connected correctly? Make sure that you have used a USB cable to correctly connect the UA-25 to the USB connector of your computer. Could other USB devices be connected? When installing, all USB devices other than the UA-25 should be disconnected from your computer. - Page 53 The driver cannot be installed unless the USB connector is enabled. Does your computer or USB hub have a sufficient power supply? If you are using bus power, the UA-25 cannot be connected if insufficient power is being supplied to it. Check whether the following cases might apply.
- Page 54 The “Welcome to the Found New Hardware Wizard” dialog box appears even though you installed the driver. Did you connect the UA-25 to a different USB connector than the one you used when installing the driver? If your computer or USB hub has two or more USB connectors, and you connect the UA- 25 to a USB connector to which you have not previously connected it, this dialog box may appear even though you have already installed the driver.
- Page 55 Have you specified the audio and MIDI data output destination in the operating system? Depending on the software you are using, you may need to specify the UA-25 as the audio data output destination for your computer. For details on this setting, refer to “Driver settings”...
- Page 56 Could the UA-25's digital input switch be turned on (Digital Input mode)? If the UA-25 is in digital input mode, the audio signal being input to the digital input jack will be output. The audio signal from your computer will not be output.
- Page 57 Set the sample rate to the same setting. If you change the UA-25’s sample rate, you must disconnect the USB cable that connects the UA-25 to your computer, and then re-connect the USB cable in order for the new setting to take effect.
- Page 58 Have you correctly specified the MIDI device you want to use? In order to record/play MIDI tracks via the UA-25, you must install the UA-25 driver correctly (➔ “Driver installation and settings” (Windows, p. 14 / Mac OS, p. 32)).
- Page 59 Noise or pops are heard when recording/ playing on your computer Noise is heard during audio playback Pops/clicks occur during audio playback Noise is heard in the recorded sound In Windows, did you make the setting described in “Giving priority to background services”? In order to ensure that audio/MIDI processing occurs smoothly, make the setting described in “Giving priority to background services.”...
- Page 60 Are you using a USB device in addition to the UA-25? Try switching off USB audio devices other than the UA-25. If you have connected the UA-25 to an external USB hard disk, please connect the UA- 25 directly to a USB connector on the computer itself.
- Page 61 Set your software and the UA-25 to the same sample rate. If you change the UA-25’s sample rate, you must disconnect the USB cable that connects the UA-25 to your computer, and then re-connect the USB cable in order for the new setting to take effect.
- Page 62 While you were using the UA-25, could your computer have performed a task with a heavy processing load, such as accessing a CD-ROM drive or network? If a heavy processing load occurs while the UA-25 is being used, it may not work correctly. In this case, stop playback/recording, and then start playback/recording once again.
- Page 63 The sound is too weak Has a mic or guitar been left connected? If a mic or guitar is connected to the UA-25, disconnect the mic or guitar and turn the input sensitivity knob all the way toward the left (lowering the input level).
- Page 64 Troubleshooting A substantial amount of noise is present in the guitar sound Does the noise decrease when you turn down the volume of your guitar? If the noise decreases when you turn down the volume of your guitar, the guitar pickup may be affected by noise from your computer or display.
-
Page 65: Main Specifications
Main Specifications ● Number of Audio Record/ Playback Channels Record: 1 pair of stereo Playback: 1 pair of stereo DIGITAL IN SWITCH = OFF: Full duplex (except for 96 kHz setting) DIGITAL IN SWITCH = ON: Recording only ● Signal Processing PC interface: 24 bits (24-bit operation is available only when ADVANCE switch = ON) -
Page 66: Index
Index Numerics 96 kHz REC/PLAY select switch ADVANCE (mode select) switch Advanced mode Analog input mode AppleTalk ASIO ASIO Device ASIO direct monitor ASIO driver Audio devices Audio MIDI Setup background services Combo input jacks Digital input connector Digital input indicator Digital input mode Digital input switch Digital output connector... - Page 67 MEMO...
- Page 68 Information When you need repair service, call your nearest EDIROL/Roland Service Center or authorized EDIROL/Roland distributor in your country as shown below. HONG KONG Parsons Music Ltd. 8th Floor, Railway Plaza, 39 EUROPE Chatham Road South, T.S.T, EDIROL (Europe) Ltd.