Table of Contents
Advertisement
Quick Links
OWNER'S MANUAL
Thank you, and congratulations on your choice of the Roland Synthesizer SH-32.
Before using this unit, carefully read the sections entitled: "USING THE UNIT
SAFELY" and "IMPORTANT NOTES" (p. 2; p. 4). These sections provide important
information concerning the proper operation of the unit. Additionally, in order to
feel assured that you have gained a good grasp of every feature provided by your
new unit, Owner's Manual should be read in its entirety. The manual should be
saved and kept on hand as a convenient reference.
The SH-32's Low Boost function , which compensates for smaller speakers and other
systems with insufficient low end, is set to ON at the factory. When using the SH-32 with
large speakers or a PA, we recommend turning this feature off. Use the following procedure.
1. While holding down [2/B], turn on the SH-32's power.
2. Press [VALUE
] to switch the function to "
3. Turn the power off, then on again.
Copyright © 2001 ROLAND CORPORATION
All rights reserved. No part of this publication may be reproduced in any form without
the written permission of ROLAND CORPORATION.
" (Off).
Advertisement
Table of Contents

Related Manuals for Roland SH-32


Summary of Contents for Roland SH-32
- Page 1 The SH-32’s Low Boost function , which compensates for smaller speakers and other systems with insufficient low end, is set to ON at the factory. When using the SH-32 with large speakers or a PA, we recommend turning this feature off. Use the following procedure.
- Page 2 (except when this manual provides specific instructions directing you to do so). Refer all servicing to your retailer, the nearest Roland Service Center, or an authorized Roland distributor, as listed on the “Information” page. • Never use or store the unit in places that are: •...
-
Page 3: Using The Unit Safely
• Before using the unit in a foreign country, consult with your retailer, the nearest Roland Service Center, or an authorized Roland distributor, as listed on the “Infor- mation” page. -
Page 4: Important Notes
• In order to fully broaden the range of expression that is possible from its sounds, the SH-32 makes it possible to make settings for a wider range of parameters than those offered by an ordinary sound module. -
Page 5: How To Use This Manual
This owner’s manual is organized as follows. Quick Start For those who are using the SH-32 for the first time, this section provides a simple explanation of how to use and enjoy various functions. Please read the “Quick Start” and follow along by actually operating the SH-32. -
Page 6: Table Of Contents
Listening to the Demo Songs ... 18 Quick Start ... 19 Producing Sound ...20 Getting Started ... 20 About the Playing Modes of the SH-32 (PATCH/PERFORMANCE) ... 20 Switching Modes... 20 Standalone Play of Sounds (PREVIEW)... 21 Playing a Sound with a MIDI Keyboard... 22 Listening to the Preset Sounds ... - Page 7 Rewritable Memory ... 47 Non-Rewritable Memory ... 47 Main Setting Destinations... 48 Objects of Settings That Change with the SH-32’s Mode ... 50 Chapter 2. Creating Your Own Sounds...52 Creating Sounds that Reflect the Position of Sliders/Knobs (MANUAL)... 52 Using Preview Function Hold to Continue Playing a Sound ... 52 Determining the Basic Waveform and Pitch (OSC 1 &...
- Page 8 Contents Other Settings (settings that can be saved to Patches) ... 61 Settings for Use in Playing Monophonic Sounds (SOLO, LEGATO)... 61 Layering Sounds for Greater Fatness (UNISON) ... 62 Applying the Portamento Function (PORTAMENTO, PORTA TIME) ... 62 Applying Analog-Like Modulation to the Pitch (ANALOG FEEL) ... 62 Changing the Pan When Using Stereo Output (PAN) ...
- Page 9 Selecting SH-32 Sounds from an External MIDI Device... 87 Synchronizing Arpeggiator and the LFO to an External MIDI Device ... 88 Saving SH-32 Settings on an External Sequencer (BULK DUMP) ... 88 Restoring Saved Content to the SH-32... 89 Chapter 9. Other Settings...90 Settings Applied to the SH-32 Overall (System Settings)...
- Page 10 Contents Appendices ... 95 Troubleshooting...96 Error Message List...98 Patch List...99 Rhythm Set List...100 Performance List...101 Arpeggio Style List ...102 Rhythm Style List...103 Chord Form List ...104 Parameter List ...105 Patch Parameters ... 105 Rhythm Set Parameters ... 106 Performance Parameters ... 106 System Parameters ...
-
Page 11: Main Features
67 different oscillator waveforms at your fingertips, the SH- 32 makes it possible for you to create sounds unlike any others. The SH-32 also includes four Rhythm Sets (two Preset and two User) that feature TR-909/808 and other drum waveforms. With 32... -
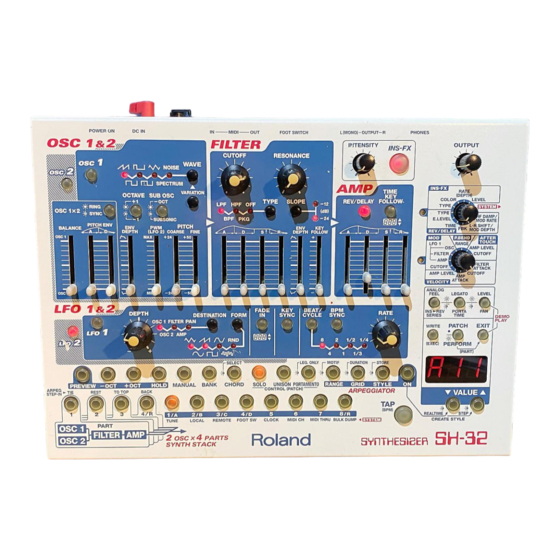
Page 12: Panel Descriptions
Panel Descriptions Front Panel fig.00-02 OSC 1 & 2 (Oscillator 1 & 2) Section Select the waveforms on which sounds are based, and adjust the pitch and other components of the sound. In addition, you can combine OSC 1 and OSC 2 to create a wide variety of sounds. FILTER Section Change the type of filter used, and alter the characteristics of the sound by making various changes to the output waveforms. - Page 13 When you select a parameter for which you want to make settings, the indicator on the left begins to blink, indicating that the SH-32 is ready for changes in the settings. MIDI Settings Knob Selects the parameter to be set when modifying sounds as the result of messages (Modulation, Pitch Bend, Aftertouch, Velocity) received from an external MIDI device.
- Page 14 BACK: Deletes the last note or rest that has been input. [1/A]–[8/R] These switch the tone banks and numbers. Setting the FX/SYSTEM knob to “SYSTEM” allows for selection of parameters with settings that affect the SH-32 as a whole (system parameters). (p. 90) [TAP (BPM)] Sets the tempo (BPM) for arpeggios.
-
Page 15: Rear Panel
Panel Descriptions Rear Panel fig.00-03 1. Security Slot ( http://www.kensington.com/ 2. PHONES Jack This is the jack for connecting headphones (sold separately). 3. OUTPUT Jacks (L (MONO), R) These jacks output the audio signal to the connected mixer/amplifier system in stereo. For mono output, use the L jack. (p. -
Page 16: Getting Ready
Getting Ready Connecting External Devices The SH-32 does not contain an amp or speakers. In order to produce sound, you need to hook up audio equipment such as a monitor speaker or a stereo set, or use headphones. To prevent malfunction and/or damage to speakers or other devices, always turn down the volume, and turn off the power on all devices before making any connections. -
Page 17: Turning On The Power
3. Turn off the POWER switch of the SH-32. Restoring the Factory Settings (Factory Reset) When using the SH-32 for the first time, start out by restoring the settings programmed at the factory to ensure that the SH-32 functions correctly according to the procedures described in the Owner’s Manual. -
Page 18: Listening To The Demo Songs
Listening to the Demo Songs The SH-32 comes with three prerecorded demonstration songs. Playing back these demo songs is called Demo Play. Try starting out by playing the demo songs, and enjoy listening to the SH-32’s excellent tones and effects. No. Song Name Composer... -
Page 19: Quick Start
Quick Start... -
Page 20: Producing Sound
About the Playing Modes of the SH-32 (PATCH/PERFORMANCE) SH-32 offers two modes, allowing you to choose the one that is best for the purpose you have in mind. You can either work with single “Patches” (Patch mode), or use four Patches (including a Rhythm Set) to play in combination with one another (Performance mode). -
Page 21: Standalone Play Of Sounds (Preview)
Standalone Play of Sounds (PREVIEW) You can use the note-entry buttons on the unit to play notes (Preview function). fig.001 Press [PREVIEW]. [PREVIEW] lights up in red, and the buttons you can use in the preview mode (note- entry buttons) light up in orange. Press any of the note-entry buttons to play a note. -
Page 22: Playing A Sound With A Midi Keyboard
Producing Sound Playing a Sound with a MIDI Keyboard You can play the SH-32’s sounds using a MIDI keyboard. To do so, you need to connect the MIDI OUT connector of your keyboard with the MIDI IN connector of the SH-32 (p. 16). -
Page 23: Listening To The Preset Sounds
Listening to the Preset Sounds The SH-32 comes with 128 different Preset Patches, so you can immediately enjoy having a wealth of sounds at your fingertips. fig.004 Press [BANK]. [BANK] lights up, and [1/A]–[4/D] and [8/R] blink. Select a bank. -
Page 24: Using The Effects
Producing Sound Using the Effects The SH-32 comes with two independent effects processors; one of them provides spatial effects such as reverb and delay (Reverb/Delay), while the other is used for inserting distortion, phaser, tremolo, and various other effects (Insertion Effects). -
Page 25: Playing A Rhythm Set
Playing a Rhythm Set Apart from general synthesizer sounds, the SH-32 also has four Rhythm Sets. By using the onboard Arpeggiator (p. 36, p. 74), you can play a loop of simple rhythm patterns. fig.007 Press [BANK]. [BANK] lights up, and [1/A]–[4/D], [8/R] blink. -
Page 26: Modifying The Sound
Modifying the Sound Creating Sounds The SH-32 creates sounds in much the same way as other analog type synthesizers, as shown below. fig.008 OSC 1 Filter FILTER Oscillators OSC 2 OSC (Oscillators) Generate the basic waveforms used as the sound source by the synthesizer (p. 27). -
Page 27: Easy Sound Editing
1. Selecting a Waveform (Oscillator) Here you create the waveforms for the sound source of the synthesizer. The SH-32 provides 2 oscillators, which can be used independently or mixed. fig.010 Press [OSC 1] or [OSC 2] to select the oscillator you want to work with. - Page 28 Modifying the Sound Press [WAVE] to select a waveform group. The indicator for the currently selected waveform lights. To select one of the lower waveforms, get the two indicators above the waveform to light. fig.011 The selected waveform Here are some examples of waveform groups. Saw Tooth waveform group The waveforms of this group contain a fundamental sine wave and its integral harmonics, at a fixed ratio.
-
Page 29: Working On Oscillator Waveforms (Filter)
2. Working on Oscillator Waveforms (FILTER) The filter alters the tone color by cutting or boosting the harmonics of the waveforms created by the oscillator. fig.013 Press [TYPE] to select a filter type. The indicator of the selected filter type lights up. To select a filter type on the lower row, get the two indicators above the name to light. - Page 30 Modifying the Sound Turn [CUTOFF] to set the frequency you want to cut off (Cutoff Point). Here you determine the Cutoff Point of the filter you selected in step 1. Turn the knob clockwise to raise the Cutoff Point, and turn it counterclockwise to lower it. Turn [RESONANCE] to enhance the frequency near the Cutoff Point set in step 2.
-
Page 31: Adding Changes In The Volume (Amp)
3. Adding Changes in the Volume (AMP) After a sound’s been created by the oscillators and has been filtered, you can apply changes to the volume of the sound, and control the attack or decay of the sound. fig.016 Use the Envelope sliders to adjust the changes in volume. fig.015 Attack time slider Decay time slider... -
Page 32: Adding Modulation To The Sound (Lfo)
The LFO creates waveforms that can control the oscillator, filter, and amp, and add some extra change to the sound. The SH-32 has two LFOs. Each LFO can be used independently in setting a different modulation depth with respect to the oscillator, filter, amp, and pan. - Page 33 Press [DESTINATION] to set the destination for which the modulation depth is to be set by means of [DEPTH]. The indicator of the selected destination lights up. To select a destination on the lower row, get the two indicators above the name to light. fig.019 The destination The manner in which sound changes depends on the destination of the LFO.
-
Page 34: Adding An Effect
Effects to the Sound (INS-FX, REV/DELAY)” (p. 64) for details. Are you satisfied with the sound you created? The sound settings created so far will be lost when you switch off the SH-32. Let’s now save the sound into the internal memory. -
Page 35: Saving The Sound
Saving the Sound Sound created on the SH-32 relies on a unique interaction of several parameters, so it’s a good idea to save your sound settings whenever you achieve something you like, and may want to use later. You can save as many as 128 different sound settings on the SH-32. -
Page 36: Playing Arpeggio (Arpeggiator)
Playing Arpeggio (Arpeggiator) The SH-32 provides an automatic arpeggio function (Arpeggiator). With this function, you can play a chord in arpeggio. Also, when a Rhythm Set is selected, you can play a rhythm pattern. An arpeggio is played in accord with the keys that are pressed. There are a number of preset Arpeggio Styles from which you can choose (Arpeggio Styles). - Page 37 Press a chord by using the Preview function (p. 21) or a MIDI keyboard to start playing arpeggio. The Arpeggio Style of the SH-32 starts playing arpeggio according to the position of the touched key. fig.023 Example When you select this style, When you select a Rhythm Set in Patch mode (p.
-
Page 38: Changing The Arpeggiator Tempo
Playing Arpeggio (Arpeggiator) Changing the Arpeggiator Tempo You can change the tempo for arpeggio performances. fig.025 Press [TAP (BPM)]. [TAP (BPM)] lights up. Press [VALUE / ] to set the desired tempo. The tempo is shown in the display. Press [EXIT] to turn the button off. Display You can also set the tempo to the timing you’ve used when... -
Page 39: Playing The Arpeggio Together With A Rhythm Pattern
Playing the Arpeggio Together with a Rhythm Pattern In Performance mode, you can play the arpeggio while playing a rhythm pattern. fig.026 6, 13 8, 13 3, 6 Press [PATCH/PERFORM] to light up the button, and to enter Performance mode. In Performance mode, you can play four Parts (each with its own Patch assigned to it) at the same time. - Page 40 Playing Arpeggio (Arpeggiator) Press [EXIT] to return to Performance mode. Press [STYLE] to light up the button and then press [VALUE select a Rhythm Style. The Rhythm Style number is shown in the display. Press [4/R] while pressing [ON] to light up [4/R]. The Part 4 is set for the arpeggio play.
-
Page 41: Playing A Chord At The Touch Of A Finger (Chord Memory)
Playing a Chord at the Touch of a Finger (Chord Memory) You can easily play a chord simply by touching just one key to which a “Chord Form” has been registered (Chord Memory function). The SH-32 can remember 64 different Chord Forms (11.c–88.c) Using the Chord Memory Function Here’s how you can play a chord by using the Chord Memory function. -
Page 42: Switching Chord Forms
Playing a Chord at the Touch of a Finger (Chord Memory) Switching Chord Forms You can select the Chord Form that has the chord you want to play from the preset Chord Forms. fig.028 Press [CHORD] to make it blink. Press [VALUE / ] to select a Chord Form number (11.c–88.c). -
Page 43: Advanced Use
Advanced Use... -
Page 44: Chapter 1. An Overview Of The Sh-32
MIDI keyboard connected to the MIDI IN connector are treated in the same way as those performed using the SH-32’s Preview function (p. 21) to play sounds. You can also choose to have the OUT connector function as a THRU connector (p. 92). -
Page 45: Patches, Rhythm Sets, And Performances
Patches, Rhythm Sets, and Performances Patches (A11–D88) An individual sound used in a performance is called a Patch. The SH-32 offers a total of 256 Patches, divided into 128 “User Patches” and 128 “Preset Patches.” fig.01-02.e Patch LFO 1 FILTER... -
Page 46: Performances (1-1-8-8)
Performances (1-1–8-8) A combination of four Patches, or of three Patches and a Rhythm Set, is called a Performance. The SH-32 contains 64 Performances; all of these are User Performances that can be overwritten at will. With Performances, four separate tones are handled simultaneously, thus allowing you to enjoy playing ensemble performances or performances using lush tones. -
Page 47: About Memory
Patch, and then you save your changes while in one of these modes, the content of the temporary area for the other mode will not be revised. Chapter 1. An Overview of the SH-32 Rewritable Memory System Memory System memory stores system parameter settings that determine how the SH-32 functions. -
Page 48: Main Setting Destinations
Chapter 1. An Overview of the SH-32 Main Setting Destinations Patches and Performances fig.01-06.e Patch PATCH LEVEL PATCH PAN Arpeggiator Settings STYLE No. (A) ON/OFF Basic Tones OSC1/OSC2 FILTER LFO1/LFO2 Arpeggio Style Rhythm Style PERFORMANCE LEVEL MIDI CH PART TUNE... - Page 49 PERFORMANCE LEVEL PART PITCH PART LEVEL PART PAN OSC RESERVE PART 4/R Arpeggiator Settings STYLE No. (R) ON/OFF Performance Chapter 1. An Overview of the SH-32 Effective only in Patch mode Effects ON/OFF(INS) ON/OFF(REV) GRID TYPE SERIES SW INST PAN MIDI...
-
Page 50: Objects Of Settings That Change With The Sh-32'S Mode
Chapter 1. An Overview of the SH-32 Objects of Settings That Change with the SH-32’s Mode Even when the same knobs and buttons are used, the parameters that are changed with various settings vary according to the current mode as shown by the table on the following page. - Page 51 Patches assigned to each Part in Perfor- mance mode. Chapter 1. An Overview of the SH-32 Part Assign Mode Rhythm Tone Edit Preview function turned on with a...
-
Page 52: Chapter 2. Creating Your Own Sounds
Continue Playing a Sound By having the Preview function hold, you can have sounds continue to play, even without having to hold down the SH-32’s note-entry buttons. This is very a convenient feature, as it allows you to keep both hands free to adjust sliders and knobs while monitoring how a sound changes when, for example, you are editing sounds. -
Page 53: Selecting The Fundamental Waveform (Wave, Variation)
Selecting the Fundamental Waveform (WAVE, VARIATION) [WAVE] Select the waveform groups on which the synthesizer’s sounds are based. Each time [WAVE] is pressed, the selected waveform group is switched in the order shown right. Holding down [WAVE] and pressing [VARIATION] switches the waveform groups in the reverse order of that shown right. -
Page 54: Determining The Pitch (Octave, Pitch)
The dedicated wave that is added in -OCT mode recalls the suboscillator wave of the vintage Roland Juno Series synths. Now it’s easy to reproduce the sound of that legendary synth. SUBSONIC Mode Press [SUB OSC] to make the indicator start blinking. -
Page 55: Changing The Pulse Width Of A Square Wave Periodically (Pwm)
[ENV DEPTH] Here’s how you can adjust the depth of the Pitch Envelope. The more the slider is moved upwards, the greater the change is. Moving the slider below the center position inverts the waveform, and the change in the opposite direction increases. At the center position, the pitch envelope does not create any change in pitch. -
Page 56: Changing The Characteristics Of Sounds (Filter)
Oscillator Sync is applied, and the normal OSC 2 sound. • On the SH-32, the Oscillator Sync function cannot be used together with the sound generator section’s filter functions. If you want to add a simple filter effect to a patch that uses Oscillator Sync, use INS-FX as the filter type (p. -
Page 57: Setting The Cutoff Frequency (Cutoff)
Cutoff frequency In response to demands by pro sound designers for tone- changing capabilities, the SH-32 permits a wide variety of resonance settings. Because of this, raising the resonance level too much results in extremely high output levels in specific frequency ranges. -
Page 58: Changing The Filter According To The Keyboard Position (Key Follow)
Chapter 2. Creating Your Own Sounds [ENV DEPTH] Sets the amount of filter envelope applied. The change in the sound increases the more you raise the slider above the center position. Moving the slider below the center position inverts the shape, and the change increases in the opposite direction. -
Page 59: Increasing And Decreasing The Rate Of Change In Volume According To The Keyboard Position (Time Key Follow)
Increasing and Decreasing the Rate of Change in Volume According to the Keyboard Position (TIME KEY FOLLOW) [TIME KEY FOLLOW] Set this to have the time following the decay time of the amplifier envelope altered according to the position of the key pressed. With the amplifier envelope for the C4 key (Middle C) as the reference, then when values are positive (+), then the higher the key being pressed is above the C4 key, the shorter the time, with negative (-) -
Page 60: Adjusting The Rate Of Modulation (Rate)
The sound produced is relatively smoother than that of the sample and hold wave. The waveforms depicted on the SH-32’s panel are merely images used for reference. While the actual waveforms that are output may resemble these images, they are not identical. -
Page 61: Synchronizing The Modulation To The Song Tempo (Bpm Sync, Beat/Cycle)
You can synchronize the LFO cycle to the tempo specified with [TAP (BPM)] (p. 74). When you press [BEAT SYNC], causing its indicator to light up, the SH-32 is readied for synchronization. When CLOCK, a System function, is set to “... -
Page 62: Layering Sounds For Greater Fatness (Unison)
If you press [VALUE ] while the Legato function is on, “ displayed, and the SH-32 switches to a retrigger-type legato. When employing “Legato On” (as explained above), a smooth legato effect can be obtained. However, the limitations of the sound generator’s... -
Page 63: Changing The Pan When Using Stereo Output (Pan)
Destination Before saving a Patch when you have an external MIDI keyboard connected to the SH-32’s MIDI IN connector, you can play the Patch that is already at that save destination to determine whether or not you really do want that Patch to be overwritten. This gives you better protection against accidental overwriting of your important Patches. -
Page 64: Chapter 3. Applying Effects To The Sound (Ins-Fx, Rev/Delay)
Chapter 3. Applying Effects to the Sound (INS-FX, REV/DELAY) About the Onboard Effects The SH-32 has two built-in effect units, and you can independently edit each unit’s settings. Insertion Effects These effects are inserted directly into the signal path. Included here are distortion, equalization, compression, Auto Wah, and other effects. -
Page 65: Setting The Insertion Effects
[WRITE] and carry out the write procedure. Using the FX/SYSTEM Knob and [VALUE 1. Confirm that the SH-32 is in Patch mode. 2. Turn the FX/SYSTEM knob to the parameter to be set; select “COLOR,” “RATE (DEPTH),” or “LEVEL.”... -
Page 66: Setting The Reverb/Delay
You can set a variety of parameters in each Patch or Rhythm Set for the Reverb/Delay selected with the effect type. 1. Confirm that the SH-32 is in Patch mode. 2. Rotate the FX/SYSTEM knob to select the “REV/DELAY” parameter to be set. -
Page 67: About Effect Settings In Performance Mode
About Effect Settings in Performance Mode When in Normal Performance Mode Normal Performance mode refers to the mode the SH-32 is in after you’ve pressed [PATCH/PERFORM], causing it to light up. fig.03-11 In this mode, you can make effect settings, just as in Patch mode. -
Page 68: Chapter 4. Playing The Rhythm Sets
Selecting Rhythm Sets and Playing the Percussion Instruments The SH-32 has four different Rhythm Sets stored internally; these are divided into two “User Rhythm Sets” and two “Preset Rhythm Sets.” 1. Press [PATCH/PERFORM], causing the indicator light to go off. -
Page 69: Making Settings For Each Rhythm Tone (Percussion Instrument)
Making Settings for Each Rhythm Tone (Percussion Instrument) Here’s how to make the settings for the individual percussion instruments in the Rhythm Set. These settings can be made in Patch mode, Performance mode, or Part Assign mode. 1. Select the Rhythm Set with the settings you want to change. 2. -
Page 70: Saving Changed Settings (Write)
Changes in settings are temporary, and are lost when the power is turned off or when you select another tone. To keep the settings you have modified, save them to the SH-32’s User Memory. A dot appears in the display when a Rhythm Set’s settings are changed. -
Page 71: Chapter 5. Using In Performance Mode
MIDI channels. This type of sound generator, in which each Part is performed independently from the others, is called a mutitimbral sound generator. The following section explains the use of the SH-32 as a mutitimbral sound generator. 1. Confirm that the SH-32 is in Performance mode. -
Page 72: Layering Patches For A Thicker Sound (Part Stack Function)
Parts used in a stack, messages are received only via the MIDI channel for the Part with the lowest Part number. 1. Confirm that the SH-32 is in Performance mode. 2. Assign the Patches you want to have played to their respective Parts (p. -
Page 73: Making Settings For Each Patch Or Rhythm Set In The Parts
1. Confirm that the SH-32 is in Performance mode. 2. Hold down [PATCH/PERFORM] and press [EXIT]. Both buttons blink, and the SH-32 switches to Part Assign mode. 3. Press [1]–[4/R] (Part buttons) to select the Part whose Oscillator Reserve settings you want to make. -
Page 74: Chapter 6. Using Arpeggiator (Arpeggiator)
FOOT SWITCH jack to turn the Arpeggiator on and off (p. 91). • By holding the Preview function, you can have arpeggios continue to play even without having to hold down the SH-32’s note-entry buttons (p. 21). Using in Combination with the Chord... -
Page 75: The Relationship Between Arpeggio Styles And Rhythm Styles
When the System function FOOT SW (Foot Switch) is set to “ ”, you can also use the foot switch connected to the FOOT SWITCH jack to switch Arpeggio Style numbers (p. 91). About Arpeggio Styles An Arpeggio Style is a series of data for basic arpeggio patterns and chord styles recorded in the form of a grid consisting of a maximum of 32 steps x 16 pitches. -
Page 76: Applying Staccato And Tenuto (Duration)
Chapter 6. Using Arpeggiator (ARPEGGIATOR) Applying Staccato and Tenuto (DURATION) This setting (duration) determines whether the sounds are played staccato (short and clipped), or tenuto (fully drawn out). This setting has no effect with Rhythm Styles. 1. Press [GRID], causing the indicator to blink. fig.06-05 2. -
Page 77: Creating Your Own Styles
Patches and factory-set User Performances in which the Arpeggiator is turned on change. By carrying out Factory Reset (p. 94), you can get the SH-32 to once again sound exactly as it did when you first took it out of the box. -
Page 78: Creating Styles By Playing Sounds One At A Time (Step)
1. Hold down ARPEGGIATOR [ON] and press [VALUE (STEP)]. [ON] lights up while [VALUE ] blinks. “toP” appears in the display, indicating that the SH-32 is in Step Input standby. Additionally, the Preview (note-entry) function is turned on automatically. fig.06-08 2. -
Page 79: Creating Styles Using An External Sequencer
Styles in the form of sequence data, then load that data into the SH- 32 to create Styles. To load the data, you need to synchronize the SH-32 to the tempo of the sequencer that’ll be doing the transmitting, and then carry out Realtime Input. -
Page 80: Using Arpeggiator In Performance Mode
Styles that are performed. When Selecting an Arpeggio Style 1. Confirm that the SH-32 is in Performance mode. 2. Press a Part button [1]–[3] to select a Part 1–3. If a Patch is assigned to Part 4/R, then you can also select an Arpeggio Style by selecting Part 4/R. -
Page 81: Chapter 7. Using The Chord Memory Function (Chord)
Chord Memory is a function that allows you to play chords based on pre-programmed Chord Forms, just by pressing a single key on the keyboard. The SH-32 can store 64 of these Chord Forms (11.c–88.c). The 64 Chord Forms programmed at the factory are all fully rewritable. -
Page 82: Creating Your Own Chord Forms
Preset Patches and factory-set User Performances in which the Chord Memory function is turned on change. By carrying out Factory Reset (p. 94), you can get the SH-32 to once again sound exactly as it did when you first took it out of the box. -
Page 83: Chord Memory Parameter Settings
Chord Memory Parameter Settings The settings for the Chord Memory function On/Off and for selection of the Chord Forms are set basically the same way as in Patch mode, and these settings can be saved to individual Performances. Settings for Chord Memory parameters stored in Patches have no effect on operations in Performance mode. -
Page 84: Chapter 8. Using The Sh-32 With External Midi Devices
MIDI connectors. Virtually all electronic musical instruments today are equipped with MIDI. Without MIDI, we would not be able to play the SH-32’s sounds using an external keyboard, or use the SH-32’s Arpeggiator to play back MIDI performance data. Although the SH-32 can be used without knowing very much about MIDI, this chapter provides a simple explanation of the SH-32’s MIDI functionality so that... -
Page 85: Playing The Sh-32 From An External Midi Keyboard
Playing the SH-32 from an External MIDI Keyboard Use an external MIDI keyboard to play the SH-32’s sounds. 1. Use a MIDI cable to connect the SH-32’s MIDI IN connector to the MIDI OUT connector of the external MIDI keyboard. fig.08-01.e... -
Page 86: Determining The Amount The Pitch Is Changed With The Pitch Bender
Chapter 8. Using the SH-32 with External MIDI Devices 2. Press [VALUE / ] to select the value (-63–63). When the value is set to “0,” then no change occurs when Modulation messages are received, and the sound is played according to the value set for the Patch. -
Page 87: Changing The Sound According To The Force Used To Play The Keys (Velocity)
SH-32, causing the SH-32 to select the appropriate Patch, etc. 1. Use a MIDI cable to connect the SH-32’s MIDI IN connector to the MIDI OUT connector of the external MIDI device. 2. Set the SH-32’s receive channel to match the external MIDI device’s transmit channel. -
Page 88: Synchronizing Arpeggiator And The Lfo To An External Midi Device
You can synchronize the Arpeggiator performance tempo and the 1–8 LFO modulation cycle to an external MIDI device’s tempo (clock). 9–16 1. Use a MIDI cable to connect the SH-32’s MIDI IN connector to 17–24 25–32 the MIDI OUT connector on the external MIDI device. -
Page 89: Restoring Saved Content To The Sh-32
Factory Reset procedure (p. 94). 1. Use a MIDI cable to connect the SH-32’s MIDI IN connector to the MIDI OUT connector of the external sequencer. -
Page 90: Chapter 9. Other Settings
• BULK DUMP (Bulk Dump) (p. 88) Setting the Master Tuning (TUNE) This allows you to adjust the overall tuning for the SH-32. The display indicates the frequency of the A4 key (Middle A), with the hundreds place (i.e., 400) omitted. -
Page 91: Foot Sw
Setting the Foot Switch Function (FOOT SW) This selects the function controlled by the foot switch connected to the FOOT SWITCH jack. You can connect two switches, “SW 1” and “SW 2.” When using the DP-2 pedal switch (optional), you can use only the SW 1 function. -
Page 92: Switching The Low Boost Function On And Off
Switching the Low Boost Function On and Off The SH-32 features a Low Boost function that is applied to the total output in order to compensate for a lack of low frequencies that occurs when you use small speakers and headphones. You can turn this on and off whenever you want. -
Page 93: Selecting The Status To Use When The Power Is Turned On
Selecting the Status to Use When the Power is Turned On This selects the status to which the SH-32 switches when the power is turned on (Power Up mode). 1. First, press the POWER switch on the rear panel to turn off the power. -
Page 94: Restoring The Factory Settings (Factory Reset)
Restoring the Factory Settings (Factory Reset) This restores all of the data contained in the SH-32 (or specified types of data) to the settings as programmed at the factory (Factory Reset). When a Factory Reset is carried out, all of the data that has been targeted for Factory Reset will be completely lost;... -
Page 95: Appendices
Appendices... -
Page 96: Troubleshooting
If checking these points does not resolve the problem, please contact your dealer or a nearby Roland service center. * Roland can take no responsibility for the recovery of any lost data, or for any damages incurred as a result of such loss. - Page 97 Certain operations, including the use of the Arpeggiator, result in a large number of sounds being created. In such cases, the SH-32's sys- tem gives priority to processing the sounds themselves, which may halt the processing of large amount of MIDI data and prevent proper functioning.
-
Page 98: Error Message List
Error Message List If there has been a mistake in operation, or if the SH-32 is unable to continue processing as you directed, an error message will appear in the display. Take the appropriate action for the displayed error message. -
Page 99: Patch List
Patch List Bank C (User) Patch Name Comment Bass 1 Bass sound with Resonance effect SyncLead 1 Oscillator Sync lead sound Slicer 1 Beat sound that uses the LFO Arpeggiator Saw 1 Dance sound with ample use of Arpeggiator Dist Lead Feedback lead with distortion strongly applied LFO Pulsing FX sound with heavy use of Noise waveform and LFO... -
Page 100: Rhythm Set List
Rhythm Set List r1U (User) r2U (User) Wave Name Wave Name Note No. BreakSnr2Rvs BreakSnr2Rvs TR808 Snr 5 TR808 Snr 5 TR909Snr4Rvs TR909Snr4Rvs TR909 Snr 3 Break Snare2 TR909 Snr 7 TR909 Snr 7 TR909 Snr 5 TR808 Snr 8 TR909 Snr 5 TR909 Snr 5 TR909 Snr 7... -
Page 101: Performance List
Performance List Performance Name Arpeggio Style Power Beat 11.a Techno Beat 1 11.a HipHop Beat 1 26.a HipHop Beat 2 85.a Pop Beat 1 16.a Dist Sync LoFi Stack 1 Noise FX 1 LFO Pad Pop Beat 2 11.a Asian Beat 24.a Bell ARP 1 51.a... -
Page 102: Arpeggio Style List
Arpeggio Style List * All data is that programmed at the factory. For instructions on carrying out Factory Reset, refer to (p. 94). * The “Patch/Performance Using This Arpeggio Style” column only lists the Arpeggio Styles when the Arpeggiator is turned on at the time the Patch or Performance is called up. -
Page 103: Rhythm Style List
Rhythm Style List * All data is that programmed at the factory. For instructions on carrying out Factory Reset, refer to (p. 94). * The “Performance Using This Rhythm Style” column only lists the Rhythm Styles when the Arpeggiator is turned on at the time the Performance is called up. -
Page 104: Chord Form List
Chord Form List * All data is that programmed at the factory. For instructions on carrying out Factory Reset, refer to (p. 94). * The “Patch/Performance Using This Chord Form” column only lists the Chord Forms when the Chord Memory function is turned on at the time the Patch or Performance is called up. -
Page 105: Parameter List
Parameter List Patch Parameters Parameter Value Patch Level 0–127 L64–63R Common/ Analog Feel 0–127 Control Solo Switch SOLO, POLY (p. 59, p. 61) Unison Switch OFF, ON Portamento Switch OFF, LEGATO ONLY, FULLTIME Portamento Time 0–127 Portamento Type RATE, TIME Legato Switch OFF, ON, trG (retrigger) OSC 1&2... -
Page 106: Rhythm Set Parameters
Parameter List Rhythm Set Parameters Parameter Rhythm Set Rhythm Set Level Common/ Control (p. 59) INS > REV Series Rhythm Set INS-FX Effects INS-FX Switch (p. 64) Type Send Level Intensity Color Rate (Depth) Level REV/DELAY REV/DELAY Switch Type E.Level Time FBK (Feedback) L-R Shift/Mod Depth... -
Page 107: Effects List
Effects List Insertion Effects Parameters STEREO EQ (Stereo Equalizer) This is a two-band (one variable band + one fixed band: 700 Hz) peaking stereo equalizer. fig.StereoEQ L in 2-Band EQ R in 2-Band EQ Parameter Value Description INTENSITY -15– +15 dB Adjustable EQ boost/cut (Gain) COLOR... -
Page 108: Stereo Compressor
Effects List DISTORTION 2 This is a distortion effect that provides heavy distortion. fig.Distortion2 L in Tone Distortion Simulator Control R in Parameter Value Description 0–127 Amount of distortion INTENSITY (Drive) Also changes the volume. COLOR [SML], [bLt], Type of guitar amp (Amp Type) [2St], [3St] [SML]: small amp... -
Page 109: Ring Modulator
TREMOLO CHORUS This is a chorus effect with added Tremolo (cyclic modulation of volume). fig.TremCho L in L out Tremolo Chorus R in R out Parameter Value Description INTENSITY 0.05–10.0 Hz Modulation frequency of the tremolo (Tremolo Rate) effect COLOR 0–180 deg Spread of the tremolo effect (Phase) - Page 110 Effects List LOFI This is an effect that intentionally degrades the sound quality for creative purposes. fig.LoFi L in Post Lo-Fi Filter R in Parameter Value Description INTENSITY 200–8000 Hz Reference frequency of the filter (Cutoff) COLOR 1–9 Degrades the sound quality. (LoFi Type) The sound quality grows poorer as this value is increased.
-
Page 111: Auto Pan
AUTO PAN Cyclically modulates the stereo location of the sound. fig.AutoPan L in Auto Pan R in Auto Pan Parameter Value Description INTENSITY 0.05–10.0 Hz Frequency of the change (Rate) [tri], [SqU], [Sin], Selects the way the positioning COLOR (Wave Type) [SW1], [SW2] of the sound is changed. - Page 112 Effects List LONG DELAY Although the effect sound is in mono, this delay provides a longer delay time. fig.LongDelay L in Delay Feedback R in Parameter Value Description INTENSITY 0.0–480 ms Adjusts the time until the delay sound (Delay Time) is heard.
-
Page 113: Reverb/Delay Parameters
Reverb/Delay Parameters REVERB ROOM Simulates the reverberation in a smaller room. REVERB STAGE Simulates the reverberation on a stage. REVERB HALL Simulates the reverberation in a larger hall. fig.REV (L Dry) L in Reverb E.Level R in (R Dry) Parameter Value Description 0–127... -
Page 114: Stereo Chorus
Effects List PAN DELAY (Panning Delay) This is a delay effect with echoes that pan left and right. fig.DELAY2 (L Dry) L in Delay E.Level R in (R Dry) Parameter Value E.LEVEL 0–127 (Delay Level) TIME 0–500 ms (Delay Time) -98–... -
Page 115: Midi Transmit/Receive Setting List
MIDI Transmit/Receive Setting List Exc: Exclusive Message CC: Control Change Section Parameter “Mod1” (Mode 1) Patch Common/ Level CC07 Control CC10 Solo Switch CC126/127 Unison Switch CC70 Portamento Time CC05 Portamento Type Exc (Transmit/Receive)/ CC65 (Receive) Legato Switch Exc (Transmit/Receive)/ CC68 (Receive) OSC 1&2 Oscillator 1:2 Balance... -
Page 116: Midi Implementation Chart
SYNTHESIZER MODULE Model SH-32 Function... Basic Default Channel Changed Default Mode Messages Altered Note Number : True Voice Note On Velocity Note Off After Key's Touch Channel's Pitch Bend 0, 32 6, 38 Control Change 15–31, 33–94 100, 101 Program... -
Page 117: Specifications
Specifications SH-32: Synthesizer Parts 4 parts Maximum Polyphony 32 voices Sound Generator Organization 2 Oscillators + 1 Filter + 1 Amp + 2 LFOs Suboscillator (with subsonic mode; can be switched on and off independently of the oscillators), PWM function (can be switched on... -
Page 118: Index
Index Symbols [+OCT] ... 13, 21 [-OCT] ... 13, 21 Numerics [1/A]–[8/R] ... 14 [1]–[4/R] ... 14, 71 [A D S R] ... 57–58 AFTERTOUCH ... 86 Aftertouch ... 86 AMP ... 12, 26, 31, 45, 58 AMP ATTACK ... 87 AMP LEVEL ... - Page 119 [INS > REV SERIES] ... 13, 64 [INS-FX] ... 12, 24, 34, 64 [INTENSITY] ... 12, 34, 65 [KEY FOLLOW] ... 58 [KEY SYNC] ... 61 [LEG. ONLY] ... 13 [LEGATO] ... 13, 61 [LEVEL] ... 13, 59 LFO ... 59 [LFO 1] ...
- Page 120 Index [RANGE] ... 14, 76 RANGE ... 76 [RATE] ... 33, 60 REALTIME ... 77 Realtime input ... 77 REMOTE ... 90 Remote keyboard switch ... 90 [RESONANCE] ... 30, 57 [REST] ... 14, 78 [REV/DELAY] ... 24, 34, 65 Rhythm pattern ...
-
Page 121: Blank Chart
Blank Chart... - Page 122 Information When you need repair service, call your nearest Roland Service Center or authorized Roland distributor in your country as shown below. SINGAPORE AFRICA AFRICA Swee Lee Company 150 Sims Drive, EGYPT SINGAPORE 387381 TEL: 846-3676 Al Fanny Trading Office...
- Page 123 Apparatus containing Lithium batteries ADVARSEL! Lithiumbatteri - Eksplosionsfare ved fejlagtig håndtering. Udskiftning må kun ske med batteri af samme fabrikat og type. Levér det brugte batteri tilbage til leverandøren. ADVARSEL Eksplosjonsfare ved feilaktig skifte av batteri. Benytt samme batteritype eller en tilsvarende type anbefalt av apparatfabrikanten.
- Page 124 INS-FX Parameter Correspondence Chart Display Effect Name (TYPE) STEREO EQ EZ FILTER ISOLATOR AUTO WAH OVERDRIVE DISTORTION 1 DISTORTION 2 STEREO COMPRESSOR STEREO LIMITER PHASER ROTARY HEXA-CHORUS TREMOLO CHORUS SPACE-D STEREO FLANGER STEP FLANGER STEP FLANGER SYNC RING MODULATOR LOFI LOFI NOISE SLICER SLICER SYNC...