Table of Contents
Advertisement
Advertisement
Table of Contents

Related Manuals for Roland TD-9


Summary of Contents for Roland TD-9
- Page 2 IMPORTANT: THE WIRES IN THIS MAINS LEAD ARE COLOURED IN ACCORDANCE WITH THE FOLLOWING CODE. BLUE: NEUTRAL BROWN: LIVE As the colours of the wires in the mains lead of this apparatus may not correspond with the coloured markings identifying the terminals in your plug, proceed as follows: The wire which is coloured BLUE must be connected to the terminal which is marked with the letter N or coloured BLACK.
- Page 3 Thank you, and congratulations on your choice of the Roland Percussion Sound Module TD-9. Before using this unit, carefully read the sections entitled: “USING THE UNIT SAFELY” and “IMPORTANT NOTES” (Owner’s manual p. 4–5; p. 6–7). These sections provide important information concerning the proper operation of the unit.
-
Page 4: Using The Unit Safely
• When using the unit with a rack or stand recom- mended by Roland, the rack or stand must be carefully placed so it is level and sure to remain stable. If not using a rack or stand, you still need to... - Page 5 The unit and the AC adaptor should be located so their location or position does not interfere with their proper ventilation. 101c • This (TD-9) for use only with Roland stand MDS series. Use with other stands is capable of resulting in instability causing possible injury. 102c •...
-
Page 6: Important Notes
However, in certain cases (such as when circuitry related to memory itself is out of order), we regret that it may not be possible to restore the data, and Roland assumes no liability concerning such loss of data. Additional Precautions •... - Page 7 • Do not allow cards to become wet. • Do not disassemble or modify the cards. • Do not unplug USB memory key from the TD-9 while the USB memory access indicator is blinking. Doing so may damage the USB memory key or the data.
-
Page 8: Table Of Contents
1. Introduction TD-9 Components ... 12 Top and rear panels ... 12 Jack panel ... 13 Basic concepts and operations of the TD-9 ... 14 Saving your settings... 14 Buttons, dial, and knobs ... 14 Cursor... 14 Function buttons ([F1]–[F3])... 14 Using the “+”... - Page 9 3. Playing along with music Playing with the internal songs or from a USB memory key ... 34 Song Function profile ... 34 Audio files that can be played by the TD-9 ... 34 Connecting USB memory key ... 34 Song selection ... 35 What’s in “SONG”...
- Page 10 Saving data to a USB memory key (SAVE) ... 56 Loading data from a USB memory key back into the TD-9 (LOAD) ... 58 Deleting data from a USB memory key / Formatting a USB memory key (DL/FMT) ... 59 Restoring the factory settings [F3] (RESET)...
-
Page 11: Introduction
1. Introduction... -
Page 12: Td-9 Components
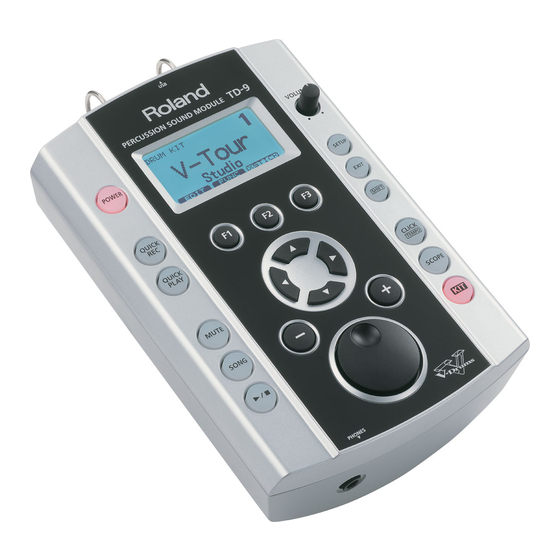
TD-9 Components Top and rear panels 1. POWER button Turns the power on/off. 2. Display This shows the drum kit name in “normal” playing mode, or if you select Edit, Song etc, various graphic/text displays will appear. 3. VOLUME knob Adjusts the volume from the OUTPUT and PHONES jacks. -
Page 13: Jack Panel
Use the dial when you want to quickly change the drum kit or value in large steps. 13. SETUP button Use this button to make settings that affect the entire TD-9, such as MIDI, triggering, pad sensitivity etc. 14. EXIT button Each time you press this button, you return to the screen of the previous level. -
Page 14: Basic Concepts And Operations Of The Td-9
TD-9’s functionality. Saving your settings The TD-9 has no “Save” function to save your settings. Any changes you make will be saved when you turn off the power. * Be sure to turn off the power by pressing the POWER button (p. -
Page 15: Preview Function
To turn it off, press [CLICK (TEMPO)] once again, and the button goes dark. Basic concepts and operations of the TD-9 Setting the Tempo (for the metronome or song) To adjust the tempo, hold down [SHIFT] and press [CLICK (TEMPO)] the tempo screen appears. -
Page 16: Getting Ready To Play
* Use only the included wing boits. Using any other nuts may cause malfunction. * You must use the TD-9 with the sound module mounting plate installed. • When turning the unit upside-down, get a bunch of newspapers or magazines, and place them under the four corners or at both ends to prevent damage to the buttons and controls. -
Page 17: Connecting Your Audio Equipment
* The indicator will light when you plug the AC adaptor into an AC outlet. * To prevent accidental disruption of power to the TD-9 (should the plug be pulled out accidentally), and to avoid applying undue stress to the AC adaptor jack,... -
Page 18: Turning The Power On/Off
3. Press [POWER]. After a time, [POWER] will light. * The TD-9 is equipped with a protection circuit and requires a brief interval a few seconds) after powering before it will operate normally. Caution when turning on the power... -
Page 19: Tensioning The Pads
Use a drum key to make adjustments. You can tension mesh heads the same way you do with acoustic drums. Adjusting the tension of the PD-105/85 head is only for playing response and will not affect the pitch as on an acoustic drum. - Page 20 M E M O...
-
Page 21: Performing
2. Performing... -
Page 22: Selecting A Drum Kit
Volume, Drum Kit Name Selecting a drum kit 1. Press [KIT]. [KIT] lights up, and the “DRUM KIT” screen appears. About the “DRUM KIT” screen This is the TD-9’s basic screen; it appears when you press [KIT]. TOM2 Head CRASH2 Head 2. -
Page 23: Performance Techniques
Performance techniques Pads (e.g., PD-105/PD-85) Head Shot Hit only the head of the pad. Head Rim Shot Strike the head and the rim of the pad simultaneously. Cross Stick When XSTICK (p. 22) is on Only strike the rim of the pad. Depending on the sound assigned to the rim you can play rim shots and/or cross stick sounds. -
Page 24: Choking A Cymbal
The Choke function only works when you grasp in the area (where the edge sensor is) as shown in the figure. If you do otherwise, it will not work. Roland logo Edge sensor Hi-Hat (CY-5, VH-11) -
Page 25: Creating A Drum Kit
Creating a drum kit All sounds assigned to a drum kit can be edited for your specific purposes. Selecting an instrument On the TD-9, all sounds are referred to as “instruments” (INST). 1. Press [KIT]-[F1] (INST). The “INST” screen appears. - Page 26 Creating a drum kit Screen Parameter Value TOM1–3 Head Tuning -240– +240 Muffling OFF, TAPE1–2, FELT1–2 HI-HAT Cymbal Size 1”–40” Fixed Hi-Hat NORMAL, FIXED1–4 CRASH1–2 Cymbal Size 1”–40” Sustain 1–100 RIDE Cymbal Size 1”–40” Sustain 1–100 BELL Cymbal Size 1”–40” Sustain 1–100 Other sounds...
-
Page 27: Using The Mixer (Mixer)
Using the Mixer (MIXER) Adjusting the volume and pan (stereo position) of individual pads/pedals. 1. Press [KIT]-[F1] (INST). The “INST” screen appears. 2. Press [F2] (MIXER). 3. Press [F1]–[F3] to select the item you want to edit. Screen If you pressed [F1] or [F2] 4-1. -
Page 28: Using The Onboard Effects (Amb/Eq)
Using the onboard effects (AMB/EQ) “Ambience” allows you to choose the environment where the drums are being played. You can adjust room size, wall material and the position of the ambience mics. The “Equalizer” is used to adjust the overall tone. -
Page 29: Naming A Drum Kit
Naming a drum kit You can create a name of up to twelve characters for each kit. A sub-title of up to sixteen characters can also be added below the name. This is useful for song indications, dates, styles etc. 1. -
Page 30: Copying A Drum Kit
The “COPY” screen appears. 3. Press [F1] (KIT). 4. Use [CURSOR], [+/-], and [VALUE] to choose the copy-source and copy-destination. Types of copy-source PRESET: Preset (the ORIGINAL Roland fac- tory settings) USER: User data Backup USB: Data saved on a USB Key. -
Page 31: Copying An Instrument
The “COPY” screen appears. 3. Press [F2] (INST). 4. Use [CURSOR], [+/-], and [VALUE] to choose the copy-source and copy-destination. Types of copy-source PRESET: Preset (the ORIGINAL Roland fac- tory settings) USER: User data Backup USB: Data saved on a USB Key. -
Page 32: Midi Parameters For Each Pad & Pedal
2. Press [F3] (MIDI). Screen If you’re using an external MIDI device (Midi controller pad, keyboard or sequencer) to play the TD-9’s internal sounds, note numbers transmitted to the TD-9 will trigger the instrument of the pad that is assigned to that note number. -
Page 33: Playing Along With Music
3. Playing along with music... -
Page 34: Playing With The Internal Songs Or From A Usb Memory Key
USB memory key The TD-9 contains fifty songs of various styles. Enjoy playing the TD-9 along with them. You can also play the TD-9 while listening to songs (audio files) saved to an optional USB memory key. Song Function profile The internal songs consist of “drum,”... -
Page 35: Song Selection
Song selection 1. Press [SONG]. The button will light, and the “SONG” screen appears. 2. Use [+/-] or [VALUE] to select a song. Title Composer New Disco Break Beat Michael Schack Jump’n Bass Break BeatPtn What’s in “SONG” screen Song number Indicates the number of the currently selected song. -
Page 36: Setting The Tempo
Playing with the internal songs or from a USB memory key 3. To stop playback, press [ ] goes dark, and you will return to the beginning of the song. [CURSOR] functions Button Display Function Returns to the beginning to song. -
Page 37: Viewing Song Information / Editing Song Settings
0–100 The audio file’s Song Volume and Type settings are saved to USB memory key when you switch off the TD-9’s power while USB memory key is connected, or when you save User Data (p. 56) to USB memory key. -
Page 38: Using The Mix In
* Lower the volume of the TD-9 and your audio player before making connections. * If a connection cable has built-in resistors, the volume level of the source connected to the TD-9 (MIX IN) may be too low. If this occurs, use connection cables that do not contain resistors. -
Page 39: Practicing
4. Practicing... -
Page 40: On Board Metronome
On Board Metronome Practicing with the TD-9’s built in metronome will help you perfect your tempo skills. Using the metronome 1. Press the [CLICK (TEMPO)] button. The [CLICK (TEMPO)] button lights up and the metronome starts. 2. Play along with it or press the button again to stop it. -
Page 41: Quick Recording And Playback (Quick Rec / Quick Play)
Quick recording and playback (QUICK REC / QUICK PLAY) The TD-9 provides a Quick Rec function that lets you easily record your own performance, and a Quick Play function that immediately plays back what you recorded. This is a very useful practice tool, recording and then checking your drumming. -
Page 42: Playback
Quick recording and playback (QUICK REC / QUICK PLAY) Playback 1. Press [QUICK PLAY] and the button lights up. The “QUICK PLAY” screen appears, and playback begins. The following buttons correspond to various playback functions. Button Function Returns to the beginning of what you have re- corded. -
Page 43: Using The Scope Function (Scope)
Using the Scope function (SCOPE) The Scope function provides an on-screen view of the timing of your drumming. This will help you improve timing control in the tempo and time signature of your own choosing. 1. Press [SCOPE] and the button lights up. The “SCOPE”... - Page 44 M E M O...
-
Page 45: Advanced Applications
5. Advanced applications... -
Page 46: Optimizing The Pad Settings (Trigger Parameters)
[SETUP] will light and the “SETUP” screen will appear. Specifying the type of pad [F1] (TYPE) For each trigger input, you can select the type of pad you’re using (the trigger type) so the TD-9 will accurately receive the signal from the pad. Trigger type The trigger type is a collection of parameters optimized for specific models of pad. -
Page 47: Setting The Pad Sensitivity [F2] (Basic)
Setting the Pad Sensitivity [F2] (BASIC) When you specify the trigger type (p. 46), the following settings (basic trigger parameters) are automatically set to the values appropriate for each pad, meaning that you will normally not need to adjust them. If you wish to make detailed adjustments, you can edit the following parameters. -
Page 48: Detailed Settings For Trigger Parameters [F3] (Advncd)
Optimizing the pad settings (Trigger parameters) Detailed settings for trigger parameters [F3] (ADVNCD) The following parameters (Advanced Trigger Parameters) are automatically set to the most efficient values for each pad when you select the Trigger Type (p. 46). They don’t require adjustment, except if you experience any of the problems that are discussed in the explanation of each parameter. -
Page 49: [F2] (Rim)
When playing a kick trigger, the beater can bounce back and hit the head a second time immediately after the intend- ed note—with acoustic drums sometimes the beater stays against the head—this causes a single hit to “double trigger” (two sounds instead of one). The Mask Time setting helps to prevent this. -
Page 50: Connecting The Vh-11 And Making Settings On The Td-9
Optimizing the pad settings (Trigger parameters) Connecting the VH-11 and making settings on the TD-9 Connections Motion sensor unit CONTROL OUT jack Connect the HHC cable Settings 1. Make sure that the VH-11 is correctly connected to the TD-9. 2. Set up the hi-hat, take your foot off the pedal, and power-on the TD-9. -
Page 51: Midi-Related Settings
Description Specifies the transmit/receive channel. * If you set the drum part to “CH11,” it will be the same as the TD-9’s percussion part, and the percussion part will no longer sound. Specifies whether program change messages will be transmitted to an external MIDI device (ON) or not transmitted (OFF). - Page 52 MIDI sequencer, and NOT use the TD-9’s internal sounds. If that is your need, then turn Local Control to “OFF.” When recording/using TD-9 perfor- mances on an external sequencer, turn Local Control to “OFF” and be sure the sequence’s MIDI OUT is connected to the TD-9’s MIDI In.
-
Page 53: Midi Settings For Precise Expressiveness In Performances [F2] (Ctrl)
TD-9 and pads. TD9/TD20: Choose this setting if you’re using just the TD-9 and pads, or if you’re using a TD series unit such as the TD-9 or TD-20 as your MIDI sound module. -
Page 54: Editing A Percussion Set [F3] (Perc)
MIDI-related settings Editing a percussion set [F3] (PERC) A collection of different percussion instruments is called a percussion set. A different percussion instrument is assigned to each note number, and multiple instruments can be used together. The percussion part is to CH11 (fixed). Editing the Percussion Set Select an instrument for each note number. -
Page 55: Other Settings (Utility)
Other settings (Utility) 1. Press [SETUP]-[F3] (UTIL). The “UTILITY” menu screen appears. Overall settings for the TD-9 [F1] (UTILITY) “UTILITY” screen Using a pad as a switch (Pad Switch) A pad connected to the TRIGGER IN AUX jack can function as a switch to change drum kits or to start/stop a song. -
Page 56: Using Usb Memory [F2] (Usb)
Using USB memory [F2] (USB) “USB UTILITY” screen Saving data to a USB memory key (SAVE) Here’s how to save TD-9 data to a USB memory key. Data that will be saved • Backup data: TD-9 settings (drum kit and setup settings) •... - Page 57 Saving data recorded by Quick Rec 1. In the “USB UTILITY” screen, press [F1] (SAVE). The “UTILITY USB SAVE” screen appears. 2. Press [F2] (Q REC). The “SAVE QUICK REC DATA” screen appears. 3. Use [+/-] or [VALUE] to select the save-destination number.
-
Page 58: Loading Data From A Usb Memory Key Back Into The Td-9 (Load)
Other settings (Utility) Loading data from a USB memory key back into the TD-9 (LOAD) Data you’ve saved on a USB memory key can be loaded back into the TD-9. This is called “Load.” Loading backup data 1. In the “USB UTILITY” screen, press [F2] (LOAD). -
Page 59: Deleting Data From A Usb Memory Key / Formatting A Usb Memory Key (Dl/Fmt)
Deleting data from a USB memory key / Formatting a USB memory key (DL/FMT) How to delete saved data from USB memory key and formatting the USB memory key. Deleting backup data 1. In the “USB UTILITY” screen, press [F3] (DL/FMT). The “USB DELETE/FORMAT”... -
Page 60: Restoring The Factory Settings [F3] (Reset)
The “Factory Reset” operation returns all settings of all pads and instruments stored in the TD-9 to their factory-set condition. • All data and settings in the TD-9 will be lost. If you want to keep any of your data or settings, save them to USB memory before you continue. - Page 61 1. Turn off the power. 2. Press [POWER] to turn on the power. Then, while “Roland” is showing in the screen, press both [SHIFT] and [SETUP] simultaneously. The “DEFAULT TRIG SETTING” screen appears.
- Page 62 M E M O...
-
Page 63: Appendices
6. Appendices... -
Page 64: Error Messages
Error Messages If an error message appears in the TD-9’s screen, the TD-9 has failed to operate correctly for some reason, or an incorrect operation has been performed. Please take the appropriate action described here. Message Meaning MIDI-related error messages A MIDI cable was disconnected. -
Page 65: Preset Drum Kit List
Preset Drum Kit List Name V-Tour Studio CoolJazz Double BASS Compact 18”Kick Acoustic House +LatinPerc Ambient ChillOut Junk INDUSTRIAL TightHit 2ndHi-Hat Brushes Ballad Reverb Big Rock Stadium Modern JAZZ JazzyBop Sizzle Fusion Alterna Rock/Punk Blast Mixture Groove Vintage 30’s-40’s Name JazzFunk 90’sRock 80’sRock... -
Page 66: Preset Song List
Preset Song List Name Alterna Rock Cool Jazz Neo Funk Medium Pops New Disco Heavy Rock Rock Ballad Mixture Rock 70’s Hard Prog Rock ShuffleBlues Acid Jazz Contemp Jazz Jazzy Funk Fusion Urban R&B NorthernSoul SouthernSoul Break Beat Jump’n Bass Post Punk Thrash Metal Bossa Nova... -
Page 67: Drum Instrument List
Drum Instrument List Name KICK Maple K Custom K Birch K Shallow K Medium K Studio K Wood K Soft K Vintage K Oak K RoseWood K 26"Deep K 18"Hybrid K OnePly K Plugged K Heavy K Dry K Meat K SNARE Buzz K Bop K... - Page 68 Drum Instrument List Name 156 18"Custom T4 199 12"Roto T2 157 18"CustomT4R 200 14"Roto T3 158 12"Coated T1 201 19"Roto T4 159 12"CoatedT1R 202 Oct T1 160 14"Coated T2 203 Oct T2 161 14"CoatedT2R 204 Oct T3 162 16"Coated T3 205 Oct T4 163 16"CoatedT3R 206 Brush T1...
- Page 69 Name 321 20"Heavy Ch 361 Voice Cr 322 16"Swish 362 TR808 Cr 323 19"PiggyBack 363 Elec Cr 324 Piggy-Crash 364 Bongo Hi RIDE PERCUSSION 325 20"Custom Rd 365 Bongo Lo 326 20"CustomRdE 366 Conga Open 327 20"CustomRdB 367 Conga Mute 328 22"Clean Rd 368 Conga Slap 329 22"Clean RdE...
- Page 70 TD-9. Reproduction or duplication of any of the sound contained in the TD-9, either as they exist on this sound module or by any means of reformatting, mixing, filtering, re-synthesizing, processing or...
-
Page 71: Preset Percussion Set List
Preset Percussion Set List Name Volume Note No. Tambourine1 CENTER Tambourine2 CENTER AfricaJingle CENTER MetalCrasher CENTER Bendir CENTER RainStick CENTER 78Guiro CENTER 78Tambourine CENTER 808Clap CENTER 808Cowbell1 CENTER 808Maracas CENTER 909Clap CENTER HI-Q CENTER MetalSlap CENTER Scratch1 CENTER Scratch3 CENTER Sticks CENTER Click... -
Page 72: Midi Implementation Chart
MIDI Implementation Chart PERCUSSION SOUND MODULE Model TD-9 Function... Basic Default Channel Changed Default Mode Messages Altered Note Number : True Voice Note On Velocity Note Off After Key’s Touch Channel’s Pitch Bend 0, 32 Control Change Program Change : True Number... -
Page 73: Specifications
Specifications TD-9: Percussion Sound Module ● Instruments Drum Instruments: 522 ● Drum Kits ● Instrument Parameters KICK: Head Tuning, Muffling SNARE: Head Tuning, Muffling TOM: Head Tuning, Muffling HI-HAT: Cymbal Size, Fixed Hi-Hat CYMBAL: Cymbal Size, Sustain Others: Pitch, Decay ●... -
Page 74: Block Diagram
Block Diagram Drum Kit Head KICK Head SNARE XStick XStick Head TOM1 Head TOM2 Head TOM3 Head HI-HAT Pedal Head CRASH1 Head CRASH2 Head RIDE BELL Head Percussion Song External Song Click KIT/ KIT/ EDIT/ KIT/ EDIT/ MIXER/ EDIT/ KITVOL/ Volume Inst Kit Volume... - Page 75 KIT/ INST/ AMB/EQ/ Equalizer High Freq High Gain Low Freq Low Gain KIT/ INST/ AMB/EQ/ Ambience Type Size Wall Shape Level MIX IN Volume L/MONO OUTPUT PHONES TD-9 Block Diagram...
-
Page 76: Index
Index Symbols +/- ... 13–14 A ... 37 Advanced Trigger Parameters ... 48 AMB ... 28 Amb Send Level ... 54 AMB/EQ ... 28 Ambience ... 28 AMBIENCE SEND ... 28 Audio Files ... 34–35 AUX ... 13 B ... 37 Basic Trigger Parameters ... - Page 77 ONESHOT ... 37 Open Hi-Hat ... 24 OTHERS ... 36 Others Part ... 34, 36 OUTPUT ... 13 Pad Switch ... 55 PAN ... 27 Pan ... 40, 54 PD-105 ... 19 PD-85 ... 19 Pedal HH Volume ... 27 PedalCC ...
- Page 78 Information When you need repair service, call your nearest Roland Service Center or authorized Roland distributor in your country as shown below. PHILIPPINES AFRICA G.A. Yupangco & Co. Inc. 339 Gil J. Puyat Avenue EGYPT Makati, Metro Manila 1200, Al Fanny Trading Office...
- Page 79 For EU Countries For China...
- Page 80 C5100064 08-02-2YG...