Table of Contents
Advertisement
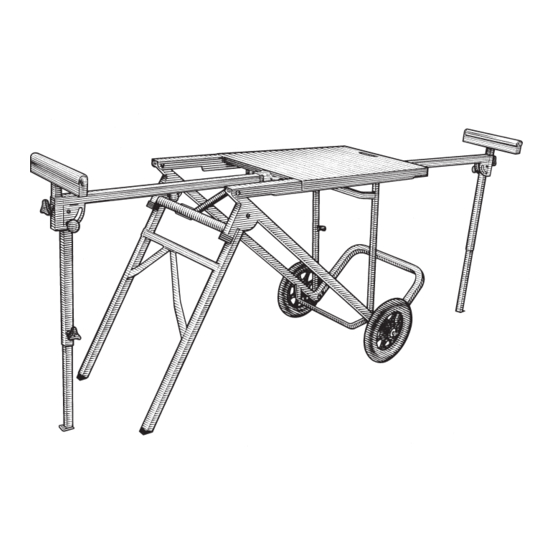
This Miter Saw Utility Vehicle has been engineered and manufactured to our high standard for dependability, ease of op-
eration and operator safety. When properly cared for, the Miter Saw Utility Vehicle will give you years of rugged, trouble-free
performance.
WARNING
To reduce the risk of injury, the user must read and understand the operator's manual before using this product.
Thank you for buying a RIDGID product.
SAVE THIS MANUAL FOR FUTURE REFERENCE
OPERATOR'S MANUAL
Miter Saw Utility Vehicle
AC9940
For Use With RIDGID 10 in. and
12 in. Miter Saws and other
miter saws
1
TM
Advertisement
Table of Contents

Related Manuals for RIDGID AC9940


Summary of Contents for RIDGID AC9940
-
Page 1: Miter Saws
This Miter Saw Utility Vehicle has been engineered and manufactured to our high standard for dependability, ease of op- eration and operator safety. When properly cared for, the Miter Saw Utility Vehicle will give you years of rugged, trouble-free performance. -
Page 2: Table Of Contents
INTRODUCTION Your Miter Saw Utility Vehicle has many features for making the use of this product more pleasant and enjoyable. Safety, per- formance, and dependability have been given top priority in the design of this product making it easy to maintain and operate. -
Page 3: Rules For Safe Operation
RULES FOR SAFE OPERATION Safe operation of this accessory requires that you read and understand this operator's manual, the operator’s manual for the miter saw and all labels affixed to the tool. READ ALL INSTRUCTIONS KNOW YOUR ACCESSORY. Read the operator's manual carefully. -
Page 4: Symbols
SYMBOLS The purpose of safety symbols is to attract your attention to possible dangers. The safety symbols, and the explanations with them, deserve your careful attention and understanding. The safety warnings do not by themselves eliminate any danger. The instructions or warnings they give are not substitutes for proper accident prevention measures. SYMBOL MEANING DANGER: Indicates an imminently hazardous situation, which, if not avoided, will result in death or serious injury. -
Page 5: Unpacking
Plastic Caps (2) STAND ASSEMBLY TOOLS NEEDED The following tools (not included) are needed for properly assembling your Miter Saw Utility Vehicle. HAMMER small parts can get lost in packaging material. Do not throw away any packaging until the accessory is completely assembled and your power tool is attached. -
Page 6: Assembly
ASSEMBLY ATTACHING THE LOWER FOOT See Figures 1 and 2. Place stand assembly “flat” on floor. Rotate lower foot into upright position aligning holes as shown. Locate the following parts: Hex Bolt, M8 x 50 mm (2) Flat Washer, M8 (4) Lock Nut, M8 (2) Install bolt, two washers and lock nut as shown. -
Page 7: Before You Start
If a slide compound miter saw is already assembled to the stand, follow the above steps plus slide the head/ blade assembly to the front of the saw and lock the slide rails. UPRIGHT POSITION... - Page 8 Failure to unplug the tool could result in accidental starting causing possible serious personal injury. Before You Start RIDGID miter saws bolt directly onto this workstand. When you are finished attaching your saw to the workstand re-read the Operation and Rules for Safe Operation sections of this manual.
- Page 9 ASSEMBLY MOUNTING OTHER BRANDS See Figure 8. NOTE: Other brands of miter saws (not RIDGID miter saws) will require additional 5/16 in. mounting holes to be drilled. See instructions below. Locate the following parts: Hex Bolts, M6 x 40mm (4)
- Page 10 Tighten foot knob. Repeat for the other extension bar. NOTE: It may be necessary to realign roller assemblies with the miter saw table. See Mounting and Aligning Roller Assembly on page 9. ADJUSTABLE HANDLE Fig.
- Page 11 Make sure miter saw is securely attached to the stand per the instructions in this manual. If a miter saw is already assembled to the stand, make sure to place the blade 90° to the table (if applicable), miter the blade to the right as far as it will go, place the blade in the “locked down”...
- Page 12 CAUTION: Do not lift by any part of the miter saw that is attached to the workstand. Failure to do so may result in possible injury and damage the tool.
-
Page 13: Exploded View/Repair Parts
829758-3 829757 Hex Head Bolt (M8 x 1.25 x 47) 829836 Hex Head Bolt (M5 x 0.8 x 15) Miter Saw Utility Vehicle Model AC99400 RIDGID parts are at www.ridgidparts.com Description Rear Roller Extension Nylock Nut (M10) Rubber Cap Table... - Page 14 NOTES...
-
Page 15: Warranty
2/1/04 and after. This product is manufactured by One World Technologies, Inc. The trademark is licensed from RIDGID, Inc. All warranty communications should be directed to One World Technologies, Inc., attn: RIDGID Hand Held and Stationary Power Tool Technical Service at (toll free) 1-866-539-1710. -
Page 16: Customer Service Information
Customer Service Information: For parts or service, contact your nearest RIDGID authorized service center. Be sure to provide all relevant information when you call or visit. For the location of the authorized service center nearest you, please call 1-866-539-1710 or visit us online at www.ridgid.com.