
Related Manuals for Radio Shack HANDHELD TRUNKING 20-521


Summary of Contents for Radio Shack HANDHELD TRUNKING 20-521
- Page 1 Owner’s Manual Cat. No. 20-521 PRO-91 150-Channel Handheld Trunking Scanner Please read before using this equipment.
- Page 2 FEATURES Your RadioShack PRO-91 150-Channel Handheld Trunking Scanner is one of a new generation of scan- ners designed to track Motorola Type I and Type II (such as Smartnet and Privacy Plus) and hybrid ana- log trunking systems, which are extensively used in many 800 MHz communication systems.
- Page 3 IDs when tracking trunked systems. Priority Channels — lets you program one channel in each bank (5 in all) and then have the scanner check that channel every 2 seconds while it scans the bank, so you don't miss transmissions on those channels.
- Page 4 Memory Backup — keeps the frequencies stored in memory for an extended time if the PRO-91 loses pow- Three Power Options — let you power the scanner using internal batteries, external AC power using an optional AC adapter/charger, or DC power using an op- tional DC cigarette-lighter power cable.
-
Page 5: Fcc Notice
Try the following methods to eliminate the interference: • Move your scanner away from the receiver • Connect your scanner to an outlet that is on a dif- ferent electrical circuit from the receiver • Contact your local RadioShack store for help Note: Mobile use of this scanner is unlawful or requires a permit in some areas. -
Page 6: Table Of Contents
Do not open your scanner's case to make any modifications that could allow it to pick up transmis- sions that it is not legal to listen to. Doing so could sub- ject you to legal penalties. - Page 7 Turning the Battery Save Function Off/On ... 38 Skipping Data Signals ... 39 Trunk Tracking ... 40 Types of Trunking Systems ... 40 Setting the Scanner to the Trunk Tracking Mode ... 41 Setting Squelch for the Trunk Tracking Mode .. 42 Storing Trunked Frequencies ... 42 Scanning a Trunked Bank ...
- Page 8 Frequency Conversion 63 Troubleshooting 64 Resetting the Scanner ... 67 Care and Maintenance ... 68 Specifications ... 69...
-
Page 9: Preparation
PREPARATION POWER SOURCES You can power your scanner from any of three sources: • Internal batteries (not supplied) • Standard AC power (using an optional AC adapter) • Vehicle battery power (using an optional DC adapter) Using Internal Batteries You can power your scanner using four AA batteries. - Page 10 3. If you are installing alkaline batteries, use a pointed object such as a pencil to set JACK . Or, if you are installing nickel-cadmium ALKALINE batteries, set it to Warning: Never set if you are installing non-rechargeable bat- NI-CD teries.
-
Page 11: Charging Nickel-Cadmium Batteries
Caution: Always dispose of old batteries promptly and properly. Do not bury or burn them. Charging Nickel-Cadmium Batteries The scanner has a built-in circuit that lets you recharge nickel-cadmium batteries while they are in the scanner. To charge the batteries, set... -
Page 12: Using Ac Power
Using AC Power You can power the scanner from a standard AC outlet using an optional AC adapter (such as Cat. No. 273- 1665). Warning: Do not use an AC adapter’s polarized plug... -
Page 13: Using Vehicle Battery Power
• To protect your vehicle’s electrical system, always plug the adapter into the scanner before you plug it into your vehicle’s cigarette-lighter socket. Always unplug the adapter from the vehicle’s cigarette- lighter socket before you unplug it from the scan- ner. - Page 14 2. Set the adapter’s voltage switch to 9V. 3. Connect the 3.4 mm outer diameter/1.3 mm inner diameter tip to the adapter cord, matching TIP to –. 4. Plug the adapter’s barrel plug into your scanner’s jack. POWER 5. Plug the other end of the adapter into your vehi- cle’s cigarette-lighter socket.
-
Page 15: Connecting The Antenna
Note: Always use 50-ohm coaxial cable, such as RG- 58 or RG-8, to connect an outdoor antenna. If the dis- tance from the scanner to the antenna is over 50 feet, use RG-8 low-loss dielectric coaxial cable. If your an- tenna’s cable does not have a BNC connector, your lo-... -
Page 16: Connecting An Earphone/Headphones
Traffic Safety Do not use an earphone or headphones with your scanner when operating a motor vehicle in or near traf- fic. Doing so can create a traffic hazard and could be il- legal in some areas. -
Page 17: Connecting An Extension Speaker
ATTACHING THE BELT CLIP You can attach the supplied belt clip to make your scanner easier to use when you are on the go. Use a Phillips screwdriver and the supplied screws to attach the belt clip to the scanner. Then slide the clip over your... -
Page 18: About Your Scanner
Once you understand a few simple terms we use in this manual and familiarize yourself with your scanner’s features, you can put the scanner to work for you. You simply determine the type of communications you want to receive, then set the scanner to scan those commu- nications. -
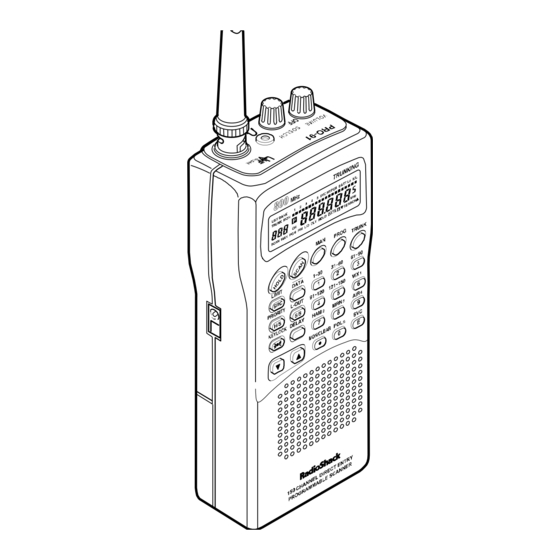
Page 19: A Look At The Keypad
A LOOK AT THE KEYPAD Your scanner’s keys might seem confusing at first, but this information should help you understand each key’s function. — holds the frequency search; holds on the cur- HOLD rent ID in the trunk tracking mode. -
Page 20: A Look At The Display
SVC (service)/E (enter) enters frequencies into channels. A LOOK AT THE DISPLAY The display has indicators that show the scanner’s cur- rent operating status. A good look at the display will help you understand how your scanner operates. — appears with numbers (1–5). The numbers... - Page 21 — appears when the priority feature is turned on. — appears when you manually select a channel HOLD or when the scanner is holding during a search. — appears when you program a delay. — appears when you manually select a channel or frequency you locked out.
-
Page 22: Understanding Banks
(during conventional scanning only). UNDERSTANDING BANKS Service Banks The scanner is preprogrammed with all the frequencies allocated to the weather, ham, marine, aircraft, and po- lice (fire/emergency) services. This is handy for quickly finding active frequencies instead of doing a limit search (see “Service Bank Search”... -
Page 23: Monitor Memories
Monitor Memories The scanner also has 5 temporary memory locations called monitor memories. You can use these monitor memories to temporarily store frequencies while you decide whether to store them into a channel. This is handy for quickly storing an active frequency when you search through an entire band (see “Searching For and... -
Page 24: Operation
OPERATION TURNING ON THE SCANNER AND SETTING SQUELCH Note: Make sure the scanner’s antenna is connected before you turn it on. 1. Turn SQUELCH 2. Turn VOLUME/OFF hear a hissing sound. 3. Press scanning, turn set to a point just after the hissing sound stops. -
Page 25: Storing Known Frequencies Into Channels
(including the decimal point) you want to store. 3. Press to store the frequency into the channel. Notes: • If you entered an invalid frequency in Step 2, appears and the scanner beeps three Error times. Simply enter the frequency again. PROG to enter the frequency •... -
Page 26: Searching For And Temporarily Storing Active Frequencies
Notes: While doing a limit, direct, or service bank search, you can press: • if you want the scanner to pause 2 seconds DELAY after a transmission ends before it proceeds to the next frequency (see “Delay” on Page 33). -
Page 27: Direct Search
(including the decimal point), then press 5. Press t to search from the upper to the lower limit, or s to search from the lower to the upper limit. 6. When the scanner stops transmission, quickly press either: •... -
Page 28: Service Bank Search
PROG • If you enter an invalid frequency, the scanner displays Error 3. Press t to search downward or s to search upward from the selected frequency. -
Page 29: Search Skip Memory
To clear a single frequency from skip memory so the scanner once again stops on it during a limit, direct, or service bank search: 1. Press HOLD 2. Press t or s to select the frequency. -
Page 30: Listening To The Monitor Memories
Notes: • If you marked all frequencies to be skipped within the search range, the scanner beeps 3 times and does not search. • If you program more than 20 frequencies to skip, each new frequency replaces one you already stored, starting from the first frequency you stored. -
Page 31: Scanning The Stored Channels
Notes: • If you have not stored frequencies into any chan- nels, the scanner does not scan. • If the scanner picks up unwanted, partial, or very weak transmissions, turn decrease the scanner's sensitivity to these signals. If you want to listen to a weak or distant station,... - Page 32 Or, if your scanner is scanning and stops at the desired channel, press one time. (Pressing addition- al times causes your scanner to step through the chan- nels.) To resume automatic scanning, press SCAN...
-
Page 33: Special Features
BANKS ON AND OFF You can turn each channel-storage bank on and off. When you turn off a bank, the scanner does not scan any of the 30 channels in that bank. While scanning, press the number key that corresponds to the bank you want to turn on or off. -
Page 34: Locking Out Channels
The scanner scans all the channels within the dis- played banks that are not locked out (see “Locking Out Channels”). Notes: • You can manually select any channel within a bank, even if that bank is turned off. • You cannot turn off all banks. One bank must always be active. - Page 35 PRIORITY ority channels. To turn on the priority feature, press scanning. appears. Every 2 seconds the scanner checks the priority channel in each bank that is turned To turn off the priority feature, press disappears. Notes: • The priority feature must be turned off to listen to the monitor memories or to use the data skip fea- ture.
-
Page 36: Using The Keylock
USING THE KEYLOCK Once you program your scanner, you can protect it from accidental program changes by turning on the keylock feature. When locked, the only controls that operate are SCAN SQUELCH Note: The keylock does not prevent the scanner from scanning channels. -
Page 37: Turning The Key Tone Off/On
5 seconds and no signal is received. save is set to on. While the battery save mode is set to on, the scanner repeatedly turns off the internal power for 1 second, then turns it back on for about transmission. -
Page 38: Skipping Data Signals
SKIPPING DATA SIGNALS You can set the scanner so it skips nonmodulated or data signals (such as fax or modem transmissions) during a search or scan. Note: Since data signals are not generally found in the air band, this feature does not work in the air band. -
Page 39: Trunk Tracking
TRUNK TRACKING Your scanner is designed to track transmissions on Mo- torola Type I, Type II, and hybrid analog trunking sys- tems, which are extensively used in 800 MHz communications. Remember these important points when tracking transmissions: • Your scanner monitors Type II systems by default. -
Page 40: Setting The Scanner To The Trunk Tracking Mode
There are also hybrid systems which are a combination of both Type I and Type II. Your scanner defaults to monitor Type II systems, but you can change to Type I or a hybrid of Type I and Type II systems by selecting a preprogrammed fleet map or creating a custom fleet map for your area (see “Scanning Type I and Hybrid... -
Page 41: Setting Squelch For The Trunk Tracking Mode
Note: You can change this setting, if necessary, to pro- vide better performance in your area. STORING TRUNKED FREQUENCIES Before you set up your scanner to track a trunked sys- tem, consider the following: • Valid trunked system frequencies range from 851.0000–868.9875 in 12.5 kHz steps. - Page 42 Before scanning a trunked system’s transmissions, you must store the trunked system’s frequencies in one of the banks in your scanner by following these steps. 1. Press PROG one or more bank numbers flash. 2. Select the bank you want to store the trunked sys- tem’s frequencies in by pressing a number key.
-
Page 43: Scanning A Trunked Bank
While the scanner looks through the frequencies, you see them on the display. When the scanner finds the data channel, it begins trunk tracking. SCANNING A TRUNKED BANK You can scan one trunked bank at a time. Once you... -
Page 44: Monitoring An Active Id
See “Scan Lists” on Page 48. Temporarily Storing an ID into the Monitor ID Memory 1. When your scanner stops on an ID you want to store, press ID into the monitor ID memory. 2. Press to resume searching. -
Page 45: Locking Out Ids
Unlocking All IDs Hold down L-OUT press to unlock all the IDs at once. The scanner beeps twice. Note: When you unlock all the IDs, the scan list ap- pears. Press SCAN lists or press function. -
Page 46: Using Trunk Tracking Scan Delay
You can program a 5-second delay to hold on an ID for 5 seconds to wait for a reply. The scanner continues to monitor the fre- quency for 5 seconds after the transmission stops be- fore resuming scanning. -
Page 47: Channel Activity Bars
ID. Your scanner does not monitor these types of calls. BANK • If the scanner is holding on an ID which is not active, the other activity bars turn on and off as other groups use the system. -
Page 48: Scan Lists
When you program trunked frequencies into a bank (see “Storing Trunked Frequencies” on Page 41), your scanner sets up 5 scan lists into which you can store your favorite IDs. Each list can contain up to 10 IDs, so you can store a total of 50 IDs for each trunk tracking bank (250 IDs if you use all banks as trunking banks!). -
Page 49: Moving Ids To Scan Lists
2. Select the ID scan list location where you want to store the IDs. Then press 3. Press MON/CLEAR 4. Press . The scanner stores the IDs into the selected ID scan lists. Deleting a Stored ID 1. Press PROG 2. -
Page 50: Scanning The Scan Lists
Note: If you have not stored any IDs, scrolls on SCAN the display, but your scanner does not stop on an ac- tive conversation. To remove a scan list from active scanning, use the number keys to enter the scan list’s number. The scan list number turns off, and the IDs in that list are not scanned. - Page 51 Listen to see if you are following complete conver- sations. If not, try another preset map. Programming a Fleet Map 1. Set the scanner for conventional scanning, press , then press PROG 2. Select the bank where you want to program the fleet map by pressing a number key.
- Page 52 IDs is divided into 8 equal-size blocks, numbered 0–7, and each block is assigned a size code. When you set up your scanner to track a Type I system, you must choose a size code for each block.
- Page 53 The size codes selected by a Type I system designer depend on the specific needs of the system's users. Some organizations might want many subfleets with only a few radios each, while another organization might want only a few subfleets, with many radios each. To scan Type I systems, you must select or program a fleet map with the same size code assignments as the trunked system.
-
Page 54: Selecting A Preset Fleet Map
E1P4 Size Block Code (S12) E1P7 Size Block Code E1P10 Size Block Code E1P5 Size Block Code (S12) E1P8 Size Block Code E1P11 Size Block Code E1P6 Size Block Code (S12) (S12) E1P9 Size Block Code E1P12 Size Block Code... -
Page 55: Programming A Fleet Map
E1P13 Block E1P15 Block Selecting a Preset Fleet Map 1. Set the scanner for conventional scanning, press , then press PROG 2. Select the bank where you want to store the preset fleet map by pressing a number key. DATA 3. -
Page 56: Programming A Hybrid System
For example, if you assign Block 0 as an S-12, the scanner prompts you for the next block available, instead of b1. And if you as- sign Block 0 as an S-14, you would not see another prompt because it uses all available blocks. -
Page 57: A General Guide To Scanning
A GENERAL GUIDE TO SCANNING Reception of the frequencies covered by your scanner is mainly “line-of-sight.” That means you usually cannot hear stations that are beyond the horizon. GUIDE TO FREQUENCIES National Weather Frequencies 162.400 162.425 162.450 Canadian Weather Frequencies 161.650... -
Page 58: Guide To The Action Bands
GUIDE TO THE ACTION BANDS Typical Band Usage VHF Band Low Range 6-Meter Amateur U.S. Government 2-Meter Amateur High Range UHF Band U.S. Government 70-cm Amateur Low Range FM-TV Audio Broadcast, Wide Band Public Service Conventional Systems Conventional/Trunked Sys- tems Trunked Systems Public Safety High Range... -
Page 59: Band Allocation
To help decide which frequency ranges to scan, use the following listing of the typical services that use the fre- quencies your scanner receives. These frequencies are subject to change, and might vary from area to area. For a more complete listing, refer to the “Police Call Ra- dio Guide including Fire and Emergency Services,”... - Page 60 ROAD ....Road & Highway Maintenance RTV....Radio/TV Remote Broadcast Pickup TAXI .
- Page 61 152.0075 ........MED 152.030–152.240 ......TELB 152.270–152.480 .
-
Page 62: Frequency Conversion
462.9375–463.1875 ......MED 463.200–467.925 ....... BUS FM-TV Audio Broadcast, UHF Wide Band (470–512 MHz) (Channels 14 through 69 in 6 MHz steps) 475.750 . -
Page 63: Troubleshooting
TROUBLESHOOTING If you have problems, here are some suggestions that might help. If they do not, take your scanner to your local RadioShack store for assistance. PROBLEM Scanner is on but will not scan. Scanner is totally inoperative. The scanner’s... - Page 64 The scanner locks on frequen- cies that have an unclear transmis- sion. Scanner will not track a trunked system. Scanner is set to receive Type I trunked frequen- cies, but does not scan them. POSSIBLE CAUSE POSSIBLE CAUSE An antenna is not...
- Page 65 The system you are trying to track is a Type I sys- tem, and the scanner is set to scan Type II sys- tems. The selected fleet map is incor- rect. Not all of the trunk’s frequen-...
-
Page 66: Resetting The Scanner
Caution: This procedure clears all the information you have stored into the scanner. Before you reset the scanner, try turning it off and on to see if it begins work- ing properly. Reset the scanner only when you are sure it is not working properly. -
Page 67: Care And Maintenance
Trunking Scanner is an example of superior design and craftsmanship. The following suggestions will help you care for your scanner so you can enjoy it for years. Keep the scanner dry. If it gets wet, wipe it dry immediately. Liquids can contain minerals that can corrode the electronic circuits. -
Page 68: Specifications
SPECIFICATIONS Frequency Coverage: ... 29–54 MHz (in 5 kHz steps) 108–136.975 MHz (in 12.5 kHz steps) 806.0000–823.9375 MHz (in 12.5 kHz steps) 851.0000–868.9875 MHz (in 12.5 kHz steps) 896.1125–956.0000 MHz (in 12.5 kHz steps) Monitor Channels 5 Number of Banks 5 Sensitivity (AM/FM): NFM: 20 dB S/N at 3 kHz deviation): 29–54 MHz 0.5 µV... - Page 69 Power Requirement: 4 AA Alkaline Batteries (6.0 VDC), or 4 AA Rechargeable Ni-Cd Batteries (4.8 VDC), Current Drain: Squelched ... 70 mA Full Output ... 180 mA Dimensions (HWD) ... 6 Weight (without antenna, batteries, belt clip) ... 8.1 oz Specifications are typical;...
- Page 70 NOTES...
- Page 72 Limited One-Year Warranty This product is warranted by RadioShack against manufacturing de- fects in material and workmanship under normal use for one (1) year from the date of purchase from RadioShack company-owned stores and authorized RadioShack franchisees and dealers. EXCEPT AS PROVIDED HEREIN, RadioShack MAKES NO EXPRESS WAR- RANTIES AND ANY IMPLIED WARRANTIES, INCLUDING THOSE OF MERCHANTABILITY AND FITNESS FOR A PARTICULAR PUR-...