Table of Contents
Advertisement
Quick Links
Advertisement
Table of Contents

Related Manuals for Pyle PLTV7.5DIN


Summary of Contents for Pyle PLTV7.5DIN
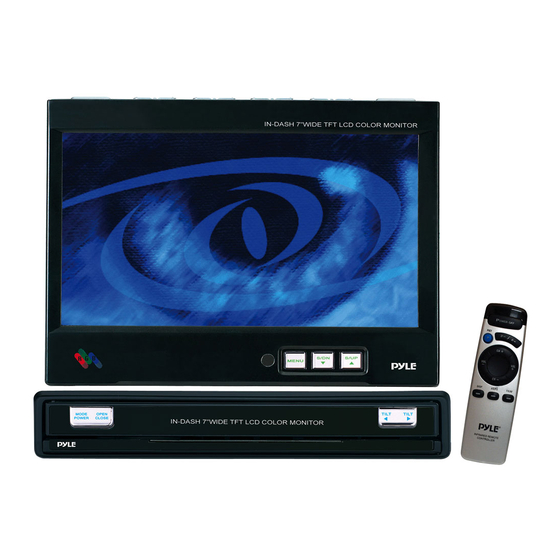
- Page 1 MOTORIZED 7” WIDE TFT LCD MONITOR WITH COLOR TV MODEL NO. : PLTV7.5DIN...
- Page 2 ANY CHANGES OR MODIFICATIONS IN CONSTRUCTION OF THIS UNIT DEVICE WHICH IS NOT APPROVED BY THE PARTY RESPONSIBLE FOR COMPLIANCE COULD VOID THE USER’S AUTHORITY TO OPERATE THE EQUIPMENT. WARNING DO NOT WATCH MONITOR WHILE DRIVING...
-
Page 3: Table Of Contents
CONTENTS WARNING CAUTION UNIT 1. MONITOR 2. REMOTE CONTROL 3. REMOTE CONTROL BATTERY BASIC OPERATION 1. POWER ON/OFF 2. OPENING THE MONITOR 3. CLOSING THE MONITOR 4. ADJUSTING TILT POSITION 5. ADJUSTING MOVE POSITION 6. ADJUSTING LEFT/RIGHT VIEWING POSITION 7. SELECTING MODE 8. - Page 4 WATCHING TV 1. MENU CONTROL 2. CHANNEL CONTROL 3. FINE TUNING CONTROL 4. AUTO MEMORY 5. CHANNEL SEARCH WARNING SCREEN INSTALLATION BASIC CONNECTION CONNECTING TO AV SOURCES SPECIFICATIONS TROUBLE SHOOTING...
-
Page 5: Warning
WARNING The exclamation mark in triangle and WARNING mark are intended to alert the user to the important operating instructions. Wrong operations will result in severe injury to the unit. DO NOT WATCH MONITOR WHILE DRIVING Watching the video while driving may interrupt driving and may cause an accident. DO NOT OPERATE ANY FUNCTION THAT TAKE YOUR ATTENTION AWAY FROM DRIVING YOUR VEHICLE Operation of some functions for this unit is very complicated. -
Page 6: Caution
CAUTION DO NOT RAISE THE VOLUME EXCESSIVELY Keep the volume at a specific level which you can still hear outside noise while driving . Keeping the volume loud may cause an accident. DO NOT USE THIS EQUIPMENT OUTSIDE THE VEHICLE Do not use this equipment for purpose other than those listed for a vehicle. -
Page 7: Unit
UNIT 1. MONITOR 1. POWER ON/OFF / MODE BUTTON 2. OPEN/CLOSE BUTTON 3. TILT UP/DOWN BUTTON 4. MENU BUTTON 5. SEARCH UP/DOWN BUTTON... -
Page 8: Remote Control
2. REMOTE CONTROL 3. REMOTE CONTROL BATTERY - Do not insert battery in the wrong direct - Be sure to observe the correct polarity (+/-) a battery compartment. - It is dangerous to charge/heat/open or short circuitry the battery. - Please remove the battery in case of not using the remote control f - It is time to replace the battery if the remote control does not work properly or if the operating range becomes reduced. -
Page 9: Basic Operation
BASIC OPERATION 1. POWER ON/OFF ) POWER ON (1) Press the POWER button on the unit or on the remote control to turn the power on. But the monitor will not be opened and you can listen to the sound of this unit. ) You can also turn the power on by pressing the OPEN/CLOSE button. -
Page 10: Closing The Monitor
3. CLOSING THE MONITOR Press OPEN/CLOSE button on the unit o closed. 2) If it is not closed, hold left and right upper side of the monitor and make the monitor parallel with the unit as the picture. And press OPEN/CLOSE button to close the monitor. 1) If the monitor is not parallel to the front of the unit, the monitor will not be closed. -
Page 11: Adjusting Move Position
5. ADJUSTING MOVE POSITION ) Press MENU button to show FUNCTION on the screen. 2) Press SEARCH ▲/▼ button to select MOVE. 3) Press VOLUME ▶button to move the unit o the position at 1, 2, 3. ress VOLUME ◀button the position at 2, 1, 0. -
Page 12: Selecting Mode
7. SELECTING MODE ress MODE button to select the desired mode. Each time you press this button, the mode changes as follows. AV1 -> AV2 ->AV3 ->TV AV3 has only video input. . AUDIO MUTE ress MUTE button to make the sound mute. Press MUTE button again to return to the previous audio level, or if you press VOLUME ◀... -
Page 13: Selecting The Menu
follows. 1) Press MENU button repeatedly until CONTROL MENU is selected. 2) Press SEARCH ▲/▼ button to select SCREEN. 3) Press VOLUME ▶ or ◀ button to select the desired picture mode. 10. SELECTING THE MENU You can select the menu to make this unit or AV sources connected to this unit operate in e best conditions. -
Page 14: Function
FUNCTION 1. FM TRANSMITTER CONTROL This is to listen to the sound of AV sources connected to this unit with the car speakers. If you set the FM frequency of the FM transmitter in the following way and you have the FM Radio unit in your car, you can listen to the sound of AV sources of this unit. -
Page 15: Tilt Position Control
2. TILT POSITION CONTROL 1) Press MENU button to show FUNCTION on the screen. 2) Press SEARCH ▲/▼ button to select TILT POSITION. 3) Press VOLUME ▶button to swing the LCD panel one ste Press VOLUME ◀button to swing the LCD panel one st The TILT position is +2, +1, 0, -1, -2. -
Page 16: Control
CONTROL 1. NAVIGATION AUDIO When a navigation system is connected to this unit, you can use the navigation system properly after you adjust the navigation audio control. If you press NAVI button on the remote control, the navigation mode will be displayed on the screen on any mode, when you connect the navigation system to this unit, you should connect it through RGB connector at the backside of this unit NOTE... -
Page 17: Watching Navigation
2. WATCHING NAVIGATION Press NAVI button on the remote control in order to watch the navigation. NOTE When the rear view camera is connected to this unit and you put the gear lever to R(Reverse Gear), the rear view will be displayed on the screen even if the monitor is on Navigation mode. -
Page 18: Watching The Rear View
4. WATCHING THE REAR VIEW Put the gear lever to R(Reverse) on any mode. The monitor will show the rear view camera picture. 5. WIRING CONNECTION Connect orange color connection wire with a “REVERSE GEAR” sticker to a switched power output terminal of the R (Reverse) gear. -
Page 19: Picture
PICTURE 1. CONTRAST CONTROL ) Press MENU button to show PICTURE on the screen. 2) Press SEARCH ▲/▼ button to select CONTRAST. 3) Press VOLUME ▶ or ◀ button to change the CONTRAST. VOLUME ▶ : CONTRAST level will be increased. VOLUME ◀... -
Page 20: Color Control
3. COLOR CONTROL 1) Press MENU button to show PICTURE on the screen. 2) Press SEARCH ▲/▼ button to select COLOR. 3) Press VOLUME ▶ or ◀ button to change the COLOR. VOLUME ▶ : COLOR level will be increased and the COLOR will be richer. VOLUME ◀... -
Page 21: Dimmer Control
5. DIMMER CONTROL 1) Press MENU button to show PICTURE on the screen. 2) Press SEARCH ▲/▼ button to select DIMMER. 3) Press VOLUME ▶ or ◀ button to change the DIMMER ON or OFF. ON : When this unit is set to on. The brightness of this unit will be changed depending on the brightness of the environment. - Page 22 WATCHING TV <WARNING> You cannot control this unit while driving for your safety. You should control this unit after you park your car in a safe place and pull the parking brake up. 1. MENU CONTROL 1) Press MENU button to show MENU on the screen on TV mode. 2) Each time you press MENU button, the MENU changes as follows.
- Page 23 3. FINE TUNING CONTROL 1) Press MENU button to show TUNING on the screen. 2) Press SEARCH ▲/▼ button to select FINE. 3) Press VOLUME ▶ or ◀ button to do the FINE TUNING. VOLUME ◀ : The center frequency level of the channel will be decreased. VOLUME ▶...
- Page 24 DELETE (A) Go to the memorized channel which you want to delete. (B) Press delete button on the remote control. The channel will be deleted.
- Page 25 WARNING SCREEN The monitor shows the following warning picture when the parking brake is not pulled or while driving to prevent traffic accident that may happen while watching the screen. The monitor shows the warning picture only and does not show any other picture, but you can enjoy the sound only.
- Page 26 INSTALLATION PRECAUTIONS Choose the mounting location carefully so that the unit will not interfere with the normal driving functions of the driver. Avoid installing the unit where it would be subject to high temperatures, such as from direct sunlight or hot air from the heater, or where it would be subject to dust, dirt or excessive vibration.
-
Page 27: Basic Connection
BASIC CONNECTION NOTE 1. Be sure that the PARKING SENSOR WIRE must be grounded or opened. If it is connected to ACC(B+). The unit can be damaged. 2. Do not ground the POWER ANTENNA wire or REMOTE TURN ON wire. If it is grounded, the unit can be damaged. - Page 28 CONNECTING TO AV SOURCES...
-
Page 29: Specifications
SPECIFICATIONS General Power Supply Power Consumption Operating Temperature Audio Input Sensitivity Audio Output Voltage Video Input Signal Video Output Signal Dimensions Polarity Fuses Weight Gross Monitor Section Screen Size LCD Type LCD Drive System Number of Pixels Effective Pixels Back Lighting Color System FM Transmitter Frequency... -
Page 30: Trouble Shooting
TROUBLE SHOOTING GENERAL Problem Power does not turn on. (No sound is produced.) Nothing happens when buttons pressed. Display is not accurate. remote controller does not work. MONITOR The image is not displayed. The display is dark. Cause Measure Fuse is blown Replace with a fuse of the same amperage. - Page 31 The color of the display is light shade of color is not good . image gets unclear. Screen has a double triple image. Screen spots stripes in the image. There are red, green, blue points in the display. The headlight of The display is made dark at night to the vehicle is lit.