ProForm 400C User Manual
Pro-form user's manual
Hide thumbs
Also See for 400C:
- User manual (32 pages) ,
- Gebruiksaanwijzing (26 pages) ,
- Manuel de l'utilisateur (26 pages)
Advertisement
Model No. PATL30506.0
Serial No.
Serial Number
QUESTIONS?
If you have questions, or if any
parts are missing or damaged,
PLEASE CONTACT OUR CUS-
TOMER SERVICE DEPARTMENT
DIRECTLY.
Call toll-free:
800-830-7240
E-mail:
service@goodfamily.cc
Goodfamily's Web site:
www.goodfamily.cc
ICON's Web site:
www.iconfitness.com
CAUTION
Read all precautions and instruc-
tions in this manual before using
this equipment. Save this manual
for future reference.
Decal
USER'S MANUAL
Goodfamily is an authorized dealer of this treadmill in the
territory of mainland China. This treadmill is designed and
manufactured by ICON Health & Fitness, Inc.
Advertisement
Table of Contents

Related Manuals for ProForm 400C


Summary of Contents for ProForm 400C
- Page 1 Save this manual for future reference. USER'S MANUAL Goodfamily is an authorized dealer of this treadmill in the territory of mainland China. This treadmill is designed and manufactured by ICON Health & Fitness, Inc.
-
Page 2: Table Of Contents
HOW TO FOLD AND MOVE THE TREADMILL ........ -
Page 3: Important Precautions
2. Use the treadmill only as described. 3. Place the treadmill on a level surface, with at least 2.5 m (8 ft.) of clearance behind it and 0.5 m (2 ft.) on each side. Do not place the treadmill on any surface that blocks air open- ings. - Page 4 SAVE THESE INSTRUCTIONS The decals shown at the right have been placed on the treadmill. If a decal is miss- ing, or if it is not legible, call the toll-free telephone number on the front cover of this manual and order a free replacement decal.
-
Page 5: Before You Begin
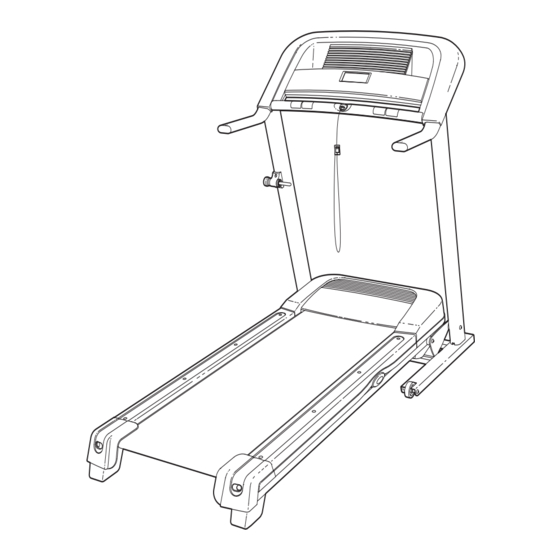
BEFORE YOU BEGIN Thank you for selecting the new PROFORM treadmill. The 400 C treadmill combines advanced tech- nology with innovative design to help you achieve your fitness goals in the convenience of your home. And when you’re not exercising, the 400 C treadmill can be folded up, requiring less than half the floor space of other treadmills. -
Page 6: Assembly
During shipping, a small amount of lubricant may be transferred to the top of the walking belt or the shipping carton. This does not affect treadmill performance. If there is lubricant on top of the walking belt, simply wipe off the lubricant with a soft cloth and a mild, non-abrasive cleaner. - Page 7 Upright Star Washers (6); do not tighten the Upright Bolts yet. 3. Turn the Base (37) over, and set it near the front of the treadmill as shown. Locate the wire in the Right Upright (39). See the inset drawing. Secure the wire to the connector on the Upright Wire (69).
- Page 8 4. Raise the Uprights (38, 39). See the left inset drawing. Identify the two Frame Spacers (96). Open the included packet of grease, and apply grease to both sides of both Frame Spacers. Next, identify the outer side of each Frame Spacer. Hold a Frame Spacer (96) and a Frame Washer (65) between the Right Upright (39) and the Lift Frame (41), with the outer side of the Frame...
- Page 9 6. Pull the wire through the Right Upright (39) until the Upright Wire (69) extends from both ends of the Right Upright. Then, disconnect and discard the wire. 7. Route the Upright Wire (69) through one of the Handrails (40). Attach the Handrail to the Right Upright (39) with two Handrail Bolts (9) and two Handrail Star Washers (11).
- Page 10 8. Have a second person raise and hold the tread- mill Frame (36). Identify the Gas Spring (83). Note that the Gas Spring has a piston end and a cylinder end. See the two small inset drawings. Locate the Spring Clip (90) in the piston end of the Gas Spring.
- Page 11 See the inset drawing. Push the Uprights (38, 39) sideways so that the treadmill Frame (36) is centered between the Uprights. Firmly tighten the Upright Bolts (4) and the Frame Bolt (1) on each side of the treadmill. Do not overtighten the Frame Bolts. Wire Harness...
- Page 12 15. Make sure that all parts are properly tightened before you use the treadmill. Note: Extra hardware may be included. Keep the included hex keys in a secure place; the large hex key is used to adjust the walking belt (see page 21).
-
Page 13: Operation And Adjustment
OPERATION AND ADJUSTMENT THE PRE-LUBRICATED WALKING BELT Your treadmill features a walking belt coated with high-performance lubricant. IMPORTANT: Never apply sili- cone spray or other substances to the walking belt or the walking platform. Such substances will deterio- rate the walking belt and cause excessive wear. - Page 14 Make sure that the on/off switch is in the “on” position. Next, stand on the foot rails of the treadmill. Locate the clip attached to the key (see the drawing above), and slide the clip securely onto the waistband of your clothes.
- Page 15 Start button, the Speed increase button, or one of the nine num- bered buttons. Note: The first time you use the treadmill, periodi- cally inspect the alignment of the walking belt, and center it if necessary (see page 20).
- Page 16 When you are finished exercising, remove the key. Step onto the foot rails, press the Stop button, and adjust the incline of the treadmill to the lowest setting. The incline must be at the lowest setting when the treadmill is folded to the storage posi- tion, or the treadmill will be damaged.
- Page 17 IMPORTANT: If a “d” appears in the display, the console is in the “demo” mode. This mode is intended to be used only when a treadmill is displayed in a store. When the console is in the demo mode, the power cord can be plugged in, the key can be removed from the console, and the display will remain lit;...
-
Page 18: How To Fold And Move The Treadmill
HOW TO FOLD THE TREADMILL FOR STORAGE Before folding the treadmill, adjust the incline to the lowest position. If this is not done, the treadmill may be per- manently damaged. Next, unplug the power cord. CAUTION: You must be able to safely lift 20 kg (45 lbs.) to raise, lower, or move the treadmill. - Page 19 HOW TO LOWER THE TREADMILL FOR USE 1. Hold the treadmill with your right hand as shown. Pull the latch knob to the left and hold it. Pivot the frame down until it is past the latch pin. 2. Hold the metal frame firmly with both hands, and lower it to the floor.
-
Page 20: Troubleshooting
PROBLEM: The power turns off during use SOLUTION: a. Check the circuit breaker located on the treadmill frame near the power cord (see the drawing above). If the circuit breaker has tripped, wait for five minutes and then press the switch back in. - Page 21 Be careful to keep the walking belt centered. Then, plug in the power cord, insert the key, and run the treadmill for a few minutes. Repeat until the walking belt is properly tightened. c. If the walking belt still slows when walked on, see the front cover of this manual.
-
Page 22: Conditioning Guidelines
For maximum fat burning, adjust the speed and incline of the treadmill until your heart rate is near the middle number in your training zone. Aerobic Exercise If your goal is to strengthen your cardiovascular sys- tem, your exercise must be “aerobic.”... - Page 23 SUGGESTED STRETCHES The correct form for several basic stretches is shown at the right. Move slowly as you stretch—never bounce. 1. Toe Touch Stretch Stand with your knees bent slightly and slowly bend forward from your hips. Allow your back and shoulders to relax as you reach down toward your toes as far as possible.
- Page 24 PART LIST—Model No. PATL30506.0 Key No. Qty. Description Frame Bolt Console Bolt 3/4” Screw Upright Bolt Wheel Bolt Upright Star Washer Upright Washer 1/4” Star Washer Handrail Bolt Silver Ground Screw Handrail Star Washer 5/32” Hex Key Hex Key Motor Pivot Bolt Motor Bolt Belt Guide Screw Motor Tension Bolt...
- Page 25 EXPLODED DRAWING—Model No. PATL30506.0 R1106A...
-
Page 26: Ordering Replacement Parts
When ordering parts, please be prepared to provide the following information: • the MODEL NUMBER of the product (PATL30506.0) • the NAME of the product (PROFORM 400 C treadmill) • the SERIAL NUMBER of the product (see the front cover of this manual) •...