Table of Contents
Advertisement
Advertisement
Table of Contents

Related Manuals for Pioneer Elite VSX-21


Summary of Contents for Pioneer Elite VSX-21
- Page 1 AUDIO/VIDEO MULTI-CHANNEL RECEIVER VSX-21 Operating Instructions...
-
Page 2: For Canadian Model
Thank you for buying this Pioneer product. Please read through these operating instructions so you will know how to operate your model properly. After you have finished reading the instructions, put them away in a safe place for future reference. -
Page 3: Important Safety Instructions
IMPORTANT SAFETY INSTRUCTIONS READ INSTRUCTIONS — All the safety and operating instructions should be read before the product is operated. RETAIN INSTRUCTIONS — The safety and operating instructions should be retained for future reference. HEED WARNINGS — All warnings on the product and in the operating instructions should be adhered to. -
Page 4: Advanced Theater Modes
Features DTS (Digital Theater Systems) decoder equipped DTS is a digital sound system introduced in theaters. Playback of DVD, LD, and CD recorded in DTS audio creates the environment of a theater or the sensation of a concert hall in your home. “DTS”... -
Page 5: Table Of Contents
Table of Contents Introductory Information ... 6 Checking the Supplied Accessories ... 6 How to Use This Manual ... 6 Preparing the Remote Control ... 6 Receiver Installation ... 7 When Making Cable Connections ... 7 Connections ... 8 Antennas ... 8 Audio Components Connections ... -
Page 6: Introductory Information
Introductory Information Checking the Supplied Accessories Please check that you have received all of the following accessories with the receiver. FM wire antenna AM loop antenna How to Use This Manual This manual is divided into two main sections : SET UP This section explains how to make the necessary connections from the receiver to your other audio and... -
Page 7: Receiver Installation
Introductory Information Operating other PIONEER components Connecting an optional control cord allows you to operate other PIONEER components simply by pointing the receiver’s remote control at the remote sensor on the front panel of the receiver. The receiver then sends the remote control signals to the other devices via the CONTROL OUT terminal. -
Page 8: Connections
Connections Antennas FM wire antenna Connect the FM wire antenna and fully extend (for best reception, attach horizontally along a window frame, etc.). AM loop antenna ANTENNA DIGITAL IN PCM/ UNBAL LOOP /DTS 75Ω ANTENNA DVD 5.1 CH INPUT SURROUND MONITOR TV SUBWOOFER CONTROL... -
Page 9: Audio Components Connections
Audio Components Connections Be sure to switch power to standby and remove the power cord from the wall outlet when you make or change connections. Connect your audio components as shown below. Refer to “Digital Connections” on page 11 when making digital connections from your DVD or LD player. -
Page 10: Video Components Connections
Connections Video Components Connections • When connecting components, the receiver should be off and the power cord unpluged. • Connect your video components as shown below. Also, refer to “Digital Connections” on page 11 when making digital connections from your DVD or LD player. •... -
Page 11: Digital Connections
Digital Connections Digital components can be connected as shown below. You can select up to four of the following be assigned to the digital inputs on this unit: DVD/LD, TV/SAT, MD/TAPE, CD, VCR1 (VCR). To assign the digital inputs, refer to “Setting Up for Surround Sound”... -
Page 12: Dvd 5.1 Channel Connection
Connections DVD 5.1 Channel Connection DVD and LD discs are often compatible with both 2 channel and 5.1 channel audio output formats. Refer to page 33 for more information on how to switch between the two input methods. Connections can be made from a DVD player or Multi channel decoder equipped with 5.1 analog outputs to the 5.1 analog inputs on this unit. -
Page 13: Speakers
Speakers • Use speakers with a nominal impedance of 6 Ω to 16 Ω. • The front speaker B terminal is only used in stereo mode (Not available during DVD 5.1 channel, DSP mode, or Dolby/ DTS mode). • When you use the speaker on your TV as a center speaker, please connect the CENTER PREOUT jack on this unit to the audio input jack on your TV. -
Page 14: Connecting Additional Amplifiers
Do not make simultaneous connections to both the CENTER PREOUT jack and the CENTER SPEAKER memo terminals. (e.g. Do not connect a separate power amplifier to the CENTER PREOUT jack if you have already connected a center speaker to the CENTER SPEAKER terminal.) PIONEER projection TV (for center channel) -
Page 15: Speaker Placement
Speaker placement To achieve the best possible surround sound, install your speakers as shown below. Be sure all speakers are installed securely to prevent accidents and improve sound quality. Surround Left • Install the left and right front speakers at equal distances from the TV. memo •... -
Page 16: Preparations
Preparations Setting Up for Surround Sound Be sure to switch the power of this unit on (The STANDBY indicator goes out). To ensure the best possible surround sound, be sure to complete the following set up operations. This is particularly important when using the (Dolby)/DTS sound mode. - Page 17 SPEAKER setting mode Establishes the size and configuration of the speaker system you have connected. In the display, “F”, “C”, and “S” refer to front, center, and surround speakers respectively. Speaker size is denoted as “L” for large speakers, “S” for small speakers, and “ memo If the cone size of your speaker is larger than 5 in.
- Page 18 Preparations SUB WOOFER ON/OFF setting mode Sets whether the SUB WOOFER is used or not. • Initial setting is “ON”. memo • Setting the front speaker size to “Small” in the SPEAKER setting mode automatically locks the sub woofer in the “ON” position. SIGNAL SELECT ANALOG...
- Page 19 Low cut filter ON/OFF setting mode Turn the low cut filter ON when distorted sound is output through the sub woofer. • Initial setting is “OFF”. memo • If the SUB WOOFER is set to “OFF” in the SUB WOOFER ON/OFF setting mode, the low cut filter cannot be set.
- Page 20 Preparations Dynamic range control setting mode Dynamic range is the difference between the loudest and softest sounds in any given signal. The dynamic range control helps you play back sounds so the quieter sounds are audible yet the louder sounds don’t get distored. It does this by compressing the dynamic range.
- Page 21 Optical digital input 3 setting Sets the input component to be assigned to the optical input 3 jack. • Initial setting is “TV”. memo • You cannot assign the same component to more than one digital input jack. The jack most recently selected is established for the component and the jack formerly selected is turned off.
-
Page 22: Setting Up The Remote Control
Preparations Setting Up the Remote Control In addition to controlling the receiver, the supplied remote control can operate your other components (DVD, MD, VCR, TV, LD, CD, etc.). If your component(s) are listed in the “Preset Code List” on page 56, simply recall the corresponding preset code. -
Page 23: Clearing The Remote Control Settings
Press COMMANDER SET UP to exit the preset mode. The remote control returns to the previous operation mode. • When operating a PIONEER’S DVD/LD player, set the memo manufacturer code to “000” in the preset mode. • All codes enrolled in the manufacturer code list can be set even if a code is not displayed. -
Page 24: Names Of Parts And Basic Operations
Names of Parts and Basic Operations Display SIGNAL SELECT ANALOG PRO LOGIC DIGITAL DIGITAL AC-3 1 SIGNAL SELECT indicators Light to indicate the type of input signal selected for the current component (refer to “Front Panel”, @, SIGNAL SELECT on pages 26, 27). ANALOG : Lights when the analog audio signals are selected. -
Page 25: Remote Control
Remote Control These pages describe the buttons on the remote control used to operate the receiver. RECEIVER ENTER – CHANNEL MULTI CONTROL DVD/LD TV/SAT VCR 1 TUNER TV CONTROL VCR 2 RECEIVER MD/TAPE DSP MODE MIDNIGHT CH.SELECT TEST TONE ATT SIG.SELECT CN.LEVEL EFFECT MEMU... -
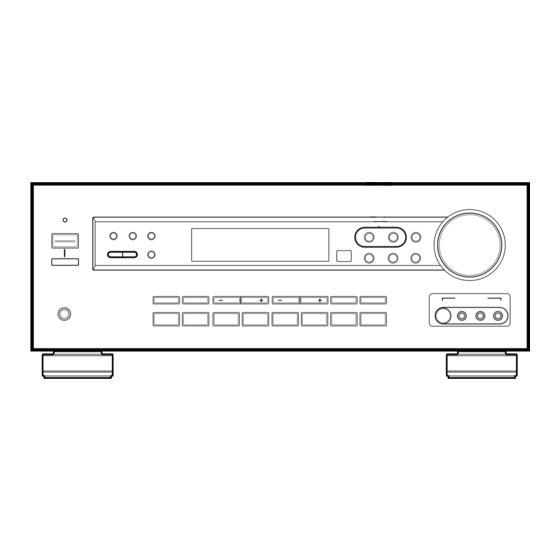
Page 26: Front Panel
Names of Parts and Basic Operations Front Panel 3 4 5 6 7 AUDIO/VIDEO MUL TI-CHANNEL RECEIVER ST ANDBY CLASS MEMORY MODE ST ANDBY/ON TUNING ST A TION SELECT FREQUENCY SPEAKERS PHONES STANDBY/ON button Press to switch the receiver on or put in standby. 2 STANDBY indicator Lights when the receiver is in standby mode. -
Page 27: Master Volume
• SIGNAL SELECT is fixed in the “ANALOG” position for components not assigned to one of the four digital input jacks. • Because the audio from a karaoke microphone and LD recorded with analog audio only is not output from the digital output, set SIGNAL SELECT to “ANALOG”. -
Page 28: Sound Modes
Sound Modes This receiver incorporates two surround modes for enjoyment of a variety of program sources. Surround modes (Dolby) mode Use this mode when playing Dolby Digital or Dolby Pro Logic software. Decoding switches automatically according to the input signal, so all you have to do is enjoy! You can identify Dolby Digital software by the , but unmarked software may also incorporate Dolby Pro Logic. -
Page 29: Switching Analog/Digital Signal Input
Switching ANALOG/DIGITAL Signal Input The input of the component set in the digital input setting (Refer to page 20, 21) can be switched to an analog or digital input signal by pressing the SIGNAL SELECT button. RECEIVER ENTER – CHANNEL MULTI CONTROL DVD/LD TV/SAT... -
Page 30: Playing Sources With Dolby Digital Or Dts Sound
Sound Modes Playing Sources with Dolby Digital or DTS Sound RECEIVER ENTER – CHANNEL MULTI CONTROL DVD/LD TV/SAT VCR 1 TUNER TV CONTROL VCR 2 RECEIVER MD/TAPE DSP MODE MIDNIGHT CH.SELECT TEST TONE ATT SIG.SELECT CN.LEVEL EFFECT MEMU CLASS TV/VCR FUNCTION DIRECT FL DIMMER... -
Page 31: Selecting A Sound Mode
Selecting a Sound Mode To ensure the best possible surround sound, be sure to complete the set up procedures described in “Setting Up for Surround Sound” (starting on page 16) before using the sound modes. This is particularly important when using the (Dolby)/DTS sound mode. - Page 32 Sound Modes Switching the Dolby/DTS mode (ADVANCED THEATER mode) Switch the Dolby/DTS mode by pressing the and DTS signal processing is performed automatically corresponding to the input signal. RECEIVER ENTER – CHANNEL MULTI CONTROL DVD/LD TV/SAT VCR 1 TV CONTROL TUNER VCR 2 RECEIVER...
-
Page 33: Cinema Re-Eq Playback
DVD 5.1ch input playback Connect a component with 5.1 channel output to enjoy the surround sound created by 5.1 channel playback. DVD/LD Using Cinema Re-EQ THX Cinema Re-EQ* is a process developed by Lucasfilm, Ltd. to make Dolby Surround soundtracks originally intended for playback at movie theaters sound more natural when played through a typical home theater set up. - Page 34 Sound Modes Reducing noise during playback (DIGITAL NR function) When DIGITAL NR is on, extraneous noise during playback can be reduced. DIGITAL NR <ARB7181> Press DIGITAL NR on the front panel. Each press switches DIGITAL NR on or off. SIGNAL SELECT ANALOG DIGITAL...
-
Page 35: Listening In Midnight Listening Mode
Listening in MIDNIGHT Listening Mode When the volume is low, surround effects tend to become less than satisfactory. Turn the MIDNIGHT listening mode on to enjoy the effects of quality surround sound even at low volumes. This mode allows you to hear effective surround sound of movies at low volume levels. -
Page 36: Tuner Operations
Tuner Operations Automatic and Manual Tuning The following steps show you how to tune in FM and AM radio broadcasts using the automatic (search) and manual (step) tuning functions. If you already know the exact frequency of the station you want, see “Direct Tuning” on the following page. -
Page 37: Direct Tuning
Direct Tuning The following steps show you how to tune directly to a specific frequency using the remote control. RECEIVER ENTER – CHANNEL MULTI CONTROL DVD/LD TV/SAT VCR 1 TUNER TV CONTROL VCR 2 RECEIVER MD/TAPE DSP MODE MIDNIGHT CH.SELECT TEST TONE ATT SIG.SELECT CN.LEVEL... -
Page 38: Memorizing Frequently Tuned Stations
Tuner Operations Memorizing Frequently Tuned Stations The following steps show you how to memorize up to 30 radio stations in 3 classes (each holding 10 channels). When memorizing FM frequencies, the receiver also memorizes the MPX mode (STEREO or MONO). Using the front panel <ARB7181>... -
Page 39: Recalling The Memorized Stations
Recalling the Memorized Stations Using the remote control RECEIVER ENTER – CHANNEL MULTI CONTROL DVD/LD TV/SAT VCR 1 TUNER TV CONTROL VCR 2 RECEIVER MD/TAPE DSP MODE MIDNIGHT CH.SELECT TEST TONE ATT SIG.SELECT CN.LEVEL EFFECT MEMU CLASS TV/VCR FUNCTION DIRECT FL DIMMER COMMANDER MODE CHECK... -
Page 40: Other Operations
Other Operations Playback RECEIVER ENTER – CHANNEL MULTI CONTROL DVD/LD TV/SAT VCR 1 TUNER TV CONTROL VCR 2 RECEIVER MD/TAPE DSP MODE MIDNIGHT CH.SELECT TEST TONE ATT SIG.SELECT CN.LEVEL EFFECT MEMU CLASS TV/VCR FUNCTION DIRECT FL DIMMER COMMANDER MODE CHECK SET UP Î... -
Page 41: Adjusting The Brightness Of The Display
Adjusting bass and treble (tone control) Use BASS (+/–) or TREBLE (+/–) to adjust the low and high frequencies. TREBLE +/– BASS +/– Adjusting the brightness of the display Use FL DIMMER to adjust the brightness of the fluorescent display. RECEIVER ENTER –... -
Page 42: Recording From Audio Components
Other Operations Recording from Audio Components The following operations show you how to record audio to the cassette, DAT, or MD deck connected to the MD/TAPE 1 or TAPE 2 MONITOR jacks. memo The receiver’s volume, balance, tone (BASS, TREBLE, and LOUDNESS), and surround effects have no effect on the recorded signal. -
Page 43: Recording From Video Components
Recording from Video Components The following operations show you how to record audio and video to the video tape recorder connected to the VCR 1 or VCR 2 jacks. The receiver’s volume, balance, tone (BASS, TREBLE, and LOUDNESS), and surround effects have no effect memo on the recorded signal. -
Page 44: Remote Controlling Other Components
2 %, 3 ENTER, 6 @ # , 8 MENU key 9 title key Pressing the DVD/LD button again or not pressing any buttons for 30 seconds returns the remote control to its former condition. *With some Pioneer DVD and DVD/LD players, cursor operation can be performed without pressing DVD/LD. -
Page 45: Number Buttons
TV operations memo Before performing these operations, press TV CONTROL or TV/SAT (MULTI CONTROL) to switch the remote to the TV operation mode. RECEIVER ENTER – CHANNEL MULTI CONTROL DVD/LD TV/SAT VCR 1 TUNER TV CONTROL VCR 2 RECEIVER MD/TAPE DSP MODE MIDNIGHT CH.SELECT... - Page 46 Other Operations SAT (Satellite Tuner) operations • The following operations are available from the receiver’s remote control after you recall a Satellite tuner memo preset code (refer to “Setting up the Remote Control” on page 22). • Before performing these operations, press the TV/SAT (MULTI CONTROL) button to switch the remote to the TV/SAT operation mode.
-
Page 47: Cd Player Operations
CD player operations memo Before performing these operations, press the CD (MULTI CONTROL) button to switch the remote to the CD operation mode. RECEIVER ENTER – CHANNEL MULTI CONTROL DVD/LD TV/SAT VCR 1 TUNER TV CONTROL VCR 2 RECEIVER MD/TAPE DSP MODE MIDNIGHT CH.SELECT... - Page 48 8 +10 Use when selecting track numbers higher than 10 or 100. For example (in case of MJ-D707 (PIONEER)), 1) To select track 15, press : +10 = 1 = 5 2) To select track 115, press :...
-
Page 49: Cassette Deck Operations
Cassette deck operations memo Before performing these operations, press the MD/TAPE (MULTI CONTROL) button to switch the remote to the MD/TAPE operation mode. RECEIVER ENTER – CHANNEL MULTI CONTROL DVD/LD TV/SAT VCR 1 TUNER TV CONTROL VCR 2 RECEIVER MD/TAPE DSP MODE MIDNIGHT CH.SELECT... -
Page 50: Vcr Operations
Other Operations VCR operations memo Before performing these operations, press the VCR 1 or VCR 2 (MULTI CONTROL) button to switch the remote to the VCR operation mode. RECEIVER ENTER – CHANNEL MULTI CONTROL DVD/LD TV/SAT VCR 1 TUNER TV CONTROL VCR 2 RECEIVER MD/TAPE... -
Page 51: Background Control Of Other Components
Background Control of Other Components The following steps show you how to control one component while listening to another. This may be useful if you want to rewind a tape while listening to CD, etc. RECEIVER ENTER – CHANNEL MULTI CONTROL DVD/LD TV/SAT VCR 1... -
Page 52: Additional Information
Additional Information Dolby Digital Dolby Digital is a compression format which records the sound of 6 channels of the theater surround system (Dolby Digital) on the movie film digital track. Of the 6 channels, the sub woofer channel is intended for bass only, and because the frequency range is smaller than the main channel, it is expressed as 5.1 channel. -
Page 53: Dts
DTS has been adopted as a sound recording format in the latest movie theaters since the release of “JURASSIC PARK” in 1993, and has a good reputation for high quality sound and dynamic surround effects. In this system, 6 channels of digital sound are recorded on CD-ROM, not on the film. It adopts a simultaneous playback format. -
Page 54: Troubleshooting
Sometimes the trouble may lie in another component. Investigate the other components and electrical appliances being used. If the trouble cannot be rectified even after exercising the checks listed below, ask your nearest PIONEER authorized service center or your dealer to carry out repair work. Symptom The power does not turn ON. - Page 55 Symptom Broadcast stations cannot be selected automatically. No sound from surround or center speakers. Sound is produced from other components, but not from LD or DVD player. No sound is output or a noise is output when software with DTS is played back.
-
Page 56: Preset Code List
Additional Information Preset Code List Device Manufacturer TOSHIBA SONY PANASONIC SAMSUNG SHARP AKAI PIONEER 000, 003 SONY PANASONIC 105,106 KENWOOD PHILIPS MITSUBISHI PIONEER 102 (DVD code) 201,203 SONY PIONEER 401,406,408,414,405,413,411 ZENITH 403,404,417 MAGNAVOX 414,408,426,403 FISHER 410,426,412,427,425,420 PANASONIC 408,432,433 TOSHIBA 405,409,426... -
Page 57: Specifications
Specifications Specifications Amplifier Section Continuous average power output of 100 watts* per channel, min., at 8 ohms, from 20 Hz to 20,000 Hz with no more than 0.09 %** total harmonic distortion (front). Continuous Power Output Front ... 100 W + 100 W (1 kHz, 0.8 %, 8 Ω) Center ... -
Page 58: Power Cord Caution
Check the power cord once in a while. When you find it damaged, ask your nearest PIONEER authorized service center or your dealer for a replacement. For Assistance With Basic Set-up, Operation, or Trouble... - Page 59 Si ce produit doit être réparé au Canada, veuillez vous adresser à un distributeur autorisée Pioneer au Canada pour obtenir le nom de la Société de Service Autorisée Pioneer le plus près de chez vous. Ou encore, veuillez vous communiquer avec le Service de Clientèle de Pioneer: Pioneer électroniques du Canada, Inc.
- Page 60 PIONEER ELECTRONICS OF CANADA, INC. PIONEER ELECTRONIC [EUROPE] N.V. Haven 1087, Keetberglaan 1, 9120 Melsele, Belgium TEL: 03/570.05.11 PIONEER ELECTRONICS AUSTRALIA PTY. LTD. PIONEER ELECTRONICS DE MEXICO S.A. DE C.V. <99A00ZF0D00> <ARB7181> 4-1, Meguro 1-Chome, Meguro-ku, Tokyo 153-8654, Japan 300 Allstate Parkway, Markham, Ontario L3R OP2, Canada 178-184 Boundary Road, Braeside, Victoria 3195, Australia, TEL: 03-9586-6300 San Lorenzo Num 1009 3er piso Desp.