
Related Manuals for Pioneer Super Tuner III D AVM-P9000


Summary of Contents for Pioneer Super Tuner III D AVM-P9000
- Page 1 Multi-Channel AV Master Unit ENGLISH Owner’s Manual AVM-P9000 This product conforms to new cord colors.
-
Page 2: Table Of Contents
Contents Before Using This Product ... 3 Key Finder ... 3 About This Product ... 4 • Video System of a Connected Component • Output Setting of the DVD Player About This Manual ... 5 To Ensure Safe Driving ... 6 •... - Page 3 TV Tuner ... 43 Basics ... 43 Operation at the Function Menu Screen ... 44 • Accessing the TV Tuner Function Menu CD Player ... 45 Basics ... 45 Operation at the Function Menu Screen ... 46 • Accessing the CD Function Menu Adjusting Audio (Basic) ...
-
Page 4: Before Using This Product
Before Using This Product Key Finder Remote Controller Buttons 1–6 PTY button 2/3 button TA button Note: • TA and PTY buttons are for DAB Tuner control. VOLUME 5/∞ button SOURCE button Joystick DISPLAY button MENU button RETURN button V.SEL button PGM button BAND button... -
Page 5: About This Product
Dolby Digital*/DTS** Compatibility (When combining the product with a Pioneer 6- Disc Multi-DVD Player such as the XDV-P9) When using this product with a Pioneer 6-Disc Multi-DVD Player, you can enjoy the atmos- phere and excitement provided by DVD-Video software featuring 5.1 channel recordings. -
Page 6: Output Setting Of The Dvd Player
Output Setting of the DVD Player When connecting Pioneer’s Multi-DVD player such as the XDV-P9, make the “Digital Output Setting (DIGITAL OUTPUT)” and “Digital and Analog Audio Output Setting (OUT SELECTION)” as follows: Function DIGITAL OUTPUT OUT SELECTION Refer to the DVD Player manual for details on how to make those settings. -
Page 7: To Ensure Safe Driving
To Ensure Safe Driving WARNING • To avoid the risk of accident and the potential violation of applicable laws, this product is not for use with a video screen that is visible to the driver. • In some countries or states the viewing of images on a display inside a vehicle even by persons other than the driver may be illegal. -
Page 8: Resetting The Microprocessor
• If the battery is disconnected, the preset memory will be erased and must be repro- grammed. • Should this product fail to operate properly, contact your dealer or nearest authorized Pioneer Service Station. When using the 50-Disc Type Multi-CD Player The available functions of the 50-Disc Type Multi-CD Player are described in this manual. -
Page 9: Remote Control And Care
Remote Control and Care This product is equipped with a remote controller for convenient operation. • Point the controller in the direction of the signal reception on the color display (sold separately) to operate. Precaution: • Do not store the remote controller in high temperatures or direct sunlight. •... -
Page 10: Operation For Each Source Unit
= External 1 = External 2 = AUX = Speaker Input Note: • External Unit refers to a Pioneer product (such as one available in the future) that, although incompatible as a source, enables control of basic functions by this product. Two External Units can be controlled by this product, although “External”... -
Page 11: When Connecting A Multi-Dvd Player
2. Select the desired picture. DISP Each press changes the picture ... Each press of the V.SEL button selects the source in the following order: Source Screen = TV Tuner Unit (BGTV) = Video (BGVTR) Note: • Select “Source Screen” to hear/view playback of normal audio/video sources. •... -
Page 12: Virtual Theater Quick Tour
Virtual Theater Quick Tour Move the joystick left to move to the entrance of the Function Menu Screen. If you click the joystick, you switch to the Function Menu Screen. Further explana- tion on how to use the Function Menu Screen will follow. -
Page 13: Menu Structure
Menu Structure The setting and adjusting operation of this product is done from the Main Menu. Press the MENU button, and four main menu icons appear on the screen: “Function”, “Audio”, “Picture” and “Set Up”. The selected function is highlighted in green. Move to each menu screen from this opening screen. -
Page 14: Information Screen
Information Screen By pressing the DISPLAY button on this remote control unit you can show the title list, make changes to the Source Plate Information Screen, etc. Switching the Information Screen In the following, the Multi-CD Player is used as an example of source. 7 Multi-CD Player Pressing the DISPLAY button switches the Information display on the Source Plate as fol- lows. - Page 15 7 Tuner Source Plate Display « Flip-Down Plate Display (Preset Frequency List) « No Plate 7 TV Source Plate Display « No Plate • For televisions, the Source Plate Display disappears after about 8 seconds. 7 Multi-DVD Player Source Plate Display «...
-
Page 16: Using The Screen Pictures (Selecting The Vtr Etc.)
Using the Screen Pictures (Selecting the VTR etc.) Selecting the Video Source Switching the Video ON/OFF Mode You can select the video unit when one is connected to the video input on this product. To select the Video mode, switch the Video in the Set Up Menu On. 1. -
Page 17: Selecting The Video Source
Selecting the Video Source You can enjoy video and audio entertainment from external components connected to video input. Switch the power to your video unit ON before performing operations. (Refer to the video unit manual.) • Select “Video” by pressing the SOURCE but- ton. -
Page 18: Selecting The Picture To Rear Display
Selecting the Picture to Rear Display You can also enjoy video and audio entertainment from external components connected to video input on a rear display (sold separately). This is only possible if a rear display is connected. Switch the power to your video unit ON before performing operations. (Refer to the video unit manual.) •... -
Page 19: Adjusting The Picture
Adjusting the Picture You can independently adjust Video, DVD and TV Tuner unit picture quality. You can also make adjustments to the picture quality when viewing with the car courtesy light ON or OFF, and store both settings in memory. 1. -
Page 20: Built-In Tuner
Built-In Tuner Reset the AM tuning step from 9 kHz (the factory preset step) to 10 kHz when using the tuner in North, Central or South America. (See page 68.) Basics Selecting the Tuner Select the “Tuner” as source by pressing the SOURCE button as many times as necessary. -
Page 21: Operation At The Function Menu Screen
Operation at the Function Menu Screen Accessing the Tuner Function Menu 1. Press the MENU button. The main menu icons whirl down, with “Function” highlighted in green. 2. Click the joystick. The Tuner Function Menu appears, offering you the following options: 7 FM Tuner Function Menu Local Seek Tuning (See page 21.) -
Page 22: Operating Each Function
Operating Each Function Best Stations Memory (BSM) The BSM function stores stations in memory automatically. Select the band before performing operations. (See “Band” on page 19.) 1. Check to see “BSM” is currently highlighted. If not, select that option by moving the joystick. “BSM”... -
Page 23: Display The Flip-Down Plate
2. Click the joystick. Each click changes the PGM mode in the following order: BSM = Local Press the PGM button in the Tuner source Function name (Display) Best Stations Memory (BSM) Local Seek Tuning (Local) Display the Flip-Down Plate •... -
Page 24: Multi-Dvd Player
Multi-DVD Player Basics Selecting the Multi-DVD Select the “DVD” as source by pressing the SOURCE button as many times as necessary. The player starts playing automatically. DISP Chapter (Track) Search and Fast Forward/Reverse You can select between Chapter (Track) Search or Fast Forward/Reverse by pressing 2/3 button for a different length of time. -
Page 25: Operation At The Function Menu Screen (Dvd, Video Cd)
Operation at the Function Menu Screen (DVD, Video CD) With Multi-DVD player, the Function Menu differs for playing DVDs, Video CDs and CDs. When playing CDs, refer to “Operation at the Function Menu Screen (CD)”. (See page 27.) Accessing the DVD Function Menu (DVD, Video CD) Begin play of a disc before selecting options from the DVD Function Menu. -
Page 26: Operating Each Function
Operating Each Function Repeat Play You can select the desired repeat mode play range from the chapter (track), title or disc cur- rently in play. 1. Check to see “RPT” is currently highlighted. If not, select that option by moving the joystick. “RPT”... -
Page 27: Pgm Button
PGM button You can create a shortcut for Pause or Repeat Play Mode. If you want to control the function of one of these, without needing to go to the Function Menu each time, do the following: 1. Select “PGM” by moving the joystick. “PGM”... -
Page 28: Operation At The Function Menu Screen (Cd)
Operation at the Function Menu Screen (CD) With Multi-DVD player, the Function Menu differs for playing DVDs, Video CDs and CDs. When playing DVDs and Video CDs, refer to “Operation at the Function Menu Screen (DVD, Video CD)”. (See page 24.) Accessing the DVD Function Menu (CD) Begin play of a disc before selecting options from the DVD Function Menu. -
Page 29: Operating Each Function
Operating Each Function Repeat Play Repeat Play plays the same disc and track repeatedly. 1. Check to see “RPT” is currently highlighted. If not, select that option by moving the joystick. “RPT” is highlighted in green. 2. Click the joystick. Each click changes the Repeat mode in the following order: Disc RPT = Track RPT... -
Page 30: Scan Play
Scan Play Scan Play plays the first 10 seconds or so of each track on a CD in succession. 1. Select “Scan” by moving the joystick. “Scan” is highlighted in green. 2. Switch the Scan Play On by clicking the joy- stick. -
Page 31: Pause
Pause Pause pauses the currently playing track. 1. Select “Pause” by moving the joystick. “Pause” is highlighted in green. 2. Click the joystick. Each click toggles the Pause On/Off. PGM button You can create a shortcut for Pause, RPT, Random or ITS Mode. If you want to control the function of one of these, without needing to go to the Function Menu each time, do the following: 1. -
Page 32: Display The Flip-Down Plate
Display the Flip-Down Plate • Press the DISPLAY button. Each press of the DISPLAY button changes the Source Plate and Flip-Down Plate in the following order: Source Plate = Disc Title List = No Plate Examples Source Plate (e.g. for DVDs) Note: •... -
Page 33: Selecting Discs By Disc Title List
Selecting Discs by Disc Title List You can select a disc from Disc Title List you want to listen to and play. 1. Press the DISPLAY button for the Flip-Down Plate to appear. 2. Select the desired disc title by moving the joy- stick up/down. -
Page 34: Multi-Cd Player
Multi-CD Player Basics Selecting the Multi-CD Player Select the “Multi-CD” as source by pressing the SOURCE button as many times as necessary. The player starts playing automatically. DISP Track Search and Fast Forward/Reverse You can select between Track Search or Fast Forward/Reverse by pressing the 2/3 button for a different length of time. -
Page 35: Operation At The Function Menu Screen
Operation at the Function Menu Screen Accessing the Multi-CD Function Menu 1. Press the MENU button. The main menu icons whirl down, with “Function” highlighted in green. 2. Click the joystick. The Multi-CD Function Menu appears offering you the following options: 7 Multi-CD Function Menu Random Play (See page 35.) -
Page 36: Operating Each Function
Operating Each Function Repeat Play There are three repeat play ranges: One-track Repeat, Disc Repeat and Multi-CD player Repeat. Default repeat play range is Multi-CD player Repeat. 1. Check to see “RPT” is currently highlighted. If not, select that option by moving the joystick. “RPT”... -
Page 37: Scan Play
Scan Play In the Disc Repeat, the beginning of each track on the selected disc is scanned for about 10 seconds. In the Multi-CD player Repeat, the beginning of the first track on each disc is scanned for about 10 seconds. 1. -
Page 38: Pause
Pause Pause pauses the currently playing track. 1. Select “Pause” by moving the joystick. “Pause” is highlighted in green. 2. Click the joystick. Each click toggles Pause On/Off. Compression and DBE Using the COMP (Compression) and DBE (Dynamic Bass Emphasis) functions enables Multi-CD player sound quality adjustment. -
Page 39: Pgm Button
PGM button You can create a shortcut for Pause, RPT, Random or ITS mode. If you want to control the function of one of these, without needing to go to the Function Menu each time, do the following: 1. Select “PGM” by moving the joystick. “PGM”... -
Page 40: Disc Title Input
Disc Title Input You can input Titles up to 10 letters long for up to 100 discs. Using this function lets you eas- ily search for and select a desired disc for play. (You can store ITS program and Disc Title data for up to 100 discs in memory.) Note: •... -
Page 41: Getting Text Displayed (For Cd Text Compatible Type)
7. Move the box left and right by moving the joy- stick left/right. 8. When you have completed title input, move to the 10th letter position, then memorize by moving the joystick right. Note: • Titles remain in memory, even after the disc has been removed from the magazine, and are recalled when the disc is reinserted. -
Page 42: Selecting Discs By Disc Title List
Selecting Discs by Disc Title List Follow the procedures below to play a disc for which you have input the title in a Multi-CD player or a CD TEXT disc on a CD TEXT compatible Multi-CD player. 1. Press the DISPLAY button for the Flip-Down Plate to appear. -
Page 43: Erase A Track Program
Erase a Track Program 1. Press the DISPLAY button for the Flip-Down Plate to appear. 2. Select the track you wish to erase, during ITS Play. 3. Select “ITS Clear” by moving the joystick. “ITS Clear” is highlighted in green. 4. -
Page 44: Tv Tuner
TV Tuner The following explains how to use this product to control TV tuners. For details of TV tuner-specific operations/features, see your TV tuner’s manual. Basics Selecting the TV Tuner Select the “TV Tuner” as source by pressing the SOURCE button as many times as necessary. -
Page 45: Operation At The Function Menu Screen
Operation at the Function Menu Screen Accessing the TV Tuner Function Menu 1. Press the MENU button. The main menu icons whirl down, with “Function” highlighted in green. 2. Click the joystick. The TV Tuner Function Menu appears, offering you the following options: 3. -
Page 46: Cd Player
CD Player The following explains how to use this product to control CD players. For details of CD player-specific operations/features, see your CD player’s manual. Basics Selecting the CD Player Select the “Compact Disc” as source by pressing the SOURCE button as many times as necessary. -
Page 47: Operation At The Function Menu Screen
Operation at the Function Menu Screen Accessing the CD Function Menu 1. Press the MENU button. The main menu icons whirl down,with “Function” highlighted in green. 2. Click the joystick. The CD Function Menu appears, offering you the following options: 3. -
Page 48: Adjusting Audio (Basic)
Adjusting Audio (Basic) Accessing the Audio Menu 1. Press the MENU button. The main menu icons whirl down,with “Function” highlighted in green. 2. Select “Audio” by moving the joystick. “Audio” is highlighted in green. 3. Click the joystick. Audio Menu appears, offering you the following options: 7 Audio Menu Position Selector (See page 49.) -
Page 49: Proper Setting For The In-Car Acoustic Characteristics
Proper Setting for the In-car Acoustic Characteristics The built-in cabin equalizer allows you to easily adjust your audio system to meet the in- car acoustic characteristics which vary depending on the type of car and its measurement. To get the best possible sound spaciousness, be sure to make settings for the speakers. As well, making settings for “Position”... -
Page 50: Position Selector
Position Selector One way to assure a more natural sound is to clearly position the stereo sound image (putting you in the center of the sound field). About the Position Selector • The Position Selector function is a feature that automatically adjusts the speakers’ output levels and inserts a delay time into the speakers’... -
Page 51: Adjustments For Speaker
5. Cancel the FAD/BAL Setting Menu by clicking the joystick. Note: • “F 00” is the proper setting when 2 speakers are in use. Adjustments for Speaker You need to make “with/without” (or yes/no) and “size” (bass reproducing capacity) selec- tion/adjustments depending on the installed speakers. - Page 52 3. Select the speaker you want to make adjust- ments to by moving the joystick. The currently selected speaker is highlighted in green. 4. Click the joystick. are displayed and you can set the size and the level for the selected speaker. 5.
-
Page 53: Equalizer Curve
Equalizer Curve You can switch between Equalizer curves. 1. Select “Equalizer” by moving the joystick. “Equalizer” is highlighted in green. 2. Click the joystick. The Graphic Equalizer Menu appears, with “Band” highlighted in green. 3. Select either “EQ+” or “EQ–” by moving the joystick up/down. -
Page 54: Source Level Adjustment (Sla)
Source Level Adjustment (SLA) The SLA (Source Level Adjustment) function prevents radical leaps in volume level when switching between sources. Settings are based on the FM volume level, which remains unchanged. Before performing the following steps, select the source whose volume level you will adjust. -
Page 55: Sound Field Control (Sfc)
Sound Field Control (SFC) The SFC function creates the sensation of a live performance. About the SFC function • The acoustics of different performance environments are not the same and depend on the extent and contour of space through which sound waves move and on how sounds bounce off the stage, walls, floors and ceilings. -
Page 56: Dynamic Range Control
4. Click the joystick. Each click toggles the selected SFC mode On/Off. Switch the SFC mode On to expe- rience a sense of presence and spaciousness. Remarks on Dolby PRO LOGIC ON/OFF • If the source is a 2-channel LPCM audio or a 2-channel Dolby Digital audio and you select SFC effects that are most applicable for 5.1-channel audio (i.e., Musical, Drama, Action or 5D), we recommend switching Dolby Pro Logic ON. -
Page 57: Loudness Adjustment
Loudness Adjustment The Loudness function compensates for deficiencies in the low and high sound ranges at low volume. You can select a desired Loudness level. 1. Select “Position Selector” by moving the joy- stick. “Position Selector” is highlighted in green. 2. -
Page 58: Fine Adjusting Audio (Expert)
Fine Adjusting Audio (Expert) Before Getting Started This section of the manual looks at trimming certain settings to customize audio to your taste. Check to make sure of the following settings before performing the steps below. In addition, it is also necessary that the Cabin Equalizer (see page 48) and Adjustments for Speaker (see page 50) should correctly have been set up and made in accordance with the type of car you are in and the speaker system in use. -
Page 59: Adjusting The Speakers'output Levels Using A Test Tone
Adjusting the Speakers’ Output Levels using a Test Tone A convenient test tone allows you to easily get the overall balance right among the speakers. 1. Select “Test Tone” by moving the joystick. “Test Tone” is highlighted in green. 2. Click the joystick. The test tone is output. -
Page 60: Selecting A Crossover Frequency
Selecting a Crossover Frequency You can select a frequency, sounds under which are reproduced through the subwoofer. If the installed speakers include one whose “Size” has been set “SMALL”, you can select a frequency, sounds under which are reproduced through a “LARGE” speaker or subwoofer. 1. -
Page 61: Adjusting The Cabin Equalizer (Expert)
Adjusting the Cabin Equalizer (Expert) At the Expert Setting Menu you can make fine adjustments for 3-band parametric EQ, speaker output level and time alignment, speaker by speaker. “Band”, “Frequency”, “EQ Level” and “Q Factor” are options you need to select when adjusting the 3-band parametric equalizer. Tips for adjusting the Cabin Equalizer •... -
Page 62: Operation At The Expert Setting Menu
Operation at the Expert Setting Menu • To select options, move the joystick up/down or left/right. You cannot move diagonally. : Move the joystick left/right. : Move the joystick up/down. Normal: Custom MEMO: See “Storing the Adjusted Cabin EQ into Memory” (p. 64). Cabin Reset: Position: Return:... -
Page 63: Adjusting The Speakers' Output Level
4. Select “Frequency”, “EQ Level” or “Q Factor” by moving the joystick up/down. Selected option is highlighted in green. 5. Adjust the selected option by moving the joy- stick left/right. The selectable options are adjustable in the following limits: Option Frequency EQ Level Q Factor... -
Page 64: Adjusting The Time Alignment
3. Select “SP Level” by moving the joystick. “SP Level” is highlighted in green. 4. Adjust the speaker’s output level by moving the joystick left/right. The display shows “–10 dB” – “+10 dB”. 5. Complete the setting by clicking the joystick. Note: The output level you set at the Expert Setting Menu is •... -
Page 65: Storing The Adjusted Cabin Eq Into Memory
Storing the Adjusted Cabin EQ into Memory Once you have adjusted a Cabin EQ, you can store it into memory. 1. Select “Custom MEMO” by moving the joy- stick. “Custom MEMO” is highlighted in green. 2. Click the joystick. Your adjusted cabin EQ has been stored into memory, and car type changes to “CUSTOM”... -
Page 66: Adjusting The Equalizer Curves
Adjusting the Equalizer Curves The Cabin EQ is factory set to provide the best possible sound depending on types of car. Against this background you can also adjust Equalizer Curves, or sound effects, to create sound according to your preference. Before performing the following steps, select the source whose EQ curve you’ll adjust. - Page 67 8. Adjust the selected option by moving the joy- stick up/down. The selectable options are adjustable in the following limits: As well, “Frequency” differs in adjustable range from Band to Band. Option Level Frequency Q Factor 9. Select “Band” by moving the joystick. 10.
-
Page 68: Changing The Initial Settings
Changing the Initial Settings Accessing the Initial Settings Menu 1. Switch the Power off by pressing the SOURCE button for 1 second. 2. Press the MENU button for 2 seconds. The Initial Settings Menu appears, with “FM” highlighted in green. 7 Initial Settings Menu Setting the AM Tuning Step (See page 68.) -
Page 69: Changing The Fm Tuning Step
Changing the FM Tuning Step The tuning step employed by Seek Tuning in the FM mode can be switched between 100 kHz (preset at the factory) and 50 kHz. 1. Check to see “FM” is currently highlighted. If not, select that option by moving the joystick. “FM”... -
Page 70: Correcting Distorted Sound
Correcting Distorted Sound You can minimize distortion likely caused depending on the EQ curve settings. 1. Select “SENS” by moving the joystick. “SENS” is highlighted in green. 2. Click the joystick. Each click toggles SENS High/Low. Note: • Setting an EQ level high can cause distortion. If highs sound crippled or distorted, try switch- ing to “Low”. -
Page 71: Adjusting The Display Position
Adjusting the Display Position You can adjust the position of the display. 1. Select “DISP POSI” by moving the joystick. “DISP POSI” is highlighted in green. 2. Click the joystick. 3. Adjust the display position by moving the joy- stick. 4. -
Page 72: Other Functions
Other Functions Switching the Center Screen and Time Display in the Center Room You can change the center screen to show a simple source information, time display in addi- tion to 9 different video clips. 1. Select the desired Display by clicking the joy- stick. -
Page 73: Listening Sounds Or Viewing Images From Additional Units
Listening Sounds or Viewing Images from Additional Units Accessing the Set Up Menu 1. Press the MENU button. The main menu icons whirl down,with “Function” highlighted in green. 2. Select “Set Up” by moving the joystick. “Set Up” is highlighted in green. 3. -
Page 74: Switching The Video Mode
Switching the Video Mode When connecting an external video component to the video input, switch the Video mode 1. Select “Video” by moving the joystick. “Video” is highlighted in green. 2. Click the joystick. Each click toggles Video On/Off. 3. Press the RETURN button. You go back to the Center Room. -
Page 75: Aux Title Input
AUX Title Input The display title for AUX source can be changed. 1. Select “AUX” by pressing the SOURCE but- ton. 2. Press the MENU button. The main menu icons whirl down, with “Function” highlighted in green. 3. Click the joystick. The Function Menu appears, with “Name Edit”... -
Page 76: Troubleshooting
Troubleshooting If you think there is something wrong with the unit. Before requesting repairs, check the following chart. 7 General Symptom The power switch does not work. No functions come on. The remote control does not work. No sounds are heard. The volume level will not rise. - Page 77 7 General (continued from previous page) Symptom Sound is not heard over a specific speaker. No images come on. 7 Audio/DSP Symptom Speakers are not available to be adjusted. Time Alignment is not available. The subwoofer is not available to switch its phase.
- Page 78 7 Audio/DSP (continued from previous page) Symptom Occasionally no sounds are output when Dolby Pro Logic is switched on. Occasionally no sounds are heard over other speakers than the center one. Switching Dynamic Range Control ON has no effects. 7 DVD Player (if installed) Symptom The DVD player’s remote control does not operate.
-
Page 79: Terms
Terms Dolby Digital Dolby Digital provides discrete multichannel (up to a maximum of 5.1) audio. This is the same audio system as is installed in movie theaters. To enjoy Dolby Digital sound you need to connect this product’s optical digital input to the digital output on a DVD player with Dolby Digital decoding capability. -
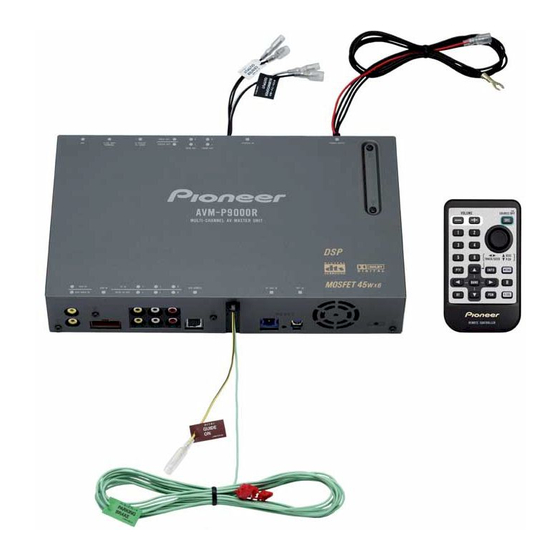
Page 80: Installation
Installation Connecting the Units Note: • This unit is for vehicles with a 12-volt battery and negative grounding. Before installing it in a recreational vehicle, truck, or bus, check the battery voltage. • To avoid shorts in the electrical system, be sure to disconnect the ·... - Page 81 • To ensure proper heat dissipation of this prod- uct, take special care not to block the cooling fan side of this product. • Cords for this product and those for other products may be different colors even if they have the same function. When con- necting this product to another product, refer to the supplied Installation manuals of both products and connect cords that...
-
Page 82: Connecting The Power Cord
Connecting the Power Cord Parking brake switch Extension lead To electric terminal controlled by ignition switch (12V DC) ON/OFF. Black (ground) To vehicle (metal) body. Yellow To terminal always supplied with power regardless of ignition switch position. Orange To lighting switch terminal. Yellow/black If you use a cellular telephone, connect it via the Audio Mute lead on the cellular telephone. - Page 83 This Product Black label (SUBWOOFER OUTPUT) White label (CENTER OUTPUT) Black/white Center speaker ≠ Black Blue/white To system control terminal of the power amp or Auto- antenna relay control terminal (max. 300 mA 12V DC). White Front speaker ≠ White/black Left Green Rear speaker...
- Page 84 Connecting to a Sold Separately Power Amp This product can be connected to a sold separately power amp using the RCA output jacks. RCA cables (sold separately) Blue/white To system control terminal of the power amp or Auto-antenna relay control terminal (max.
- Page 85 Speaker Input Jack Connection This product also can be connected to a car stereo without RCA output jacks by using the speaker input jack. This Product Speaker input terminal Gray Right Gray/black ≠ Front speaker White Left White/black ≠ Car stereo with speaker output jacks.
- Page 86 Connecting the System (A) This Product Yellow DVD control cable (supplied) IP-BUS Gray Green Black Blue Blue IP-BUS cable (supplied with the Multi-DVD player) RCA cable (supplied with STAND the Multi-DVD player) ALONE Multi-DVD player (sold separately) Black Black AV cable (supplied) Optical cable (supplied ) Gray Green...
- Page 87 Display with an IP-BUS cable (sold separately) IP-BUS cable (supplied with the TV tuner) IP-BUS cable (supplied with the display) Blue RCA cable (sold separately) 20 pin cable (supplied with the TV tuner) There is no need to connect a display that does not feature these jacks or cables.
- Page 88 Connecting the System (B) This Product Yellow DVD control cable (supplied) IP-BUS Gray Green Black Blue Blue IP-BUS cable (supplied with the Multi-DVD player) RCA cable (supplied with STAND the Multi-DVD player) ALONE Multi-DVD player (sold separately) Black Black AV cable (supplied) Optical cable (supplied ) Gray IP-BUS cable...
- Page 89 Display with an IP-BUS cable (sold separately) IP-BUS cable (supplied with the display) There is no need to connect a display that does not feature these jacks or cables. V.SEL cable (supplied with the display) Multi-CD player (sold separately) Blue Black When connecting a Display featuring non...
- Page 90 VIDEO Input/Output Connection It is possible to use an external video component by connecting it to the AV input on this product. When connecting the Display with RCA input jacks to Rear AV output, you can also watch the external video component’s picture. RCA cables (sold separately) Yellow...
- Page 91 Installation Note: • Before finally installing the unit, connect the wiring temporarily, making sure it is all con- nected up properly, and the unit and the system work properly. • Use only the parts included with the unit to ensure proper installation. The use of unautho- rized parts can cause malfunctions.
-
Page 92: Specifications
Specifications General Power source ... 14.4 V DC (10.8 – 15.1 V allowable) Grounding system ... Negative type Max. current consumption Backup current ... 10 A Accessory current ... 4 A Dimensions ... 307 (W) × 51 (H) × 187 (D) mm Weight ... - Page 96 PIONEER ELECTRONICS OF CANADA, INC. 300 Allstate Parkway, Markham, Ontario L3R 0P2, Canada TEL: (905) 479-4411 PIONEER ELECTRONICS DE MEXICO, S.A. de C.V. San Lorenzo Num 1009 3er piso Desp. 302 Col. Del Valle, Mexico D.F. C.P. 03100 TEL: 5-688-52-90 <00E00F0T01>...