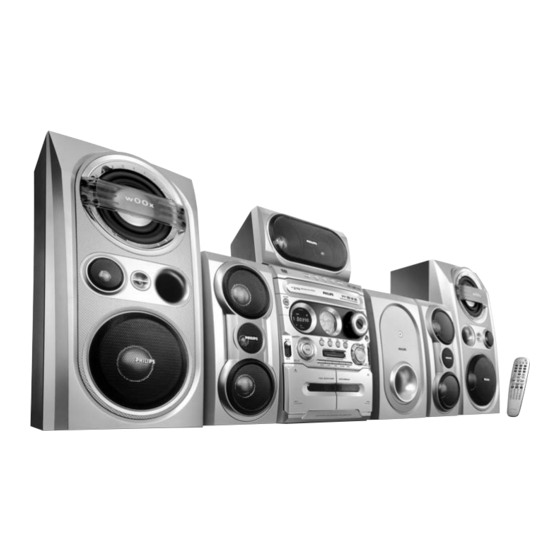
Philips FWD796/21 User Manual
Dvd mini-hifi system
Hide thumbs
Also See for FWD796/21:
- Quick use manual (2 pages) ,
- Service manual (67 pages) ,
- Service manual (13 pages)
Table of Contents
Advertisement
Advertisement
Table of Contents

Related Manuals for Philips FWD796/21


Summary of Contents for Philips FWD796/21
- Page 1 FWD796 DVD Mini-HiFi System...
- Page 2 País de Origen: China Nº de Serie: LEA CUIDADOSAMENTE ESTE INSTRUCTIVO AVISO IMPORTANTE Philips Mexicana, S.A. de C.V. no se hace responsable por daños o desperfectos causados por: – Maltrato, descuido o mal uso, presencia de insectos o roedores (cucarachas, ratones etc.).
- Page 3 § ∞ ≤ £ ™ ¡ &...
- Page 4 PLUG & PLAY -for tuner installation...
- Page 5 Manufactured under license from Dolby Laboratories. “Dolby”, “Pro-logic” and the double-D symbol are trade- marks of Dolby Laboratories. MANUFACTURED UNDER LICENSE FROM DIGITAL THEATER SYSTEMS, INC. US PAT. NO 5,451,94; 5,956,674; 5,974,380; 5,978,762; 6,226,616;6,487,535 AND OTHER U.S. AND WORLDWIDE PATENTS ISSUED AND PENDING.
-
Page 6: Table Of Contents
Contents General Information/ Maintenance Features ... 8 Discs for playback ... 8 Region codes Supplied accessories ... 8 Environmental information ... 9 Care and safety information ... 9 Connections Step 1: Placing speakers and subwoofer ... 10 Step 2: Connecting speakers and subwoofer..10 Step 3: Connecting TV set ... - Page 7 Tuner Operations Tuning to radio stations ... 37 Presetting radio stations ... 37~38 Automatic preset programming Manual preset programming Selecting a preset radio station ... 38 Deleting a preset radio station Changing tuning grid ... 38 Tape Operation/Recording Tape playback ... 39 General information on recording ...
-
Page 8: General Information/Maintenance
General Information/Maintenance Features Your DVD Mini Hi-Fi System with 2-channel full digital amplifier creates the same dynamic sound qualities that you find in full-fledged cinemas and incorporates some of the best features in home theater technology. Other features include: Built-in DTS and Dolby Digital decoder, supporting virtual surround and stereo. -
Page 9: Environmental Information
Cleaning the disc lens After prolonged use, dirt or dust may accumulate at the disc lens. To ensure good playback quality, clean the disc lens with Philips CD Lens Cleaner or any commercially available cleaner. Follow the instructions supplied with cleaner. -
Page 10: Connections
Connections Step 1: Placing speakers and subwoofer subwoofer Rear speaker ( left surround ) For best possible surround sound, all speakers (except subwoofer) should be placed at the same distance from the listening position . Place the front left and right speakers at equal distances from the TV set and at an angle of approximately 45 degrees from the listening position. -
Page 11: Step 3: Connecting Tv Set
Step 3: Connecting TV set IMPORTANT! – You only need to make one video connection from the following options, according to the capabilities of your TV system. – S-Video or Component Video connection provides higher picture quality. These options must be available on your TV set. -
Page 12: Using S-Video In Jack
RF In), you will need a RF modulator in order to view the DVD playback via TV. See your electronics retailer or contact Philips for details on RF modulator availability and operations. Using an accessory RF modulator Use the composite cable (yellow) to connect the system’s VIDEO jack to the video input jack on... -
Page 13: Step 4: Connecting Fm/Mw Antennas
Step 4: Connecting FM/MW antennas antenna fix the claw into the slot Connect the supplied MW loop antenna to the MW jack. Place the MW loop antenna on a shelf or attach it to a stand or wall. Connect the supplied FM antenna to the FM jack. -
Page 14: Step 6: Connecting A Vcr Or Cable/Satellite Box
Connections Step 6: Connecting a VCR or cable/satellite box S-VIDEO AUDIO VIDEO IN Viewing and listening to playback Connect the VCR or Cable/Satellite Box to the TV system as shown. Connect the system’s AUX IN jacks to the AUDIO OUT jacks on the VCR or Cable/ Satellite box. -
Page 15: Functional Overview
Controls on the system ECO POWER/ STANDBY ON – to switch the system on, to Eco Power or Standby mode. DISPLAY SCREEN – to view the current status of the system. SOURCE – to select the following: DISC (DISC 1•2•3) –... -
Page 16: Remote Control
Functional Overview – to connect headphones. VOLUME – to increase or decrease the volume. ¡ SENSOR – point the remote control towards this sensor. ™ INTERACTIVE VU METER – to show the VU (volume unit) meter in music or volume mode depending on the display mode selected. - Page 17 1 / ¡ / 5 / 4 – to select movement direction in disc contents menu/system menu bar. – to tuner mode, to tune to lower or higher radio frequency. (1 / ¡) – in Disc mode, press to fast reverse/forward the disc.
-
Page 18: Basic Functions
Basic Functions Plug and Play (for tuner installation) Plug and play allows you to store all available radio stations automatically. If plug and play has not been installed When you turn on the system, “AUTO INSTALL- PRESS PLAY” will be displayed. Press 38 on the system to start installation. -
Page 19: Preparations
IMPORTANT! – Make sure to complete the preparation procedures before operating the system. Step 1: Inserting batteries into the remote control Open the battery compartment. Place two batteries (Type R06 or AA) in the compartment with the correct polarity as indicated by “+”... -
Page 20: Step 3: Setting The Tv Set
(or press DISC 1/2/3 on the remote control). Turn on the TV set and set to the correct Video- In channel. You should see the blue Philips DVD background screen on the TV set. You may go to channel 1 on your TV set, then press the channel down button repeatedly until you see the Video In channel. -
Page 21: Step 4: Setting Speakers
Step 4: Setting speakers IMPORTANT! – This function is only available when you have connected other 3.1-channel speakers. You can adjust the delay time (center and rear only) for individual speakers to optimize the sound effect according to your surroundings and setup. -
Page 22: Game Operations
Game Operations About Gameport Gameport allows you to connect your game console to this mini system which enables you to enjoy a total game immersion experience through powerful sound output. Preparation before use Connect your game console’s video and audio output to the GAMEPORT video and audio inputs respectively (See Connecting to game console). -
Page 23: Disc Operations
Power on the TV system and set to the correct Video In channel (See Setting the TV set). You should see the blue Philips DVD background screen on the TV set. Press OPEN•CLOSE to open the disc tray and load a disc respectively in the first two disc trays. -
Page 24: Basic Playback Controls
Disc Operations Basic playback controls To play discs in all the disc trays Press 38. All the available discs will play once, then stop. During playback, the selected disc tray, elapsed playing time of the current track will appear on the display. To start playback from a selected disc tray Press DISC 1, DISC 2 or DISC 3. -
Page 25: Shuffle Play Mode
MENU OFF: Press REPEAT repeatedly to select the following: REPEAT TRACK REPEAT DISC REPEAT OFF Notes: – When you open the disc tray, the Repeat function will be cancelled automatically. – For CVD, SVCD and VCD 2.0 discs, the Repeat function is not available unless the PBC function is set to OFF. -
Page 26: Changing Discs During Playback
Disc Operations Changing discs during playback Press DISC CHANGE. The disc tray will open without interrupting playback. To change the inner disc, press DISC CHANGE again. The active disc will stop playing and the disc tray will close to retrieve the inner disc, then reopen with the inner disc accessible. -
Page 27: Playing From A Selected Point
Playing from a selected point This function allows you to start playback at any chosen time on the disc. For DVD Press GOTO twice to activate time menu. Enter hours, minutes and seconds from left to right in the time edit box using the numeric keys (0-9). -
Page 28: Viewing From Another Angle
Disc Operations Select from the menu bar and press 4 repeatedly to change the following zooming scale: ZOOM X1.5 pZOOM X2 pZOOM X4 pZOOM OFF To pan through the enlarged image, press SYSTEM MENU to exit and press 1 / ¡ / 5 / 4 buttons to move the zoomed picture left, right, up or down. -
Page 29: Mp3/ Wma/Divx/ Picture Disc Operations
MP3/ WMA/ DivX/ Picture Disc Operations Playing MP3/ WMA/ Picture disc (Kodak, JPEG) IMPORTANT! – You have to turn on your TV set and set to the correct Video In channel. (See Setting the TV set.) MP3/ WMA/ JPEG Picture disc Load an MP3/WMA/ Picture (JPEG) disc. -
Page 30: Playing Divx Disc
MP3/ WMA/ DivX/ Picture Disc Operations Notes: – Due to the recording nature of Digital Audio MP3 (DAM), only digital audio music will play. – It is normal to experience an occasional “skip” while you are listening to your MP3 discs. –... -
Page 31: Dvd Menu Operations
Using the menu bar You can continue some operations directly via the menu bar on the TV screen without interrupting the disc playback. But when you enter (SETUP MENU), the playback will pause. 2, 3 In disc mode, press SYSTEM MENU. The menu bar will appear across the top of the TV set screen. -
Page 32: Using The Setup Menu
DVD Menu Operations Using the setup menu (user preference settings) This DVD setup is carried out via your TV set, enabling you to customize the DVD Mini Hi-Fi System to suit your particular requirements. 2, 3 In disc mode, press SYSTEM MENU. The menu bar will appear across the top of the TV screen. -
Page 33: Setting The Screen Saver
Setting the screen saver If set to ON, the screen saver will be activated when you leave the system in stop or pause mode for 3 minutes. The default setting is ON. Setting the digital output Set Digital Output according to your optional audio equipment connections. -
Page 34: Test Tone
– You can press 1 to exit test tone mode at any time. – Main volume can be adjusted during tone test DivX(R) VOD Philips provide you the DivX(R) VOD (Video On Demand) registration code that allows you to rent and purchase videos using the DivX(R) VOD service. -
Page 35: Changing The Password
Changing the password You can change the four-digit code used as Password. In disc mode, press SYSTEM MENU. Select icon and press 4. Press 1 / ¡ / 5 / 4 on the remote control to navigate in the menu. icon and press ¡. -
Page 36: Restricting Playback By Setting Parental Level
DVD Menu Operations Restricting playback by setting parental level Some DVDs may have a parental level assigned to the complete disc or to certain scenes on the disc. This feature lets you set a playback limitation level. The rating levels are from 1 to 8 and are country specific. -
Page 37: Tuner Operations
IMPORTANT! – Make sure FM and MW antennas are connected. Tuning to radio stations Press TUNER to select “FM XX” or “MW XX”. Press and hold 1 / ¡ on the system or on the remote control until the frequency indication starts to change, then release. -
Page 38: Selecting A Preset Radio Station
Tuner Operations Manual preset programming Press TUNER (BAND) repeatedly to select the desired tuner band: FM or MW. Press and hold 1 / ¡ on the system or on the remote control to search a radio frequency. Press PROGRAM. “PROG” and “01” will display. Press O / P or numeric keys (0-9) to select the desired preset number. -
Page 39: Tape Operation/Recording
IMPORTANT! – Before playing a tape, check and tighten slack tape with a pencil. Slack tape may get jammed or may burst in the mechanism. – Store tapes at room temperature and do not put them too close to a magnetic field (for example, a transformer, TV set or speaker). -
Page 40: Preparation For Recording
Tape Operation/Recording IMPORTANT! – Recording is permissible if copyright or other rights of third parties are not infringed upon. – Recording is possible only in tape deck Preparation for recording Load a recordable tape into tape deck 2 with the full spool to the left. Prepare the source to the recorded. -
Page 41: Clock/Timer Operations
Viewing the clock The clock (if it is set) will be shown in Standby mode. Press CLOCK on the system to view clock in any source mode (or press CLOCK/ TIMER on the remote control). Press DISPLAY on the system to select 12- hour or 24-hour mode. -
Page 42: Viewing Timer
Timer Operations To exit without storing the setting Press 7 on the system. To deactivate the timer Press and hold TIMER or CLOCK/TIMER for more than 3 seconds. “TIMER OFF” will be displayed. Notes: – If the source is disc mode, playback will begin with the first track of the last selected disc or other trays if the disc is empty. -
Page 43: Sound And Volume Controls
Sound control Selecting surround sound IMPORTANT! – This DVD Mini HiFi system can only produce 5.1 channel surround sound. Press SURROUND on the system or on remote control to select surround or stereo mode. The availability of the various surround sound modes (Dolby Digital Surround and DTS Surround) depend on the number of speakers used and the incoming sound information... -
Page 44: Other Functions
Other Functions Switching on/off Switching the system ON In ECO Power/ Standby/ Demonstration mode Press ECO POWER/ STANDBY ON The system will go back to its previous status. Press DISC, TUNER, TAPE, AUX/GAME The system will switch to the selected source. Switching the system to STANDBY mode In demonstration mode... -
Page 45: Key Control
Key control This feature allows you to change the key tone when you play a DVD or VCD disc. Press KEY. “KEY CONTROL ON” will be displayed on the TV screen for 5 seconds. The Key Control indicator will flash when you press VOL +/- to change the key tone level. -
Page 46: Weight
Frequency Response ... 4 Hz - 20 kHz (44.1kHz) ... 4 Hz - 22 kHz (48kHz) ... 4 Hz - 44 kHz (96kHz) Digital Output ..SPDIF (Sony Philips digital interface) Coaxial PCM ... IEC 60958 Dolby Digital/DTS ... IEC 60958, IEC 61937 MAIN UNIT Power Supply Rating ... - Page 47 Do not open the system as there is a risk of electric shock. If a fault occurs, first check the points listed below before taking the system for repair. If you are unable to remedy a problem by following these hints, consult your dealer or Philips for help. Problem No power.
- Page 48 Troubleshooting Problem The language for the sound or subtitle cannot be changed when playing a DVD. No image is output when a function is selected. Sound cannot be heard or is of poor quality Poor radio reception. Recording or playback cannot be made The tape deck door cannot open Left and right sound outputs are reversed.
- Page 49 Analog: Sound that has not been turned into numbers. Analog sound varies, while digital sound has specific numerical values. These jacks send audio through two channels, the left and right. Aspect ratio: The ratio of vertical and horizontal sizes of a displayed image. The horizontal vs.