Philips HDD6320 User Manual
Philips jukebox model hdd6320 user manual
Hide thumbs
Also See for HDD6320:
- Quick start manual (12 pages) ,
- Specifications (2 pages) ,
- Manuel d'utilisation (57 pages)

Related Manuals for Philips HDD6320


Summary of Contents for Philips HDD6320
- Page 1 User manual Manuel d’utilisation | Benutzerhandbuch Gebruikershandleiding | Manuale per l'utente Användar-handbok Jukebox | Manual del usuario | Manual do usuário HDD6320 HDD6330 HDD6335...
- Page 2 Country Helpdesk Europe Belgique 070 253 010 Danmark 3525 8761 Deutschland 0180 5 007 532 Españal 902 888 785 0 0800 3122 1223 France 08 9165 0006 Ireland 01 601 1161 Italia 199 404 042 Luxembourg 40 6661 5645 Nederland 0900 0400 063 Norge 2270 8250...
-
Page 3: Table Of Contents
Contents Welcome ... 1 About your new player ...1 Accessories ...1 Optional accessories ...2 Register your product ...3 More information ...3 Connect and Charge ... 4 Battery level indication ...4 Install ... 4 Transfer ... 5 Enjoy ... 5 Powering on and off ...5 Reset ...5 Using your GoGear player ... - Page 4 Safety and Maintenance ... 46 Notice for the USA ... 48 Notice for Canada ... 48 Notice for the European Union ... 48 Technical data ... 49 Cameras supported ... 50...
-
Page 5: Welcome
* FM radio is only available for certain regions. It is not available for Europe. Combined charger / USB cable For US: Easy start CD 1 and 2 with Windows Media Player, Philips Device Manager, Philips Device Plug-in, User Manual,Tutorials and Frequently Asked Questions Protective pouch... -
Page 6: Optional Accessories
Optional accessories The following accessories are not included with your player, but can be bought separately. You can find them www.philips.com/GoGearshop (Europe) or www.store.philips.com (US). (PAC004) Docking cradle Dock and connect the player to your stereo system or TV for music sharing or viewing of slideshows... -
Page 7: Register Your Product
We strongly recommend that you register your product in order to gain access to free upgrades. To register your product, please log on to become available. More information Please visit www.philips.com/support Enter your product model number to view: - FAQ, Frequently Asked Questions - Latest User Manuals - Tutorials... -
Page 8: Connect And Charge
Insert the CD supplied with your product into the CD ROM drive of your PC. Follow the onscreen instructions to complete the installation of Windows Media Player (including necessary plug-ins) and Philips Device Manager. IMPORTANT! For US: There are two CDs and both are required for installation. -
Page 9: Transfer
- Microsoft Internet Explorer 6.0 or higher - USB port Lost your CD? Don’t worry, you can download the CD contents from www.usasupport.philips.com (for U.S. residents). Transfer You can transfer music and pictures to your player using Windows Media Player. See "Organise and synchronise pictures and music with Windows Media Player"... -
Page 10: Using Your Gogear Player
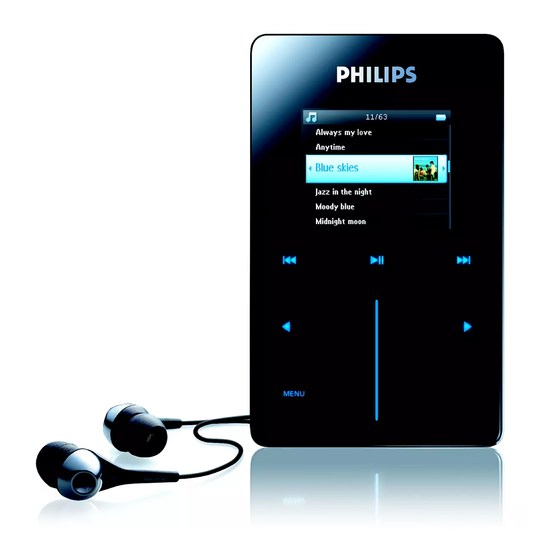
Using your GoGear player Overview of controls and connections Recording Microphone On/Off/Hold (key lock) slider Rewind/Previous key Left/Back key Menu key Press (slide down and hold for OFF HOLD about 3 seconds) (slide up) OFF HOLD § VOLUME VERTICAL TOUCH STRIP MENU Play/Pause key Power on/off... -
Page 11: Main Menu
Main menu The following are available from the main menu of your player: Menu USIC ICTURES ADIO ECORDINGS ETTINGS OW PLAYING Press and hold 1 to return to main menu. Navigation Your player has touch sensitive controls that respond to the touch of your fingers. The (see picture) is used to scroll through lists. - Page 12 Swipe SuperScroll Superscroll enables you to find your favorite songs quickly. When scrolling quickly through a list of songs, artists, albums or genres, a Superscroll letter (the first alphabet of the song, artist, album or genre) will be displayed in highlight to give you information about where you are in the list. Fast swipe up or down Tap in the middle List will scroll quickly like a wheel...
-
Page 13: Organise And Synchronise Pictures And Music With Windows Media Player
Organise and synchronise pictures and music with Windows Media Player This chapter describes the basic operations and steps that you need to follow to successfully transfer music and pictures to your player. For more information, please refer to Windows Media Player Help on your computer. Music Add songs to Windows Media Player Library Songs that are already on your computer... -
Page 14: Ripping Songs From A Cd
Click Add to Library on the bottom left of the screen. You can choose to add files from folder, URL, by searching your computer, etc. Ripping songs from a CD If you want to transfer music from a CD to your player, you need to create a digital copy of the music on your PC first. - Page 15 Select the music tracks you would like to rip and click Rip Music on the top menu bar. The music tracks will be converted into digital copies and added to Windows Media Player library. Buying songs online If you want to buy music online, you need to select a music store. Click the little triangle on the top right of the screen and select Browse all Online Stores.
- Page 16 Setting up automatic synchronisation Start Windows Media Player. Connect the player to your computer using the supplied USB cable. Select Sync tab and click Sync settings or Set up Sync. Synchronisation settings dialog box will be displayed. Select Synchronise device automatically check box. Select the check boxes that correspond to the playlists you want to synchronise.
- Page 17 Connect the player to your computer using the supplied USB cable. Select Sync tab. In the pull-down menu on the right pane, select Philips or Philips GoGear as the destination. If they are not in the list, click F5 to refresh and try again.
- Page 18 Select Library tab to access media library. Click to highlight the song you want to copy. Right click on the song and select Add to > Sync List.
- Page 19 Or drag and drop the song into the Sync List on the right pane. 10. Click Start Sync button at the bottom of the screen to start synchronisation. The progress will be displayed just above the Start Sync button. We recommend that you always use Windows Media Player to transfer music to your player.
- Page 20 Windows Media Player Playlist Creating a Playlist Start Windows Media Player. Select Library tab to access media library. Click to highlight a track. Right click on the track and select Add to > Additional Playlist... In the Add to Playlist dialog box, select an existing playlist or click New to add a new playlist. The track you have selected will be added to the playlist.
-
Page 21: Pictures
Pictures IMPORTANT! Make sure Philips Device Plug-in has been installed on your computer. This Plug-in is crucial to enable image support on your player. It is automatically installed from the supplied CD when you click Install in the Install software dialog box. -
Page 22: Add Pictures To Windows Media Player Library
Add pictures to Windows Media Player Library Start Windows Media Player. Select Library tab to access media library. Click Add to Library on the bottom left corner of the screen. Choose Add Folder... Select the folder in which you have kept your pictures and press OK. -
Page 23: Transfer Pictures To Your Player
Connect the player to your computer. Start Windows Media Player. Select Sync tab. In the pull-down menu on the right pane, select Philips or Philips GoGear as the destination. If they are not in the list, click F5 to refresh and try again. - Page 24 Select Library tab to access media library. Click All Pictures on the left pane to display the list of pictures. Click to highlight a picture you want to copy to your player.
- Page 25 Right click on the picture and select Add to > Sync List. 10. Or drag and drop the picture into the Sync List on the right pane. 11. Click Start Sync button at the bottom of the screen to start synchronisation. The progress will be displayed just above the Start Sync button.
- Page 26 12. A pop-up message will be displayed, notifying you of the synchronisation progress. 13. When the pop-up disappears, the transfer is completed and you can disconnect your player.
-
Page 27: Detailed Operation
Detailed operation Music mode Your player is preloaded with some music tracks. You can transfer your digital music and picture collection from your computer to your player using Windows Media Player. More information on music transfer can be found on page 9. Finding your music From the main menu, select MUSIC to enter music mode. -
Page 28: Play Mode
Controls During music playback, you can do the following: Play / Pause music Go to next track Go to previous track Forward search Backward search Access options menu Return to browsing Play mode You can set your player to play music tracks randomly (Shuffle All Repeat All From the main menu, select Settings >... -
Page 29: Sound Settings
Sound settings You can set your player to play music tracks with different EQ (equalizers) settings. From the main menu, select Settings > Sound Settings. Use the VERTICAL TOUCH STRIP HipHop, Classical, Jazz, Spoken Word, Custom, or Off. Press to select. Custom settings allow you specify your desired equalizer setting by adjusting the individual settings for bass (B), low (L), mid (M), high (H) and treble (T). -
Page 30: Clear Playlist On The Go
Alternatively, you can add songs, albums, artists and genres to Playlist on the go from the music library. Press and select Add to Playlist on the go. MENU A message [item name] added to playlist on the go will be displayed. Playback of playlist on the go Select Music >... -
Page 31: Delete Playlist From Your Player
Select Remove to delete the song from Playlist on the go. A message [song name] has been removed from playlist will be displayed. NOTE! The song is removed from the playlist only, it will not be deleted from the player. Most played You can playback your top 100 most played songs by selecting this playlist. -
Page 32: Now Playing
Rating your tracks You can rate a track with 1 to 5 stars. If you want to rate the track currently playing, press stars. You can also rate a song that is not currently playing. Select the song from the music library. Press and select Rate. -
Page 33: Pictures
Pictures You can view your favorite pictures on your player. While you are browsing your pictures, you can listen to music or radio at the same time. Transferring pictures to your player From PC You can transfer pictures from your PC to your player using Windows Media Player. See "Organise and synchronise pictures and music with Windows Media Player"... - Page 34 Uploading pictures from the player to your PC Connect the player to your computer. Your player will be identified as Philips or Philips GoGear in Windows Explorer. Go to Media > Pictures > From camera. Drag and drop your pictures to any desired location on your PC.
-
Page 35: Start A Slideshow
Select the picture album you wish to view. You will see a thumbnail view of all pictures in that album. Use the VERTICAL TOUCH STRIP You can also browse through your pictures in full view mode by tapping on the top or bottom of the to go to the next or previous picture. -
Page 36: Radio
Customising slideshow settings You can customise slideshow settings using Slide show settings menu. Settings Slideshow music Transitions Time per slide Shuffle slideshow Repeat slideshow TV settings TV slideshow Your player supports TV slideshow. Connect your player to the TV via the docking cradle. (this is an optional accessory which is not supplied with your player) Select the A/V channel on your TV. -
Page 37: Auto Tune
Auto tune From the main menu, select Radio to enter radio mode. The radio will start playing from the last played station. To find the radio stations with the strongest signals available in your area, press tune. The player will search for the stations with the strongest signals and save them as presets. You can preset a maximum of 20 radio stations. -
Page 38: Manual Tuning
Manual tuning Tap on the bottom or top of the The frequency bar indicates the change in frequency. Press and hold the top/ bottom end of the available station. A message Searching will be displayed and stops when a station with strong signal is found. Saving a station as preset In radio mode, press MENU... -
Page 39: Recordings
Recordings You can make voice, radio* or line-in recordings using your player. Making MIC recordings From the main menu, select Recordings. Select Start MIC recording to start a voice recording. Your player will display the following recording screen. Press to stop and save the voice recording. The player will display the saving progress. - Page 40 Making FM recordings While listening to the radio, press Choose Start FM recording. Press to stop and save the FM recording. Your FM recording will be saved on your player as a PCM file (.wav extension). You can find this file under Recordings >...
-
Page 41: Settings
A message Recording [recording name] deleted will be displayed. Upload your recordings to the computer Connect the player to your computer. Your player will be identified as Philips GoGear in Windows Explorer. Data Go to > Recordings. You will find FM recordings, Line-in recordings and Voice recordings Media folders. - Page 42 The following options are available: Settings Options Language English, French, Italian, German, Spanish, Dutch, Swedish, Portuguese, Simplified Chinese, Traditional Chinese, Korean, Japanese Play mode Shuffle All Repeat Sound Settings SRS WOW, Rock, Funk, Techno, HipHop, Classical, Jazz, Spoken Word, Custom, Off Backlight Timer 10 Sec / 30 Sec / 45 Sec / 60 Sec...
-
Page 43: Using Your Player To Store And Carry Data Files
Music library Reset play count settings Recording Silence detection settings Radio settings Europe / Americas / Asia Demo mode Start Factory settings Restore Factory settings Using your player to store and carry data files You can use your player to store and carry data files by copying data files into the Data folder of your player via Windows Explorer. -
Page 44: Updating Your Player
Updating your player Philips Device Manager Manually check whether your firmware is up to date Philips Device Manager Start Programs Philips Device Manager Update... - Page 45 Philips Device Manager Update completed Updating firmware...
-
Page 46: Troubleshooting
Troubleshooting My player skips tracks My Player is not recognised by Windows My player cannot power ON Philips Device Manager Philips Device Manager Start Programs Philips Device Manager Repair... - Page 47 Click Repair. The repair process will start. IMPORTANT! All your contents will be erased from your player. Therefore, please back up your files before repairing. After repair, simply synchronise your player again to transfer music to your player. Click Yes to proceed.
-
Page 48: There Is No Music On My Player After Transfer
Is the Philips Device Plug-in installed on your computer? Immediately after you have transferred your pictures in Windows Media Player, you should see a Philips screen pop-up. If it does not appear, then the Plug-in is probably missing. To check whether this Plug-in is available on your computer, go to Control Panel >... -
Page 49: My Gogear Player Hangs
You may have disconnected your device too soon after the picture transfer in Windows Media Player was finished. Always wait for the Philips pop-up message to show and disappear before you disconnect your device. Are your pictures in JPEG format? Pictures in other formats cannot be transferred to your player. -
Page 50: Safety And Maintenance
- Active mobile phones in the vicinity may cause interference. - Backup your files. Please ensure that you retain the original files you have downloaded to your device. Philips is not responsible for any loss of data if the product becomes damaged or not readable / legible. -
Page 51: Data Logging
The data stored on the device are retrieved and used ONLY if the user returns the device to the Philips service centre and ONLY to simplify error detection and prevention.The data stored shall be made available to user on user's first... -
Page 52: Notice For The Usa
1.This device may not cause harmful interference, and 2.This device must accept any interference received, including interference that may cause undesired operation. Notice for the European Union This product complies with the radio interference requirements of the European Union. Philips HDD082 HDD6320 HDD6330 HDD084 HDD6335 HDD085... -
Page 53: Technical Data
The resulting “GB” capacity displayed by the OS will be smaller because of using this base-2 defiinition for “Gigabyte”. *** FM radio is only available for certain regions. It is not available for Europe. PHILIPS reserves the right to make design and specification changes for product improvement without prior notice. -
Page 54: Cameras Supported
Cameras supported - Aiptek Pocket DV-4500 - Canon DIGITAL IXUS II - Canon DIGITAL IXUS 400 - Canon IXY DIGITAL 500 - Canon PowerShot G3 - Canon PowerShot G5 - Canon PowerShot G6 - Canon PowerShot SD500 - Casio Exilim EX-Z55 - DigiLife 660 - FujiFilm FinePix 420 - FujiFilm FinePix A340... - Page 55 Secure Content Owners, which may disable your device’s ability to copy, display and/or play Secure Content. In the event of revocation, Philips will attempt to make available software updates to restore some or all of your device’s ability to transfer, store, access, copy, display and/or play Secure Content. However, the abili- ty to make such updates available does not rest solely with Philips.
- Page 56 Specifications are subject to change without notice. Trademarks are the property of Koninklijke Philips Electronics N.V. or their respective owners 2005 © Koninklijke Philips Electronics N.V. All rights reserved. www.philips.com Printed in China...