
Related Manuals for Panasonic GP-KS162CUD


Summary of Contents for Panasonic GP-KS162CUD
-
Page 1: Camera Control Unit
Camera Control Unit GP-KS162CUD (Lens, Cable and Camera Head : option) Before attempting to connect or operate this product, please read these instructions completely... -
Page 2: Table Of Contents
PREFACE ... 1 FEATURES ... 1 PRECAUTIONS ... 2 SYSTEM BLOCK DIAGRAM ... 3 MAJOR OPERATING CONTROLS AND THEIR FUNCTIONS ... 3 PREPARATIONS ... 6 SPECIFICATIONS ... 7 OPTIONAL ACCESSORIES ... 7 CAUTION: Before attempting to connect or operate this product, please read the label on the bottom. -
Page 3: Preface
PREFACE The Panasonic Camera Control Unit GP-KS162CU is designed to use with the optional Camera Head GP- KS162H. This system overcomes space limitations that have compli- cated many video applications. Weight of only 0.04 lbs (16 g), this remarkably compact CCTV camera measures only two-thirds of an inch in diameter and less than two inches in length. -
Page 4: Precautions
PRECAUTIONS • Do not attempt to disassemble the camera. To prevent electric shock, do not remove screws or cover. There are no user-serviceable parts inside. Refer servicing to qualified service personnel. • Do not expose the camera or camera control unit to rain or moisture, or do not try to operate it in wet areas. -
Page 5: System Block Diagram
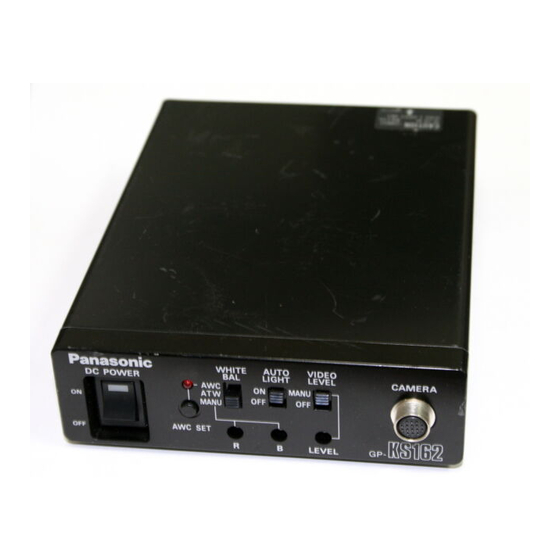
SYSTEM BLOCK DIAGRAM GP-KS162 Series Standard Configuration Camera Head, Tripod Attachment, Camera Control Unit. Optional Accessorles Wide Angle Lens GP-LM3TA Pinhole Lens GP-LP12TA C-Mount Adaptor GP-AD22TA MAJOR OPERATING CONTROLS AND THEIR FUNCTIONS Camera Control Unit GP-KS162CU WHITE AUTO LIGHT DC POWER MANU MANU AWC SET... - Page 6 Camera Control Unit GP-KS162CU 1. DC Power On/Off Switch (DC POWER, ON/OFF) 2. Auto White Balance Control Button (AWC SET) The white balance can be set by pressing this button when the White Balance Selection Switch (4) is set to the AWC position.
- Page 7 14. Electronic Light Control (ELC) On/Off Switch When shooting the objects under the high light condi- tion, the lighting can be controlled by the electronic shutter mode. This switch is used to disable the ELC function. Normally turn on this switch. 15.
-
Page 8: Preparations
PREPARATIONS Caution: Keep the Power ON/OFF Switch of the camera in the OFF position through the installation. GP-KS162H with GP-LM3TA, GP-LM7TA, GP-LM15TA or GP-LP12TA 1. Remove the front cap of the camera and confirm that the surface of the optical filter of the camera head is clean. -
Page 9: Specifications
SPECIFICATIONS (with the combination of Optional Camera Head GP-KS162H) Pick-up Device : 1/2-inch Interline transfer CCD image sensor with 768 (H) x 492 (V) pixels Horizontal Resolution : 480 lines Minimum Scene Illumination : 0.3 footcandles (3 lux) (F1.4 with AGC ON more than 30 IRE of Y signal with set up) 0.5 footcandles (5 lux) (F1.6 with AGC ON more than 30 IRE of Y signal with set up) Signal to Noise Ratio : 50 dB (Standard condition, Y signal) - Page 10 Broadcast & Television Systems Company Division of Matsushita Electric Corporation of America INDUSTRIAL CAMERA DIVISION Executive Office: One Panasonic Way 4H-2, Secaucus, New Jersey 07094 (201) 392-6674 MATSUSHITA ELECTRIC OF CANADA LIMITED 5770 Ambler Drive, Mississauga, Ontario, L4W 2T3 Canada (905) 624-5010 PANASONIC SALES COMPANY DIVISION OF MATSUSHITA ELECTRIC OF PUERTO RICO, INC.