Table of Contents
Advertisement
Dear customer
Thank you for purchasing this product. For optimum performance and
safety, please read these instructions carefully.
Before connecting, operating or adjusting this product, please read
the instructions completely.
Please keep this manual for future reference.
[GC] [GS] [GA] [GN]
Operating Instructions
DVD Home Theater Sound System
The illustrations shown may differ from your unit.
Region number
The player plays DVD-Video marked with labels containing the region
number or "ALL".
Region
The Middle East, Saudi Arabia and Kuwait
Southeast Asia and Hong Kong
Australia and N.Z.
Example: [The]Middle]East,]Saudi]Arabia]and]Kuwait]
2
ALL
SC-PT875
Model No.
Number
2
3
4
2
3
4
RQTX0234-B
Advertisement
Table of Contents

Related Manuals for Panasonic SC-PT875


Summary of Contents for Panasonic SC-PT875
-
Page 1: Operating Instructions
The illustrations shown may differ from your unit. Region number The player plays DVD-Video marked with labels containing the region number or “ALL”. Region The Middle East, Saudi Arabia and Kuwait Southeast Asia and Hong Kong Australia and N.Z. Example: [The]Middle]East,]Saudi]Arabia]and]Kuwait] SC-PT875 Number RQTX0234-B... - Page 2 ≥ These operating instructions are applicable to the model SC-PT875 for a variety of regions. ≥ Unless otherwise indicated, illustrations in these operating instructions are of the model for the Middle East, Saudi Arabia and Kuwait. ≥ Operations in these instructions are described mainly with the remote control, but you can perform the operations on the main unit if the controls are the same.
-
Page 3: Table Of Contents
TABLE OF CONTENTS Getting Started Accessories ........4 Caution for AC Mains Lead . -
Page 4: Accessories
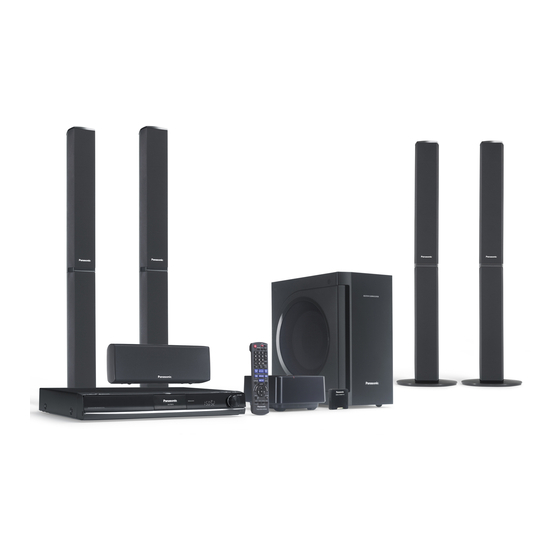
Accessories Please check and identify the supplied accessories. 1 Remote control 1 FM indoor antenna [Australia]and]N.Z.] (N2QAYB000361) [Others] (N2QAYB000363) [Australia]and]N.Z.] 2 Remote control batteries 4 Speaker stands (with cable) 1 Speaker cable 4 Bases 1 Video cable Caution for AC Mains Lead (For Saudi Arabia and Kuwait) (“GS”... -
Page 5: Step 1 Assembling The Front And Surround Speakers
step 1 Assembling the front and surround speakers Preparation ≥ To prevent damage or scratches, lay down a soft cloth to assemble speakers. ≥ For assembly, use a Phillips-head screwdriver (not included). Make sure you have all the indicated components before starting assembly, setup, and connection. ≥... -
Page 6: Step 2 Positioning
This is the normal operation of the product working to assure the best possible performance of your home theater system. If the interference persists, try moving the other devices to another location outside the range of the wireless system or move the wireless system nearer to the main unit. -
Page 7: Step 3 Connections
step 3 Connections Turn off all equipment before connection and read the appropriate operating instructions. Do not connect the AC mains lead until all other connections are complete. Wireless system Main unit Digital transmitter connection DIGITAL TRANSMITTER Speaker connections Setup example Pay attention to the type of speaker and the connector colour when you place the speakers. -
Page 8: Audio And Video Connections
≥ Set “VIDEO PRIORITY” to “ON” ( ≥ Set “VIDEO FORMAT” in Menu 5 (HDMI) ( VIERA Link “HDAVI Control” If your Panasonic TV is VIERA Link compatible, you can operate your TV synchronising with home theater operations or vice versa ( 22, Using the VIERA Link “HDAVI Control... -
Page 9: Radio Antenna Connections
TV, cable or satellite STB for the settings necessary to output its audio from the digital OPTICAL audio output to your home theater system. Only Dolby Digital and PCM can be played with this connection. ≥ After making this connection, make settings to suit the type of audio from your digital equipment ( [Australia]and]N.Z.]... -
Page 10: Step 4 Ac Mains Lead Connection
step 4 AC mains lead connection Wireless system AC IN Ferrite core To household mains socket AC mains lead (included) Conserving power The main unit and the wireless system consume a small amount of power when they are turned off (main unit: approx. 0.2 W, wireless system: approx. -
Page 11: Step 7 Smart Setup
step 7 SMART SETUP The Smart setup screen assists you in making necessary settings. Preparation Turn on your TV and select the appropriate video input mode (e.g. VIDEO 1, AV 1, HDMI, etc.) to suit the connections to this unit. ≥... -
Page 12: Setting Up The Radio
Setting up the radio Australia and N.Z. SLEEP PLAY MODE Numbered buttons PLAY MODE PLAY MODE -REPEAT (Except Australia and N.Z.) SEARCH SKIP MENU MENU MIC VOL W.SRD FL DISPLAY Presetting stations automatically [Australia]and]N.Z.] Up to 30 stations can be set in each band, FM and AM. [Others] Up to 30 stations can be set. -
Page 13: Selecting The Playback Source
Presetting stations manually [Australia]and]N.Z.] Up to 30 stations can be set in each band, FM and AM. [Others] Up to 30 stations can be set. 1 While listening to the radio broadcast Press [OK]. 2 While the frequency is flashing on the display Press the numbered buttons to select a channel. -
Page 14: Selecting The Source By The Remote Control
Selecting the playback source (continued) iPod USB, iPod SETUP SETUP Selecting the source by the remote control DVD/CD ( Each time you press the button: RADIO FM ( EXT-IN [Australia]and]N.Z.] AM ( For audio input through the AUX § terminal. D-IN For audio input through the §... -
Page 15: Selecting Sound Mode
Selecting sound mode Select a sound mode. SOUND Each time you press the button: Equalizer SUBW LVL: Subwoofer Level C.FOCUS: Center Focus Make settings. While the selected mode is displayed Refer to the following for setting details of each sound effect. Equalizer You can select sound quality settings. -
Page 16: Basic Play
Basic play If you are experiencing problems, refer to troubleshooting ( Preparation To display the picture, turn on your TV and change its video input mode (e.g. VIDEO 1, AV 1, HDMI, etc.) to suit the connections to this unit. Using the main unit Turn on the unit. -
Page 17: Using The Remote Control
Using the remote control Numbered buttons -REPEAT SEARCH SEARCH PLAY SLOW SKIP SKIP PAUSE STOP TOP MENU, DIRECT NAVIGATOR MENU RETURN PLAY MENU, PLAY LIST LIST MIC VOL ECHO W.SRD FL DISPLAY Australia and N.Z. FL DISPLAY -SLEEP Others ECHO -FL DISPLAY One touch (Remote control only) -
Page 18: Other Modes Of Play
Other modes of play Australia and N.Z. SLEEP PLAY MODE Australia and N.Z. PLAY MODE REPEAT -REPEAT Others PLAY MODE -REPEAT Repeat play This works only when the elapsed play time can be displayed. It also works with all JPEG content. [Australia]and]N.Z.] During play Select an item to be repeated. -
Page 19: Using Navigation Menus
Using navigation menus PLAY PLAY SKIP SKIP STOP TOP MENU, DIRECT NAVIGATOR MENU RETURN PLAY MENU, PLAY LIST LIST Playing data discs [WMA] [MP3] [JPEG] [MPEG4] [DivX] [DVD-VR] Select “DATA” in “DVD-VR/DATA” ( play WMA, MP3, JPEG, MPEG4 or DivX contents. Using PLAYBACK MENU “PLAYBACK MENU”... -
Page 20: Using On-Screen Menus
Using on-screen menus Numbered buttons PLAY PLAY RETURN Items shown differ depending on the type of disc. Menu 1 (Disc/Play) TRACK SEARCH TITLE SEARCH CONTENT SEARCH CHAPTER SEARCH PG SEARCH (Program Search) PL SEARCH (Playlist Search) FUNCTIONS AUDIO RETURN RETURN CANCEL CANCEL Show the on-screen... - Page 21 [JPEG] To select “ON” or “OFF” for picture’s J P G date display DATE DATE DISPLAY To rotate a picture (during pause) [JPEG]: 0,------. 90,------.180,------.270 ROTATION ^--------------------------------------------J Menu 2 (Video) NORMAL CINEMA1: Mellows images and enhances detail in dark scenes. PICTURE MODE CINEMA2: Sharpens images and enhances...
-
Page 22: Using The Viera Link "Hdavi Control Tm
VIERA Link “HDAVI Control” VIERA Link “HDAVI Control” is a convenient function that offers linked operations of this unit, and a Panasonic TV (VIERA) under “HDAVI Control”. You can use this function by connecting the equipment with the HDMI cable. See the operating instructions for connected equipment for operational details. -
Page 23: Viera Link Control Only With Tv's Remote Control
VIERA Link Control only with TV’s remote control (for “HDAVI Control 2 or later”) You can control the playback menus of this unit with the TV’s remote control. When operating the TV’s remote control, refer to the below illustration for operation buttons. 1 Select this unit’s operation menu by using the TV menu settings. -
Page 24: Using Karaoke Mode
21, Menu 4 (Karaoke)] AUDIO CHANGE KEY CONTROL VOCAL CANCEL You can play an external device through your home theater system. Playing from an USB device You can connect and play tracks or files from USB mass storage class devices. -
Page 25: Using The Ipod
Video MPEG4 (Extension: “.asf”, “.ASF”) § DivX (Extension: “.divx”, “.DIVX”, “.avi”, “.AVI”) For Panasonic D-Snap/DIGA § [Note] ≥ Maximum: 255 folders (excluding Root folder), 4000 files, 28 characters for file/folder name. ≥ Only one memory card will be selected when connecting a multiport USB card reader. -
Page 26: Speaker Installation Option
Operating other devices (continued) Enjoying photos Select the iPod menu. Play a slideshow on your iPod. You can use the remote control to operate the iPod menu. [3, 4]: To navigate menu items. [OK]: To go to the next menu. To return to the previous menu. -
Page 27: Changing The Player Settings
Changing the player settings RETURN SETUP SETUP Show the setup menu. SETUP -CH SELECT MAIN DISC VIDEO AUDIO DISPLAY HDMI OTHERS Select the menu. DISC SETTING STATE AUDIO SUBTITLE MENUS RATINGS PASSWORD Item ≥ To return to the previous screen, press [RETURN]. - Page 28 Changing the player settings (continued) AUDIO menu Select to suit the type of equipment you connected to the HDMI AV OUT terminal. Select “BITSTREAM” when the equipment can decode the bitstream (digital form of 5.1-channel data). Otherwise, select “PCM”. (If the bitstream is output to the equipment without a decoder, high levels of noise can be output and may damage your speakers and hearing.) DOLBY DIGITAL §...
-
Page 29: Divx Information
OTHERS menu REGISTRATION [DivX] Display the unit’s registration code. ≥ SHOW CODE You need this registration code to purchase and play DivX Video-on- below). Demand (VOD) content ( JPEG TIME Set the speed of the slideshow. Factory preset: 3 SEC ≥... -
Page 30: Discs That Can Be Played
Discs that can be played Reference Commercial discs Disc DVD-Video Video CD Recorded discs (±: Playable, —: Not playable) Disc Logo DVD-RAM DVD-R/RW DVD-R DL iR/iRW iR DL CD-R/RW §1 ≥ It may not be possible to play all the above-mentioned discs in some cases due to the type of disc, the condition of the recording, the recording method, or how the files were created ( This unit can play CD-R/RW recorded with CD-DA or Video CD format. -
Page 31: Maintenance
JPEG (e.g. TIFF), or play pictures with attached audio. ≥ You can play MPEG4 data [conforming to SD VIDEO specifications (ASF standard)/MPEG4 (Simple Profile) video system/G.726 audio system] recorded with Panasonic SD multi cameras or DVD recorders with this unit. -
Page 32: Troubleshooting Guide
Troubleshooting guide Before requesting service, make the following checks. If you are in doubt about some of the check points, or if the solutions indicated in the following guide do not solve the problem, consult your dealer for instructions. Power No power. - Page 33 Program and Random play do not work. These functions do not work with some DVD-Videos. Play does not start. ≥ This unit may not play WMA and MPEG4 that contains still picture data. ≥ If playing DivX VOD content, refer to the homepage where you purchased the DivX VOD content.
-
Page 34: Specifications
DivX media files. Certified to the DivX Home Theater ® Profile. MPEG4 data recorded with Panasonic SD multi cameras or DVD video recorders Conforming to SD VIDEO specifications (ASF standard)/MPEG4 (Simple Profile) video system/G.726 audio system 5.1 ch (FL, FR, C, SL, SR, SW) , DivX §5, 7... - Page 35 VIDEO SECTION Video system PAL625/50, PAL525/60, NTSC Composite video output Output level Terminal Component video output Y output level output level output level Terminal Pin jack (Y: green, P HDMI AV output Terminal HDAVI Control This unit supports “HDAVI Control 4” function. SPEAKER SECTION [Front\speakers\SB-HF970] Type...
-
Page 36: Glossary
Glossary Decoder A decoder restores the coded audio signals on DVDs to normal. This is called decoding. DivX DivX is a popular media technology created by DivX, Inc. DivX media files contain highly compressed video with high visual quality that maintains a relatively small file size. -
Page 37: Safety Precautions
HDMI, the HDMI logo and High-Definition Multimedia Interface are trademarks or registered trademarks of HDMI Licensing LLC. HDAVI Control is a trademark of Panasonic Corporation. Foreign matter Do not let metal objects fall inside the unit. This can cause electric shock or malfunction. -
Page 38: Control Reference Guide
Adjust the Microphone volume/ Turn Whisper-mode Surround on/off ( 15, 23) Aim the remote control at the Panasonic TV and press the button. [Í]: Turn the TV on/off [AV]: Change the TV’s video input mode [r, s]: Adjust the TV volume This may not work properly with some models. - Page 39 OPEN CLOSE 1 Standby/on switch (Í/I) Press to switch the unit from on to standby mode or vice versa. In standby mode, the unit is still consuming a small amount of power. ( 2 Open/Close the disc tray ( 3 Show the Smart setup ( 4 Stop playing / Select the tuning mode / Adjust the FM reception condition ( 12, 16)
- Page 40 Panasonic Corporation Web Site: http://panasonic.net RQTX0234-B F0209ZA0...