Panasonic SC-PT560 Operating Instructions Manual
Dvd home theater sound system
Hide thumbs
Also See for SC-PT560:
- Operating instructions manual (116 pages) ,
- Operating instructions manual (44 pages)
Table of Contents
Advertisement
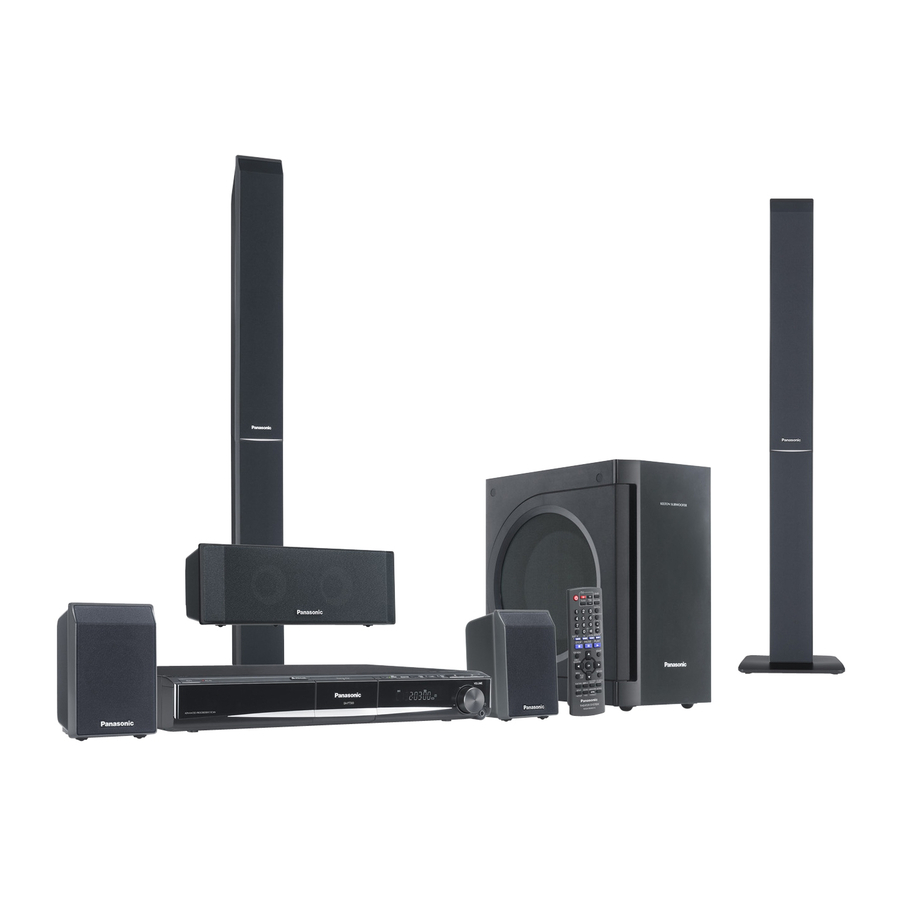
The illustration shows SC-PT565.
The illustrations shown may differ from your unit.
Region number
The player plays DVD-Video marked with labels containing the
region number or "ALL".
Region
The Middle East, South Africa, Saudi Arabia and
Kuwait
Southeast Asia and Thailand
Australia and N.Z.
Example: [The[Middle[East,[South[Africa,]Saudi[Arabia]and]Kuwait]
2
ALL
[GC] [GS] [GCS] [GCT] [GN]
Number
2
3
4
2
3
5
Operating Instructions
DVD Home Theater Sound System
Model No.
VIERA Link compatible
30
Enjoy high-quality picture and linked
operations with your VIERA TV.
Sound enhancement
options
32
Surround Enhancer, Dolby Pro
Logic II, and more.
iPod connectivity
35
Enjoy iPod music through the
speakers, view iPod photos/videos
on the TV.
Before connecting, operating or adjusting this product, please read
the instructions completely.
Please keep this manual for future reference.
SC-PT560
SC-PT565
SC-PT865
RQTX0099-1B
Advertisement
Table of Contents

Related Manuals for Panasonic SC-PT560


Summary of Contents for Panasonic SC-PT560
-
Page 1: Operating Instructions
Logic II, and more. iPod connectivity Enjoy iPod music through the speakers, view iPod photos/videos on the TV. Before connecting, operating or adjusting this product, please read the instructions completely. Please keep this manual for future reference. SC-PT560 Model No. SC-PT565 SC-PT865 RQTX0099-1B... -
Page 2: Dear Customer
≥ These operating instructions are applicable to models SC-PT560, SC-PT565 and SC-PT865 for a variety of regions. ≥ Unless otherwise indicated, illustrations in these operating instructions are of SC-PT565 for the Middle East, South Africa, Saudi Arabia and Kuwait. -
Page 3: Table Of Contents
TABLE OF CONTENTS Caution for AC Mains Lead....4 Safety precaution ..... . . 4 Accessories . -
Page 4: Caution For Ac Mains Lead
Caution for AC Mains Lead (For Saudi Arabia and Kuwait) (“GS” area code model only) For your safety, please read the following text carefully. This appliance is supplied with a moulded three pin mains plug for your safety and convenience. A 5-ampere fuse is fitted in this plug. -
Page 5: Accessories
Accessories Please check and identify the supplied accessories. [PT565] [PT560] ∏ 1 Remote control [PT565] (N2QAYB000205) [PT560] (N2QAYB000255) ∏ 2 Remote control batteries ∏ 1 FM indoor antenna ∏ [PT560] 1 AM loop antenna ∏ 1 Video cable [PT865] ∏ 1 Remote control [Southeast]Asia,[Thailand,[The[Middle[East,[ [South[Africa,[Saudi[Arabia[and[Kuwait] (N2QAYB000209) -
Page 6: Step 1 Assembling The Speakers
step Assembling the speakers [PT565] [PT865] Front speakers and surround speakers [PT560] Front speakers Preparation ≥ To prevent damage or scratches, lay down a soft cloth and perform assembly on it. ≥ For assembly, use a Phillips-head screwdriver. ≥ For optional wall mount, refer to page 8. Make sure you have all the indicated components before starting assembly, setup, and connection. -
Page 7: Step 2 Positioning
Set your surround free! Optional Panasonic wireless accessory (example: SH-FX67) You can enjoy surround speaker sound wirelessly when you use the optional Panasonic wireless accessory (example: SH-FX67). For details, please refer to the operating instructions for the optional Panasonic wireless accessory. -
Page 8: Speaker Installation Options
Notes on speaker use ≥Use only supplied speakers Using other speakers can damage the unit, and sound quality will be negatively affected. ≥ You can damage your speakers and shorten their useful life if you play sound at high levels over extended periods. ≥... -
Page 9: Step 3 Cable Connections
step Cable connections Turn off all equipment before connection and read the appropriate operating instructions. Do not connect the AC mains lead until all other connections are complete. [PT865] Wireless system Speaker connections Connecting the speakers to the main unit: Connect to terminals of the same colour. -
Page 10: Audio And Video Connections
≥ Set “VIDEO FORMAT” in Menu 5 (HDMI) (➜ 23). VIERA Link “HDAVI Control” If your Panasonic TV is VIERA Link compatible, you can operate it synchronising with home theater operations or vice versa (➜ 30, Using the VIERA Link “HDAVI Control ”). -
Page 11: Radio Antenna Connections
Other audio connections TV or external Cable required equipment terminal (not included) Optical digital audio cable ≥ Do not bend sharply when connecting. OPTICAL OUT Radio antenna connections FM indoor antenna (included) Affix this end of the antenna where reception is best. Adhesive tape Main unit FM ANT... -
Page 12: Step 4 Digital Transmitter Connection [Pt865] Step 5 Ac Mains Lead Connection
You can use the blunt end of a writing instrument to push here until the cover pops out. ≥ Remove the digital transmitter cover before installing any optional Panasonic wireless accessory. ≥ Replace the cover when the digital transmitter is not in use. Main unit... -
Page 13: Step 6 Preparing The Remote Control
[PT865] AC mains lead connection for the wireless system: The wireless system consumes a small amount of power, even when it is in “OFF” mode (approx. 0.3 W). To save power when the unit is not to be used for a long time, unplug it from the household AC mains socket. -
Page 14: Step 7 Performing Quick Setup
step Performing QUICK SETUP The QUICK SETUP screen assists you to make necessary settings. Preparation Turn on your TV and select the appropriate video input mode (e.g. VIDEO 1, AV 1, HDMI, etc.). ≥ To change your TV’s video input mode, refer to its operating instructions. -
Page 15: Step 8 Presetting The Radio Stations
step Presetting the radio stations TV/AV iPod/USB FM/EXT-IN ONE TOUCH PLAY Numbered buttons CANCEL SKIP SLOW/SEARCH STOP PAUSE PLAY TOP MENU START DIRECT NAVIGATOR -RETURN -KARAOKE MENU PLAY LIST Australia and N.Z. -FUNCTIONS -PLAYMODE -FL DISPLAY -ECHO -REPEAT -SLEEP FUNCTIONS SETUP SOUND SUBWOOFER... -
Page 16: Control Reference Guide
Show setup menu (➜ 14) [PT865] Show setup menu (➜ 14) / Auto speaker setup (➜ 33) (➜ 32) Aim the remote control at the Panasonic TV and press the button. [Í]: Turn the TV on/off [TV/AV]: Change the TV’s video input mode [r, s]: Adjust the TV volume This may not work properly with some models. -
Page 17: Utilising The Start Menu
AC IN 1 Standby/on switch [Í/I] Press to switch the unit from on to standby mode or vice versa. In standby mode, the unit is still consuming a small amount of power. (➜ 18) 2 This indicator lights when the unit is connected to the AC mains supply. -
Page 18: Basic Play
Basic play Preparation To display the picture, turn on your TV and change its video input mode. Using the main unit Turn on the unit. OPEN CLOSE Open the disc tray. Load the disc. ≥ Load double-sided discs so the label for the side you want to play is facing ≥... -
Page 19: Using The Remote Control
If you are experiencing problems, refer to troubleshooting (➜ 38 to 40). Using the remote control TV/AV iPod/USB FM/EXT-IN ONE TOUCH PLAY Numbered buttons CANCEL SKIP SLOW/SEARCH SKIP STOP PAUSE PLAY STOP, PAUSE TOP MENU START TOP MENU, DIRECT DIRECT NAVIGATOR NAVIGATOR -RETURN -KARAOKE... -
Page 20: Other Playback Functions
Other playback functions TV/AV CANCEL CANCEL SKIP STOP PAUSE STOP TOP MENU DIRECT NAVIGATOR MENU PLAY LIST -FUNCTIONS -PLAY MODE -ECHO -REPEAT SETUP SOUND SUBWOOFER -W.S. Repeat play This works only when the elapsed play time can be displayed. It also works with all JPEG content. -
Page 21: Using Navigation Menus
Using navigation menus TV/AV iPod/USB FM/EXT-IN ONE TOUCH PLAY CANCEL SKIP SLOW/SEARCH SKIP STOP PAUSE PLAY STOP TOP MENU TOP MENU, DIRECT DIRECT NAVIGATOR NAVIGATOR -RETURN MENU -KARAOKE PLAY MENU, LIST PLAY LIST -FUNCTIONS -PLAY MODE -FL DISPLAY -ECHO -REPEAT -SLEEP SETUP SOUND... -
Page 22: Using On-Screen Menus
Using on-screen menus TV/AV Numbered buttons CANCEL CANCEL SKIP STOP TOP MENU DIRECT NAVIGATOR MENU PLAY LIST -FUNCTIONS -FUNCTIONS -ECHO Australia and N.Z. FUNCTIONS SETUP SOUND -W.S. Items shown differ depending on the type of disc. ∫ Menu 1 (Disc/Play) TRACK SEARCH To start from a specific item ≥... - Page 23 [JPEG] To select “ON” or “OFF” for picture’s J P G date display DAT E DATE DISPLAY To rotate a picture (during pause) [JPEG] : 0,------. 90,------.180,------.270 ^--------------------------------------------J ROTATION ∫ Menu 2 (Video) NORMAL CINEMA1: Mellows images and enhances detail in dark scenes.
-
Page 24: About Divx Vod Contents
Using on-screen menus Confirming HDMI information e.g. HDMI --- INFORMATION CONNECTED STATE AUDIO STREAM MAX CHANNEL VIDEO FORMAT COLOR SPACE 1 Connection status 2 Shows the output signal type. 3 Shows the number of audio channels. 4 (➜ 23, VIDEO FORMAT) 5 [➜... -
Page 25: Changing The Player Settings
Changing the player settings TV/AV iPod/USB FM/EXT-IN ONE TOUCH PLAY CANCEL SKIP SLOW/SEARCH STOP PAUSE PLAY TOP MENU START DIRECT NAVIGATOR -RETURN MENU -KARAOKE PLAY LIST -FUNCTIONS -PLAY MODE -FL DISPLAY -ECHO -REPEAT -SLEEP SETUP SOUND SUBWOOFER MUTING SETUP LEVEL -W.S. - Page 26 Changing the player settings QUICK SETUP enables successive settings of the items in the shaded area. ∫ “VIDEO” menu TV ASPECT Choose the setting to suit your TV and preference. TV TYPE Select to suit the type of TV. TIME DELAY When connected with a Plasma display, adjust if you notice the audio is out of sync with the video.
-
Page 27: Language Code List
QUICK SETUP enables successive settings of the items in the shaded area. ∫ “DISPLAY” menu [The[Middle[East,[South[Africa,[Saudi[Arabia[and[Kuwait] LANGUAGE Choose the language for the on-screen messages. [Southeast[Asia[and[Thailand] [Australia[and[N.Z.] ∫ “HDMI” menu ≥ ON: When using the HDMI AV OUT terminal for video output. The resolution of the video output from the VIDEO PRIORITY ≥... -
Page 28: Enjoying The Radio
Changing the player settings Selecting the delay time of the speakers (Effective when playing 5.1-channel sound) (Center and surround speakers only) For optimum listening with 5.1-channel sound, all the speakers, except for the subwoofer, should be the same distance from the seating position. If you have to place the center or surround speakers closer to the seating position, adjust the delay time to make up for the difference. -
Page 29: (Except ]Australia[And[N.z.])
Enjoying Karaoke (except ]Australia[and[N.Z.]) TOP MENU START DIRECT NAVIGATOR -RETURN MENU -KARAOKE PLAY LIST -FUNCTIONS -PLAY MODE -FL DISPLAY -ECHO -REPEAT -SLEEP ECHO — SETUP SOUND SUBWOOFER MUTING LEVEL -W.S. -CH SELECT [Note] Before connecting/disconnecting the microphone(s), reduce the volume of the main unit to its minimum. -
Page 30: Using The Viera Link "Hdavi Control
VIERA Link “HDAVI Control” VIERA Link “HDAVI Control” is a convenient function that offers linked operations of this unit, and a Panasonic TV (VIERA) under “HDAVI Control”. You can use this function by connecting the equipment with the HDMI cable. See the operating instructions for connected equipment for operational details. -
Page 31: Speaker Control
Speaker control You can select whether audio is output from this unit’s speakers or the TV speakers by using the TV menu settings. For details, refer to the operating instructions of your TV. Home Cinema This unit’s speakers are active. ≥... -
Page 32: Using Sound Effects
Using sound effects TV/AV CANCEL SKIP SLOW/SEARCH STOP PAUSE TOP MENU DIRECT NAVIGATOR MENU PLAY LIST -FUNCTIONS -PLAY MODE -ECHO -REPEAT SETUP SOUND SUBWOOFER LEVEL -W.S. -CH SELECT SOUND, −W.S. [PT560] [PT565] [PT865] SETUP SETUP [Note] ≥ The following sound effects may not be available or have no effect with some sources, or when headphones are used (➜... -
Page 33: Adjusting The Subwoofer Level
Adjusting the subwoofer level You can adjust the amount of bass. The unit automatically selects the most suitable setting according to the type of playback source. SUB W 1 SUB W 2 SUBWOOFER ^---------------------------------------------------} LEVEL -CH SELECT ≥ To check the current setting, press [SUBWOOFER LEVEL]. ≥... -
Page 34: Operating Other Equipment
Still pictures Music Video § For Panasonic D-Snap/DIGA [Note] ≥ Maximum: 256 folders, 4000 files, 12 characters for file/folder name ≥ Only one memory card will be selected when connecting a multiport USB card reader. Typically the first memory card inserted. -
Page 35: Using The Ipod
Using the iPod Preparation ≥ To view photos/videos from the iPod. – Ensure the video connection to the VIDEO OUT terminal on this unit (➜ 10). – Operate the iPod menu to make the appropriate photo/video output settings for your TV. (Refer to the operating instructions of your iPod.) ≥... -
Page 36: Discs That Can Be Played
Discs that can be played Commercial discs Disc DVD-Video Video CD Recorded discs (±: Playable, Disc DVD-RAM DVD-R/RW DVD-R DL iR/iRW iR DL §1 CD-R/RW ≥ It may not be possible to play all the above-mentioned discs in some cases due to the type of disc, the condition of the recording, the recording method, or how the files were created (➜... -
Page 37: Maintenance
JPEG (e.g. TIFF), or play pictures with attached audio. ≥ You can play MPEG4 data [conforming to SD VIDEO specifications (ASF standard)/MPEG4 (Simple Profile) video system/G.726 audio system] recorded with Panasonic SD multi cameras or DVD recorders with this unit. -
Page 38: Troubleshooting Guide
Troubleshooting guide Before requesting service, make the following checks. If you are in doubt about some of the check points, or if the solutions indicated in the chart do not solve the problem, consult your dealer for instructions. Power No power. The unit is automatically switched to standby mode. - Page 39 General operations (Continued) ≥ The settings for “TV ASPECT” The setting you made in “TV ASPECT” (➜ 26, “VIDEO” menu) or TV. Select using TV settings. “LANGUAGE” (➜ 27, “DISPLAY” §1 menu) does not work. §2 Disc operation ≥ Play may take time to begin when an MP3 track has still picture data. Even after the track starts, the It takes time before play starts.
- Page 40 Troubleshooting guide Picture (Continued) Picture stops. [DivX] Picture size does not fit the screen Menu is not displayed correctly. Auto zoom function does not work well. When playing PAL disc, picture distorted. iPod operation Cannot charge or operate. Cannot display iPod photos/videos on the TV HDMI or progressive video There is ghosting when HDMI or...
-
Page 41: Glossary
Glossary Decoder A decoder restores the coded audio signals on DVDs to normal. This is called decoding. DivX DivX is a popular media technology created by DivX, Inc. DivX media files contain highly compressed video with high visual quality that maintains a relatively small file size. -
Page 42: Specifications
DivX ® media files. Certified to the DivX Home Theater Profile. MPEG4 data recorded with Panasonic SD multi cameras or DVD video recorders Conforming to SD VIDEO specifications (ASF standard)/MPEG4 (Simple Profile) video system/G.726 audio system 5.1 ch (FL, FR, C, SL, SR, SW) - Page 43 [PT565] [Surround\speakers\SB-HS860] Type 1 way, 1 speaker system (Bass reflex) Speaker unit(s) Full range Input power (IEC) Output sound pressure Frequency range Dimensions (WtHtD) 252 mmk1123 mmk235 mm Mass [PT560] [Surround\speakers\SB-HS560] Type 1 way, 1 speaker system (Bass reflex) Speaker unit(s) Full range Input power (IEC) Output sound pressure...
- Page 44 Matsushita Electric Industrial Co., Ltd. Web Site: http://panasonic.net RQTX0099-1B F1207GT1018...