Advertisement
Quick Links
Advanced Weather Station
with Atomic Time
Model: BAR208HGA
USER MANUAL
EN
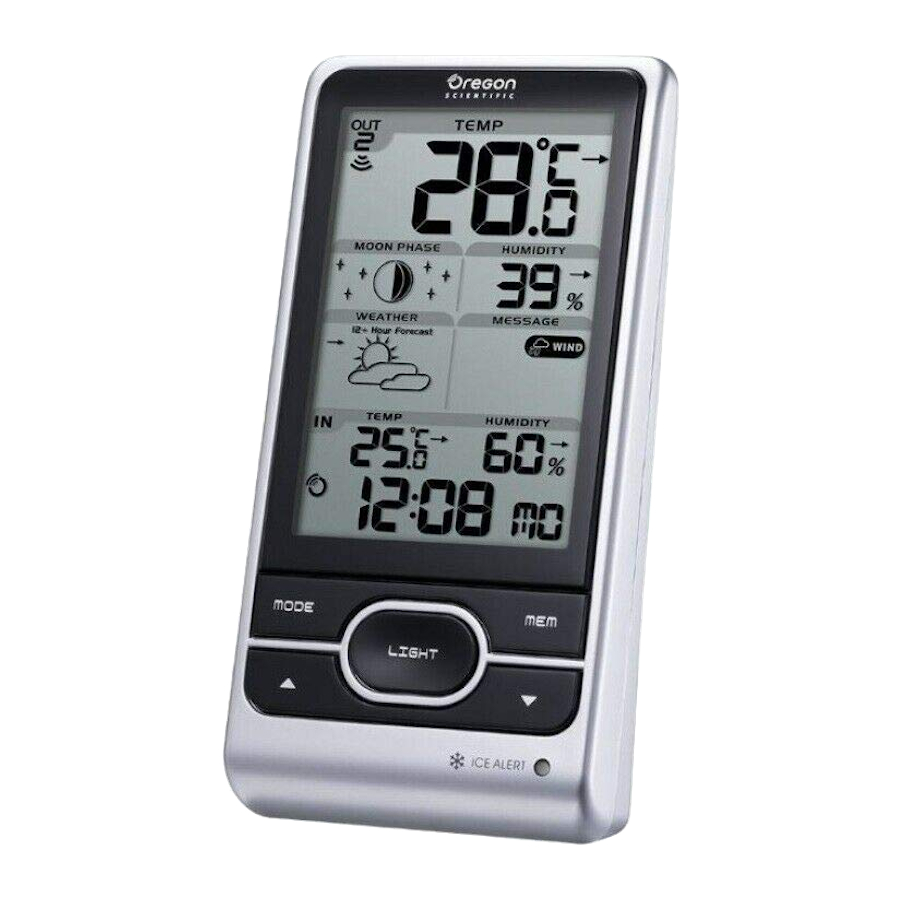
OVERVIEW
FRONT VIEW (FIG 1)
1
2
3
4
5
6
7
1.
Remote sensor reception indicator
2.
Moon phase reading
3.
Weather forecast
4.
Indoor temperature with temperature trend
5.
Clock signal reception indicator
6.
MODE: Change settings / display
7.
/
: Increase / decrease settings; activate / deacti
vate clock reception signal
8.
Outdoor temperature with temperature trend
9.
Outdoor humidity with humidity trend
10. Weather warning message
11. Indoor humidity with humidity trend
12. Time zone
13. Clock with weekday
14. MEM:
View
current,
maximum
temperature / humidity
15. LIGHT: Activate backlight for 5 seconds
16. Ice alert LED indicator
BACK VIEW (FIG 2)
1
1.
°C / °F: Select temperature unit
2.
RESET: Reset unit to default settings
REMOTE SENSOR (FIG 3)
1
2
1.
LCD display
2.
LED status indicator
3.
Wall mount hole
4.
RESET hole
5.
CHANNEL switch
6.
Battery compartment
8
GETTING STARTED
9
INSERT BATTERIES
1.
Remove the battery compartment.
10
2.
Insert the batteries, matching the polarities (see FIG 2).
3.
Press RESET after each battery change.
11
LOCATION
12
Clock / alarm and
13
Indoor temperature area
Outdoor temperature area
14
REMOTE SENSOR
15
The main unit can collect data from up to 3 sensors.
To set up the sensor:
16
1.
Open the battery compartment with a small Philips
screwdriver and insert batteries, matching the polarity.
2.
Select a channel then press RESET.
3.
Close the battery door.
4.
Place the sensor within 30 m (98 ft) of the main unit
using the table stand or wall mount.
TIP
Ideal placements for the sensor would be in any
location on the exterior of the home at a height of not more
than 5 ft and which can shield it from direct sunlight or wet
conditions for an accurate reading.
and
minimum
NOTE Use alkaline batteries for longer usage and consumer
grade lithium batteries in temperatures below freezing.
SENSOR DATA TRANSMISSION
To search for a sensor:
Press and hold
The sensor reception icon in the remote sensor area shows
the status:
ICON
2
TIP The transmission range may vary depending on many
factors. You may need to experiment with various locations to
get the best results.
3
4
5
6
MEANING
Main unit batteries low
Sensor batteries low
+ MODE.
DESCRIPTION
Main unit is searching for sensor(s).
A channel has been found.
The sensor cannot be found.
CLOCK
CLOCK RECEPTION
This product is designed to synchronize its clock
automatically with WWVB-60 signal, within 3200km (2000
miles) of Fort Collins Colorado.
To enable / disable signal reception:
Press and hold to
enable or
to disable signal reception.
NOTE Reception takes 2-10 minutes. If the signal is weak,
it can take up to 24 hours to get a valid signal. If signal
reception is unsuccessful, place your unit next to a window,
press and hold
to force another signal search.
Clock signal reception indicator:
STRONG SIGNAL WEAK SIGNALNO
MANUALLY SET CLOCK
To set the clock manually, disable the signal reception first.
1.
Press and hold MODE.
2.
Press
or
to change the settings.
3.
Press MODE to confirm.
4.
The settings order is: time zone, 12/24 hr format, hour,
minute, year, calendar mode (day – month / month
– day), month, day and language.
Select the time zone: (P) Pacific, (E) Eastern, (C) Central or
(M) Mountain.
NOTE The language options are English (E), German (D),
French (F), Italian (I), and Spanish (S).
To select display mode:
Press MODE to choose between clock with seconds /
weekday / calendar / moon phase.
WEATHER FORECAST
This product forecasts the next 12 to 24 hours of weather
within a 30-50 km (19-31 mile) radius (US- with a 75%
accuracy).
Sunny
Partially Cloudy
Cloudy
Rainy
Snowy
WEATHER WARNING MESSAGE
The weather warning messages provide indications of
probable circumstances that may arise based on the weather
station's calculations. The meanings for the warnings are
illustrated below:
Warning
Meaning
Risk of high temperatures
Risk of fast wind speeds
Risk of a storm
Risk of foggy conditions
Risk of icy conditions
TEMPERATURE AND HUMIDITY
To toggle temperature unit:
Press °C / °F.
To auto-scan between sensors:
Press and hold
+ MEM to display each sensor's data for
3 seconds.
To end press
.
To toggle between current, minimum and maximum
records for the selected sensor:
Press MEM repeatedly.
To clear the records:
Press and hold MEM.
ICE WARNING
If the channel 1 sensor falls between 3°C to -2 °C (37°F to
28°F), LED indicator will flash, and will stop flashing once the
SIGNAL
Advertisement

Related Manuals for Oregon Scientific BAR208HGA


Summary of Contents for Oregon Scientific BAR208HGA
-
Page 1: Overview
Advanced Weather Station with Atomic Time Model: BAR208HGA USER MANUAL OVERVIEW FRONT VIEW (FIG 1) Remote sensor reception indicator Moon phase reading Weather forecast Indoor temperature with temperature trend Clock signal reception indicator MODE: Change settings / display : Increase / decrease settings; activate / deacti... -
Page 2: Specifications
-20°C to 60°C (-4°F to 140°F) Power 2 x UM-4 (AAA) 1.5 V batteries ABOUT OREGON SCIENTIFIC Visit our website (www.oregonscientific.com) to learn more about Oregon Scientific products. If you’re in the US and would like to contact our Customer Care department directly, please visit: www2.oregonscientific.com/service/support...