Table of Contents
Advertisement
Quick Links
Advertisement
Table of Contents

Related Manuals for Oregon Scientific MP 130


Summary of Contents for Oregon Scientific MP 130
- Page 1 Model: MP 130 User Manual 7/5/04, 4:41 PM...
-
Page 2: Table Of Contents
DIGITAL MP3 PLAYER (MP130) USER MANUAL CONTENTS Introduction ... 1 Product Overview ... 2 Getting Started ... 3 Installing the Batteries ... 3 System Requirements ... 3 Driver Software Installation ... 4 Installing External Memory Cards ... 4 Connecting the Player to PC ... 5 File Transfer ... - Page 3 Troubleshooting ... 21 Hardware ... 21 Software ... 22 Caution ... 22 Technical Specifications ... 22 About Oregon Scientific ... 23 FCC Statement ... 24 7/5/04, 4:41 PM...
-
Page 4: Introduction
INTRODUCTION Congratulations on your selection of the MP130. This full-featured MP3 Music Player offers a variety of features including multi-format support, FM radio and voice recorder capabilities. Your player combines various playback and audio enhancing features into a portable design that you comfortably wear around your neck. -
Page 5: Product Overview
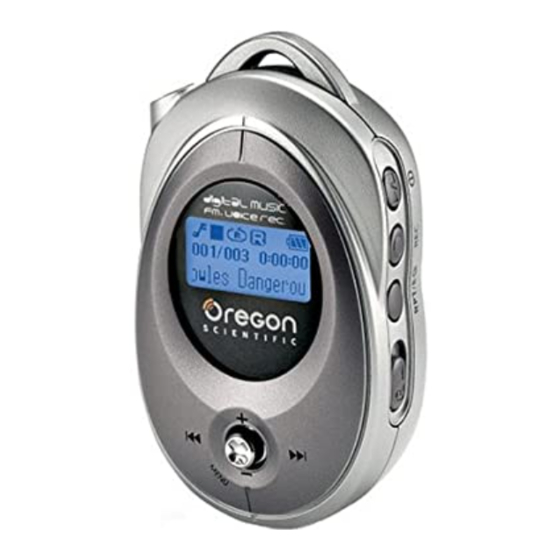
PRODUCT OVERVIEW FRONT BACK SIDE 1. Neck strap loop. 2. Earphone jack. 3. LCD display. 4. Microphone. 5. +: Increase playback volume. 6. PREV : Review the current or previous song / back to the previous option. 7. NEXT : Skip to the next track or next option. -
Page 6: Getting Started
SYSTEM REQUIREMENTS Before you begin, please check to make sure your computer meets the following system requirements: 1. Loop the strap around the MP3 player's loophole and secure tightly. 2. Plug the earphone connector into its corresponding jack. -
Page 7: Driver Software Installation
2. Follow the onscreen instructions. 3. Restart your computer. WINDOWS ME, 2000, XP When you connect your MP3 player to your PC, it will appear as two removable drives (i.e., Removable Disk (H:) and Removable Disk (I:)). MACINTOSH 10.2 or above When you connect your MP3 player to your Macintosh, it will appear as two drive icons on the desktop (i.e., Untitled). -
Page 8: Connecting The Player To Pc
Make sure you turn off the player before connecting to the PC. FILE TRANSFER After connecting your MP3 player to the computer, the computer will detect and identify the device as two removable storage drives, allowing you to drag and drop files between your computer and your player. -
Page 9: Disconnecting The Player From Pc
3. Drag and drop the file(s) you wish to copy from your computer onto your player. NOTE: Your MP3 player is equipped for mass data storage support. This means that it can also be used as a portable hard drive to store and transport all forms of computer data files. -
Page 10: Power On / Off
1 minute. The power will not automatically shut off when connected to the PC. POWER OFF To turn the power off when your MP3 player is in STOP status: • Press and hold screen appears. -
Page 11: Music
MUSIC PLAYBACK 1. Press and hold to turn the power on. 2. Press TIP: See section "MENU NAVIGATION" for information about how to: • Display elapsed or remaining track time by changing the "TIME" setting. • Change the scrolling speed of a track name displayed under the "SCROLLING SPEED"... -
Page 12: Voice
VOICE Recorded voice files are saved in .WAV format (i.e., VOICE001.WAV) and saved in a folder called "VOICE" in your MP3 player. After a recording has been made, you can retrieve and then playback the voice files in VOICE mode. -
Page 13: Radio
3. Press again to pause playback. Press and hold icon is displayed to stop playback. PLAYBACK TRACK SECTIONS (A-B REPEAT) 1. While playing a track, press REC once to mark the start of the section you wish to repeat. The icon 2. -
Page 14: Menu Navigation
1. Enter "SCAN" status. 2. Press repeatedly to search for a station manually, or press and hold 3. If a radio station is being searched and stops to identify a channel to preset, press and hold MENU to save the channel. 4. -
Page 15: Repeat
MAIN MENU MENU OPTIONS / SUBMENUS Music MODE Radio Voice Normal, One, All, Ran, RPT Ran Normal, Rock, Jazz, Classic, Pop DELETE One / All BACKLIT DISPLAY CONTRAST SCROLL SP MEMORY Total, Free, Firmware version LANGUAGE TIME SETTINGS DEFAULT NOTE: If no key is pressed for 5 seconds during menu navigation, you will return to the current mode (Music / Radio / Voice) last viewed. -
Page 16: Equalizer (Eq)
EQ SETTING Normal NOTE: EQ is not available as a menu option in RADIO mode. DELETING FILES To delete files on your MP3 player: 1. Press 2. Press MENU to confirm selection and stop the track that is playing back. -
Page 17: Display Settings
DELETE ONE 1. Press to choose a track for deletion. 2. Press MENU to delete the track. "File deleted" and the free memory will be displayed to confirm that the file has been erased. DELETE ALL 1. If you selected the delete "All" option from the menu and you pressed MENU to confirm, "Files deleted"... -
Page 18: Memory
SCROLLING SPEED If you have track information that is too long to fit into the display, it will scroll through so you can read the text that is left off screen. 1. Press to select SCROLL SP, then press MENU to select it. 2. -
Page 19: Settings
SETTINGS While in the SETTINGS menu, you can choose to adjust the language, time display, tag information, and default setting options. LANGUAGE To set the display language in English, French, German, Italian, Spanish, or Portuguese: 1. Press then press MENU to select it. 2. -
Page 20: Button Hold
DEFAULT To return the player to default settings: 1. Press to select DEFAULT, then press MENU to select it. 2. Press 3. Press MENU to confirm your selection. Factory default presets are: SETTINGS Volume Level BACKLIT CONTRAST SCROLL SP LANGUAGE TIME BUTTON HOLD You can activate an all button hold function, which locks all buttons to... -
Page 21: Upgrading Firmware (Windows Users Only)
Upgrading your MP130 MP3 player with the latest firmware ensures the device provides optimal playback performance: 1. Go to the Oregon Scientific website (www.oregonscientific.com) to download the MP130 firmware update (.zip file). 2. Unzip the file into the directory recommended by Windows and install the software by double-clicking "setup.exe". -
Page 22: Formatting The Player (Windows Users Only)
MP3 player before the firmware upgrade. Check the Format Data Area box and then click the Start button. All data stored in the MP3 player is erased and the firmware upgrade process begins. 9. Click the Close button to close the software once the process is completed. -
Page 23: Safety And Care
SAFETY AND CARE This product is designed to give you years of service if handled properly. Observe the following guidelines: • Clean the unit with a damp cloth and mild detergent. • Do not drop the unit or placing it in a high-traffic location. •... -
Page 24: Troubleshooting
TROUBLESHOOTING HARDWARE Music skips tracks. The music file may be corrupt or an unsupported format. First check to make sure it is a supported format. If the format is correct, delete the file and transfer the music from your PC to player again. The player will not start or shuts off soon after it starts. -
Page 25: Software
Your computer does not locate your player. Check to make sure the USB cable is connected properly. If you are using Win98SE, make sure you have installed the driver software. Cannot store any more files on the player. The memory may be full. Delete files to make some room. SOFTWARE The MP130 software does not automatically begin when you insert the CD. -
Page 26: About Oregon Scientific
We hope you will find all the information you need on our website, however if you'd like to contact the Oregon Scientific Customer Care department directly, please visit www2.oregonscientific.com/service/support or call 949-608-2848 in the US. For international enquiries, please visit www2.oregonscientific.com/about/international/default.asp. -
Page 27: Fcc Statement
CAUTION: Modification-The FCC requires the user to be notified that any changes or modifications made to this device that are not expressly approved by Oregon Scientific, Inc. may void the user 's authority to operate the equipment. Interface cable-Use the shielded cable sold or provided by Oregon Scientific, Inc. - Page 28 Legal Company Name: Oregon Scientific, Inc. Address: 19861 SW 95th Place, Tualatin, Oregon 97062, USA Phone, Fax: (1) 800-853-8883, (1) 503-684-8883 Oregon Scientific MP 130 Tested To Comply With FCC Standards FOR HOME OR OFFICE USE 7/12/04, 4:44 PM...
- Page 29 © 2004 Oregon Scientific. All rights reserved. 086-003399-051 7/5/04, 4:40 PM...