Table of Contents
Advertisement
Available languages
Available languages
Slim Projection Clock
Models: RM368P / RM368PU /
RM368PA / RA368P
USER MANUAL
EN
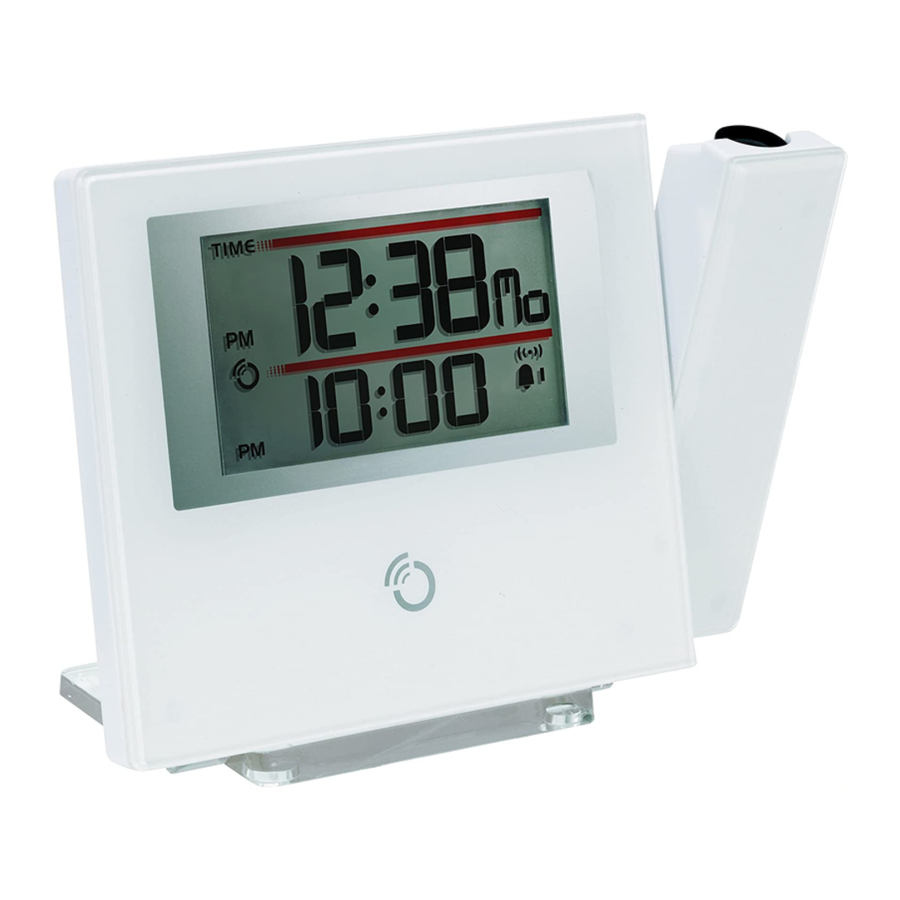
OVERVIEW
FRONT VIEW
1 2
3
4
5
7
8
9 10
1.
Indicate AM / PM
2.
Radio controlled clock reception icon
3. SNOOZE: Activate snooze alarm; turn on backlight /
projector; flip projected image 180
o
4.
Time zone offset
5.
Clock with seconds / weekday
6.
PROJECTOR: Project time / alarm status
7.
Main unit batteries low / no battery
8.
Calendar
9.
/
Indicate daily alarm is On
10. (( . )) Indicate alarm time is displayed
REAR VIEW
1.
/
: Increase / decrease value of the selected
setting; enable / disable clock reception
2.
: View alarm status; set alarm; change to alarm /
calendar display
3.
: Activate / deactivate alarm function
4.
MODE: Change display; set clock
ON . PROJECTION . OFF: enable / disable continuous
5.
projection
6.
RESET: Reset unit to default settings
7.
Battery compartment
8.
AC / DC adaptor socket
GETTING STARTED
MAIN UNIT INSTALLATION
For continuous use of projector and backlight, install
adapter.
•
Plug AC/DC adaptor into socket. Make sure the adapter
is not obstructed and is easily accessible to the unit.
To completely disconnect from power, the adapter should be
disconnected from the main unit.
NOTE The main unit and adapter should not be exposed to
wet conditions. No objects filled with liquid, such as vases,
should be placed on the main unit and adapter.
Insert batteries:
1.
Remove the battery compartment cover.
2.
Insert the batteries, matching the polarities.
NOTE Batteries should not be exposed to excessive heat
such as sunshine or fire.
CLOCK
CLOCK RECEPTION
This product is designed to synchronize its clock automatically
with a clock signal.
RM368P: EU: DCF-77 signal: within 1500 km (932 miles) of
Frankfurt, Germany.
RM368PU: UK: MSF-60 signal: within 1500 km (932 miles)
of Anthorn, England.
RM368PA: WWVB-60 signal: within 3200km (2000 miles) of
Fort Collins Colorado.
To enable / disable signal reception:
Press and hold
reception.
NOTE Reception takes 2-10 minutes. If the signal is weak,
it can take up to 24 hours to get a valid signal.
Clock signal reception indicator:
STRONG SIGNAL
MANUALLY SET CLOCK
To set the clock manually, disable the clock signal reception
6
first.
1.
Press and hold MODE.
2.
Press
3.
Press MODE to confirm.
The settings order is: time zone, 12/24 hr format, hour,
minute, year, calendar mode (month – day / day – month),
month, day and language.
Time zone offset sets the clock +/- 23 hours from the received
clock signal time. If you have deactivated the clock signal
reception, do not set a value for time zone.
RM368PA: Select the time zone: (PA) Pacific, (MO)
Mountain, (CE) Central, or (EA) Eastern.
NOTE The language options are English (E), German (D),
French (F), Italian (I), and Spanish (S).
To select clock display mode:
Press MODE to toggle between clock with seconds, clock
with weekday.
ALARM
To set the alarm:
1.
Press
2.
Press and hold
3.
Press
4.
Press
indicates alarm is ON.
To activate / deactivate alarm 1 and / or 2:
1
Press
.
2
3
To silence the alarm:
4
•
Touch SNOOZE to silence it for 8 minutes
5
6
OR
•
Press any other key to turn the alarm off and activate it
again after 24 hours.
To select display mode:
7
Press
to change display from alarm to calendar.
8
PROJECTION
To activate projection:
•
Touch SNOOZE.
To activate / deactivate continuous projection:
•
Slide PROJECTION switch to ON / OFF when adaptor
is connected.
To flip image by 180°:
•
While image is projected, touch SNOOZE.
NOTE If projection is illuminated, do not look directly into
the projector.
BACKLIGHT
Touch SNOOZE to activate EL backlight for 8 seconds, when
adaptor is connected.
RESET
Press RESET to return to the default settings.
SPECIFICATIONS
TYPE
L x W x H
Weight
Power
PRECAUTIONS
•
Do not subject the unit to excessive force, shock, dust,
temperature or humidity
•
Do not cover the ventilation holes with any items such s
newspapers, curtains etc.
•
Do not immerse the unit in water. If you spill liquid over
it, dry it immediately with a soft, lint-free cloth.
•
Do not clean the unit with abrasive or corrosive
materials.
•
Do not tamper with the unit 's internal components. This
invalidates the warranty.
•
Only use fresh batteries. Do not mix new and old
batteries.
to enable or
to disable signal
WEAK / NO SIGNAL
/
to change the settings.
to toggle between Alarm 1 / 2.
to enter alarm setting.
/
to set hour / minute.
to confirm.
DESCRIPTION
142 x 100 x 18mm
(5.59 x 3.94 x 0.71 in)
110g (3.88 oz) without battery
AC/DC 3V adaptor
2 x CR2032 batteries
•
Images shown in this manual may differ from the actual
display.
•
When disposing of this product, ensure it is collected
separately for special treatment.
•
Placement of this product on certain types of wood
may result in damage to its finish for which Oregon
Scientific will not be responsible. Consult the furniture
manufacturer's care instructions for information.
•
The contents of this manual may not be reproduced
without the permission of the manufacturer.
•
Do not dispose old batteries as unsorted municipal
waste. Collection of such waste separately for special
treatment is necessary.
•
Please note that some units are equipped with a
battery safety strip. Remove the strip from the battery
compartment before first use.
NOTE The technical specifications for this product and the
contents of the user manual are subject to change without
notice.
NOTE Features and accessories will not be available in all
countries. For more information, please contact your local
retailer.
ABOUT OREGON SCIENTIFIC
Visit our website (www.oregonscientific.com) to learn more
about Oregon Scientific products. If you're in the US and
would like to contact our Customer Care department directly,
please visit: www2.oregonscientific.com/service/support .asp
For international inquiries, please visit:
www2.oregonscientific.com/about/international.asp
EU-DECLARATION OF CONFORMITY
Hereby, Oregon Scientific, declares that this Slim Projection
Clock (Models: RM368P / RM368PU / RM368PA / RA368P)
is in compliance with the essential requirements and other
relevant provisions of Directive 1999/5/EC. A copy of the
signed and dated Declaration of Conformity is available on
request via our Oregon Scientific Customer Service.
COUNTRIES RTTE APPROVAL COMPLIED
All EC countries, Switzerland
FCC STATEMENT
This device complies with Part 15 of the FCC Rules.
Operation is subject to the following two conditions: (1) This
device may not cause harmful interference, and (2) This
device must accept any interference received, including
interference that may cause undesired operation.
WARNING
Changes or modifications not expressly
approved by the party responsible for compliance could void
the user's authority to operate the equipment.
NOTE This equipment has been tested and found to comply
with the limits for a Class B digital device, pursuant to Part
15 of the FCC Rules. These limits are designed to provide
reasonable protection against harmful interference in a
residential installation.
This equipment generates, uses and can radiate radio
frequency energy and, if not installed and used in accordance
with the instructions, may cause harmful interference to
radio communications. However, there is no guarantee
that interference will not occur in a particular installation. If
this equipment does cause harmful interference to radio or
television reception, which can be determined by turning the
equipment off and on, the user is encouraged to try to correct
the interference by one or more of the following measures:
•
Reorient or relocate the receiving antenna.
•
Increase the separation between the equipment and
receiver.
•
Connect the equipment into an outlet on a circuit different
from that to which the receiver is connected.
•
Consult the dealer or an experienced radio / TV
technician for help.
DECLARATION OF CONFORMITY
The following information is not to be used as contact
for support or sales. Please visit our website at www2.
oregonscientific.com/service for all enquiries.
We
Name:
Oregon Scientific, Inc.
Address:
19861 SW 95th Ave.,Tualatin,
Oregon 97062 USA
Telephone No.:
1-800-853-8883
declare that the product
Product No.:
RM368P / RM368PU / RM368PA /
RA368P
Product Name:
Slim Projection Clock
Manufacturer:
IDT Technology Limited
Address:
Block C, 9/F, Kaiser Estate,
Phase
1, 41 Man Yue St.,
Hung Hom, Kowloon,
Hong Kong
is in conformity with Part 15 of the FCC Rules. Operation is
subject to the following two conditions: 1) This device may
not cause harmful interference. 2) This device must accept
any interference received, including interference that may
cause undesired operation.
I
P
VI
1.
2.
3.
4.
5.
6.
7.
8.
9.
10
VI
CH
and Norway
N
1.
2.
3.
4.
5.
6.
7.
8.
O
AT
Pe
l'a
fun
•
Pe
de
N
co
su
In
1.
2.
N
qu
O
RI
Qu
au
RM
Fr
Advertisement
Table of Contents

Related Manuals for Oregon Scientific RA368P


Summary of Contents for Oregon Scientific RA368P
-
Page 1: User Manual
• Placement of this product on certain types of wood may result in damage to its finish for which Oregon Scientific will not be responsible. Consult the furniture manufacturer's care instructions for information. •... -
Page 2: Resumen
Por medio de la presente Oregon Scientific declara que el Reloj proyector con RF extra plana [Modelos: RM368P/ RM368PU / RM368PA / RA368P] cumple con los requisitos esenciales y cualesquiera otras disposiciones aplicables o exigibles de la Directiva 1999/5/CE. Tiene a su disposición una copia firmada y sellada de la Declaración... - Page 3 Sammelstellen, die Sie bei Ihrer Gemeinde erfragen können. • Wenn dieses Produkt auf bestimmte Holzfl ächen gestellt wird, kann die Oberfl äche beschädigt werden. Oregon Scientifi c ist nicht haftbar für solche Beschädigungen. Entsprechende Hinweise entnehmen Sie bitte der Pfl egeanleitung Ihres Möbelherstellers.
-
Page 4: Manuel De L'utilisateur
• Le poser sur certaines surfaces en bois peut endommager la fi nition du meuble, et Oregon Scientifi c ne peut en être tenu responsable. Consultez les mises en garde du fabricant du meuble pour de plus amples informations. -
Page 5: Panoramica Del Prodotto
Con la presente Oregon Scientific dichiara che questo passare prodotto (Modello:RM368P / RM368PU / RM368PA / RA368P) è conforme ai requisiti essenziali ed alle altre disposizioni pertinenti stabilite dalla direttiva 1999/5/CE. Una copia firmata e datata della Dichiarazione di Conformità... -
Page 6: Overzicht
OVER OREGON SCIENTIFIC Bezoek onze website (www.oregonscientific.com) om meer te weten over uw nieuwe product en andere Oregon Scientific producten zoals digitale fototoestellen, gezondheids- en fi tnessuitrusting en weerstations. Op deze website vindt u tevens de informatie over onze klantendienst, voor het geval u ons wenst te contacteren. -
Page 7: Manual Do Usuário
• A colocação deste produto sobre certos tipos de madeira pode resultar em danos ao seu acabamento, pelos quais a Oregon Scientific não se responsabilizará. Consulte as instruções de cuidados do fabricante do móvel para obter informações. • O conteúdo deste manual não pode ser reproduzido sem a permissão do fabricante. - Page 8 Denna produkt skall vid kassering sorteras som elektronikskrot. SIGNAL • Placering av denna produkt på speciella träslag kan resultera i skador på fi nishen för vilka Oregon Scientifi c ej ansvarar. Konsultera möbeltillverkaren för information. • Innehållet i denna manual får ej kopieras utan medgivande från tillverkaren.