Omron HEM-790IT Instruction Manual
Automatic blood pressure monitor with comfit cuff
Hide thumbs
Also See for OMRON HEM-790IT:
- Instruction manual (132 pages) ,
- Troubleshooting manual (3 pages) ,
- Getting started manual (3 pages)

Related Manuals for Omron OMRON HEM-790IT


Summary of Contents for Omron OMRON HEM-790IT
- Page 1 INSTRUCTION MANUAL Automatic Blood Pressure Monitor with ComFit Cuff HEM-790IT Model...
-
Page 2: Table Of Contents
TABLE OF CONTENTS Before Using the Monitor Introduction ..........4 Safety Information . - Page 3 TABLE OF CONTENTS Taking a Measurement .........27 Using the Guest Mode .
-
Page 4: Before Using The Monitor
DATE PURCHASED: __________________ SERIAL NUMBER: ____________________ Stapleyourpurchasereceipthere Your new digital blood pressure monitor uses the oscillometric method of blood pressure measurement. This means the monitor detects your blood’s movement through your brachial artery and converts the movements into a digital reading. The monitor stores measurement results for two people and features Morning and Evening Averages. -
Page 5: Safety Information
SAFETY INFORMATION To assure the correct use of the product basic safety measures should always be followed including the warnings and cautions listed in this instruction manual. SAFETY SYMBOLS USED IN THIS INSTRUCTION MANUAL WARNING CAUTION OPERATING THE DEVICE Contact your physician for specific information about your blood pressure. - Page 6 SAFETY INFORMATION OPERATING THE DEVICE (continued) Read the Special Conditions section (page 36) of the instruction manual if your systolic pressure is known to be more than 220 mmHg. Inflating to a higher pressure than necessary may result in bruising where the cuff is applied. Operate the device only as intended.
-
Page 7: Risk Of Electrical Shock
Do not submerge the device or any of the components in water. Store the device and the components in a clean, safe location. Changes or modification not approved by Omron Healthcare will void the user warranty. Do not disassemble or attempt to repair the... -
Page 8: Before Taking A Measurement
BEFORE TAKING A MEASUREMENT To ensure a reliable reading follow these recommendations: 1. Avoid eating, drinking alcohol, smoking, exercising, and bathing for 30 minutes prior to taking a measurement. Rest for at least 15 minutes prior to taking the measurement. 2. -
Page 9: Operating Instructions
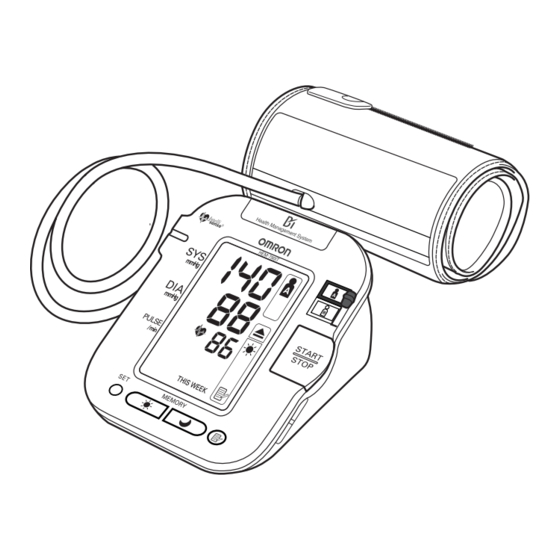
Main Unit: Memory ( ) Button Morning/Evening Average ) Buttons SET Button KNOW YOUR UNIT Display USER ID Selection Switch Start/Stop Button USB Port Air Jack Battery Compartment AC Adapter Jack... - Page 10 KNOW YOUR UNIT Components: Housing Air Tube Cord AC Adapter Air Plug (Connects to Air Jack) Arm Cuff Four “AA” Batteries Storage Case USB Cable Instruction Manual Quick Start Guide...
-
Page 11: Unit Display
UNIT DISPLAY Systolic Blood Pressure USER ID Symbol (A or B) Diastolic Blood Pressure Morning Hypertension Symbol Heartbeat Symbol Morning Average Symbol Movement Symbol Evening Average Symbol Irregular Heartbeat Symbol Deflation Symbol Average Value Symbol Date/Time Display Memory Symbol Low Battery Indicator Pulse Display Week Display TruRead... -
Page 12: Display Symbols
IRREGULAR HEARTBEAT SYMBOL ( When the monitor detects an irregular rhythm two or more times during the measurement, the Irregular Heartbeat Symbol ( the display with the measurement values. An irregular heartbeat rhythm is defined as a rhythm that is more than 25% slower or 25% faster from the average rhythm detected while the monitor is measuring the systolic blood pressure and the diastolic... -
Page 13: Morning Hypertension Symbol
85 for the Diastolic Blood Pressure value when viewing the Morning Averages and the Evening Averages in the memory. Omron Healthcare recommends you contact your physician if the MORNING HYPERTENSION SYMBOL and/or the HEARTBEAT SYMBOL appear on the display with your measurement values. -
Page 14: Heartbeat Symbol
DISPLAY SYMBOLS HEARTBEAT SYMBOL ( TAKING A MEASUREMENT The Heartbeat Symbol flashes on the display during the measurement. The Heartbeat Symbol flashes at every heartbeat. When the measurement is complete, the Heartbeat Symbol flashes on the display with your blood pressure and pulse rate if the reading is above 135 for the Systolic Blood Pressure value and/or 85 for the Diastolic Blood Pressure value. -
Page 15: Battery Installation
BATTERY INSTALLATION 1. Press the indicator on the battery cover and slide the cover off in the direction of the arrow. 2. Install 4 “AA” size batteries so the + (positive) and - (negative) polarities match the polarities of the battery compartment as indicated. - Page 16 BATTERY INSTALLATION BATTERY REPLACEMENT When the Low Battery Indicator appears on the display screen turn the monitor off and remove all the batteries. Replace with four new batteries at the same time. Longlife alkaline batteries are recommended. CAUTION If battery fluid should get in your eyes, immediately rinse with plenty of clean water.
-
Page 17: Using The Ac Adapter
USING THE AC ADAPTER Only use the authorized Omron AC adapter designed for this monitor. We recommend you install the batteries even if the AC Adapter is used. If no batteries are installed, you may need to reset the date and time if the AC Adapter is disconnected. - Page 18 USING THE AC ADAPTER TO CONNECT THE AC ADAPTER Insert the AC Adapter Plug into the AC Adapter Jack on the back side of the monitor as illustrated. Plug the AC Adapter into a 120V AC outlet (60 cycles). TO DISCONNECT THE AC ADAPTER Hold the Housing to remove the AC Adapter from the electrical outlet.
-
Page 19: Setting The Date And Time
The Blood Pressure Monitor automatically stores up to 84 individual measurement values with the dates and times. The monitor also calculates weekly averages for measurements in the morning and in the evening. - Page 20 SETTING THE DATE AND TIME 2. SETTING THE YEAR The year can be set between 2007 and 2030. When the display reaches 2030, it will return to 2007. Press the Memory button ( ) to advance by increments of one year. Press the SET button to set the current year.
- Page 21 SETTING THE DATE AND TIME 4. SETTING THE DAY Press the Memory button ( ) to advance by increments of one day. Press the SET button to set the current day. The hour flashes on the display. 5. SETTING THE HOUR The time is set using AM or PM.
- Page 22 SETTING THE DATE AND TIME RESETTING THE DATE AND TIME To adjust the date or time after it has been setup when you first use the unit. Start with the monitor in the off position. 1. Press and hold the SET button. The TruRead symbol will appear on the display for the USER ID selected.
-
Page 23: Applying The Arm Cuff
APPLYING THE ARM CUFF CAUTION Read all of the information in the instruction manual and any other literature in the box before operating the unit. CAUTION This device is intended for use in measuring blood pressure and pulse rate in the adult population. Do not use this device on infants or persons who cannot express their intentions. - Page 24 APPLYING THE ARM CUFF 3. Sit on a chair with your feet flat on the floor. Place your left arm on a table so the cuff is level with your heart. 4. Hold the thumb grip on the cuff securely with your right hand. 5.
- Page 25 APPLYING THE ARM CUFF 6. Apply the cuff to your left upper arm so the blue stripe is on the inside of your arm and aligned with your middle finger. The air tube runs down the inside of your arm. The bottom of the cuff should be approximately 1/2"...
-
Page 26: Applying The Cuff On The Right Arm
APPLYING THE ARM CUFF APPLYING THE CUFF ON THE RIGHT ARM When taking a measurement using the right arm use this instruction for Step 6 on page 25. Apply the cuff to your right upper arm so the thumb grip is centered on the inside of your inner arm. -
Page 27: Taking A Measurement
TAKING A MEASUREMENT The monitor is designed to take measurements and store the measurement values in the memory for two people using USER ID A and USER ID B. The monitor can also be used to take a single measurement for other persons using the GUEST Mode. -
Page 28: Selecting The User Id
TAKING A MEASUREMENT 3. Inflation stops and the measurement is started. When the measurement is completed, your blood pressure and pulse rate appear on the display. SELECTING THE USER ID Select your USER ID. Always use the same USER ID when taking a measurement. -
Page 29: Selecting The Truread Tm Mode
TAKING A MEASUREMENT SELECTING THE TRUREAD 1. Select your USER ID (A or B). 2. Press and hold the SET button. The TruRead symbol on the display. 3. Press the Memory button ( ) to select on. NOTE: Press the Memory button to alternate between on and oFF. - Page 30 TAKING A MEASUREMENT 4. Press the SET button to confirm the change. The number of seconds between each measurement is displayed. NOTE: The default value between each measurement is 60 seconds. 5. Press the MEMORY button ( ) to change the interval of time between each measurement.
-
Page 31: Using The Single Mode
TAKING A MEASUREMENT 7. If the date and time are correct, press the START/STOP button to turn the monitor off. To change the date and time refer to page 19, SETTING THE DATE AND TIME. CAUTION Do not use a cellular phone near the device. It may result in an operational failure. - Page 32 TAKING A MEASUREMENT 2. Press the START/STOP button. All symbols appear on the display. The USER ID Symbol you selected flashes on the display. The cuff starts to inflate automatically. As the cuff inflates, the monitor automatically determines your ideal inflation level. This monitor detects the pulse during inflation.
- Page 33 TAKING A MEASUREMENT 4. When the measurement is complete, the arm cuff completely deflates. Your blood pressure and pulse rate are displayed. 5. Press the START/STOP button to turn the monitor off. NOTE: The monitor will automatically turn off after five minutes.
-
Page 34: Using The Truread Tm Mode
TAKING A MEASUREMENT USING THE TRUREAD 1. Select your USER ID (A or B). 2. Press the START/STOP button. All symbols appear on the display. The USER ID Symbol you selected flashes on the display. The cuff starts to inflate automatically. NOTE: To stop the inflation or measurement, press the START/STOP button. - Page 35 TAKING A MEASUREMENT The second measurement is complete, waiting to start the next measurement. The consecutive measurements are complete. The average for three measurements appears on the display. 5. Press the SET button to display the blood pressure and pulse rate for the first measurement.
-
Page 36: Special Conditions
TAKING A MEASUREMENT SPECIAL CONDITIONS CAUTION Inflating to a higher pressure than necessary may result in bruising where the cuff is applied. If your systolic pressure is known to be more than 220 mmHg, press and hold the START/STOP button until the monitor inflates 30 to 40 mmHg higher than your expected systolic pressure. -
Page 37: Using The Memory Function
USING THE MEMORY FUNCTION The monitor is designed to store the blood pressure and the pulse rate in the memory for two people (USER A and USER B) every time a measurement is completed. The monitor automatically stores up to 84 sets of measurement values (blood pressure and pulse rate) for each user (A and B). -
Page 38: To Display The Measurement Values
USING THE MEMORY FUNCTION TO DISPLAY THE MEASUREMENT VALUES 1. Select your USER ID (A or B). 2. Press the Memory button ( ). The Average Symbol ( ) appears on the display when the average reading is shown. - Page 39 USING THE MEMORY FUNCTION 3. Press the Memory button ( ) to display the most recent set of measurement values on the screen. The values are displayed from the most recent to the oldest. NOTE: The date and time are alternately displayed with the measurement values.
-
Page 40: Using The Truread Tm Mode
USING THE MEMORY FUNCTION MORNING AND EVENING AVERAGES The monitor calculates and displays a weekly average for measurements taken in the morning ( ) and evening ( ). The monitor stores 8 weeks of Morning Averages and 8 weeks of Evening Averages for each user (A and B). -
Page 41: To Display Morning And Evening Averages
USING THE MEMORY FUNCTION TO DISPLAY MORNING AND EVENING AVERAGES 1. Select your USER ID (A or B). 2. Press the Morning Average button ) or the Evening Average button ( The average for the current week “THIS WEEK” appears on the display. -
Page 42: Display Combinations
USING THE MEMORY FUNCTION DISPLAY COMBINATIONS In addition to the Morning Average and Evening Average Symbols, the monitor may also display the Morning Hypertension Symbol if the morning average for that week is above the AHA guidelines. (See page 13 for details.) Depending on your measurement results, these may be displayed in the following combinations. -
Page 43: To Delete All Values Stored In The Memory
USING THE MEMORY FUNCTION The Morning Hypertension Symbol appears if the weekly average for morning measurements is above 135/85. In this case the Morning Hypertension Symbol is displayed when the Evening Average is displayed, regardless of the values for the Evening Average. -
Page 44: Downloading Instructions
INSTALLING THE SOFTWARE Optional Instructions for PC Connection To install software, choose either Microsoft Health Management software. DOWNLOADING AND INSTALLING MICROSOFT HEALTHVAULT HealthVault is a free Web-based platform designed to put people in control of their health data. It helps them collect, store and share health information with family members and participating healthcare providers, and provides people with a choice of third-party applications and devices to help them manage things such as fitness, diet and health. - Page 45 INSTALLING THE SOFTWARE OPERATING ENVIRONMENT REQUIREMENTS The following operating environments are required to run Microsoft HealthVault. HealthVault works best with the following operating systems: Supported OS*: Either 32-bit or 64-bit versions of: Microsoft Windows Vista Home Premium Windows Vista Business Windows Vista Enterprise Windows Vista Ultimate 32-bit versions of:...
-
Page 46: Downloading And Installing Omron
Omron Health Management Software allows you to view, process and print data about blood pressure and walking measured by Omron’s compatible blood pressure monitor and pedometer. • To install Omron Health Management Software onto your PC, you must have administrative privileges. - Page 47 INSTALLING THE SOFTWARE OPERATING ENVIRONMENT REQUIREMENTS The following operating environments are required to run the Omron Health Management software. Microsoft Supported OS: Microsoft Microsoft 600 MHz or higher, Pentium compatible CPU, PC/AT compatible machine Memory capacity: 128MB or more 32MB or more Hard disc space: Display resolution: Super VGA (800 adapter and monitor...
-
Page 48: Using The Software
USING THE SOFTWARE For help using the software, double-click [Omron Health Management Software Users Manual.pdf] shortcut on desktop, or click [Help] in this software after starting up. 1. Double-click the [Omron Health Management Software] shortcut icon on the desktop. If no icon appears on the desktop: From the [Start] menu, select [All programs] or [Programs] [Omron Health Management Software], and click the [Omron Health Management Software] shortcut. - Page 49 USING THE SOFTWARE 3. In the New User Registration box, enter your name (e.g., Chuck) and click [OK]. NOTES: • Omron Health Management Software can manage multiple users’ data. Data is controlled by user name. • The number of users who can register for this software varies depending on the amount of free disc space in your PC.
- Page 50 USING THE SOFTWARE Use only the authorized Omron USB cable, Model HHX-CABLE- USB2, included with this unit. CAUTION Use only Omron authorized parts and accessories. Parts and accessories not approved for use with the device may damage the unit. Open the USB Port cover. Plug the normal USB Connector (Large Connector) into the personal computer.
- Page 51 USING THE SOFTWARE Click [Download Data] icon to import the data. The Confirm dialog appears. Make sure your cable is connected then click [Yes]. Select the blood pressure monitor being used and click [OK]. Start importing data. Click [Cancel] if you want to cancel.
-
Page 52: Care And Maintenance
CARE AND MAINTENANCE To keep your digital blood pressure monitor in the best condition and protect the unit from damage, follow the directions listed below: Keep the monitor in the storage case when not in use. Make sure the AC adapter is placed under the main unit so that it does not damage the display. - Page 53 CARE AND MAINTENANCE Use the unit consistent with the instruction provided in this manual. CAUTION Changes or modification not approved by Omron Healthcare will void the user warranty. Do not disassemble or attempt to repair the unit or components. CAUTION Use only Omron authorized parts and accessories.
-
Page 54: Error Indicators And Troubleshooting Tips
ERROR INDICATORS AND TROUBLESHOOTING TIPS ERROR INDICATORS SYMBOL Cuff under-inflated. Cuff not applied correctly. Cuff over-inflated Monitor could not detect pulse wave. Air plug is not connected. Batteries are worn CAUSE Single Mode Remove the arm cuff. Read, “Taking a Measurement”. Take another measurement. -
Page 55: Troubleshooting Tips
ERROR INDICATORS AND TROUBLESHOOTING TIPS TROUBLESHOOTING TIPS PROBLEM No power. No display appears on the unit. Measurement values appear too high or too low. CAUSES AND SOLUTIONS Replace all four batteries with new ones. Check the battery installation for proper placement of the battery polarities. -
Page 56: Fcc Statement
FCC STATEMENT NOTE: POTENTIAL FOR RADIO/TELEVISION INTERFERENCE (for U.S.A. only) This product has been tested and found to comply with the limits for a Class B digital device, pursuant to part 15 of the FCC rules. These limits are designed to provide reasonable protection against harmful interference in a residential installation. -
Page 57: Warranty
® HEM-790IT IntelliSense ® Automatic Blood Pressure Monitor, excluding the arm cuff, is warranted to be free from defects in materials and workmanship appearing within 5 years from the date of purchase, when used in accordance with the instructions provided with the monitor. The arm cuff is... -
Page 58: Specifications
Model: Display: Measurement Range: Accuracy/Calibration: Pressure: ±3mmHg or 2% of reading Inflation: Deflation: Rapid Air Release: Pressure Detection: Measurement Method: Oscillometric method Pulse Wave Detection: Capacitance type pressure sensor Power Source: Battery Life: Operating Temperature 50ºF to 104ºF (10ºC to 40ºC) /15 to 90% RH /Humidity: Storage Temperature /Humidity/Air Pressure: /700 - 1060 hPa... -
Page 59: Notes
NOTES... - Page 60 Manufactured by OMRON HEALTHCARE Made in China Distributed by: OMRON HEALTHCARE, INC. 1200 Lakeside Drive Bannockburn, Illinois 60015 www.omronhealthcare.com Copyright © 2009 Omron Healthcare, Inc.
- Page 61 MANUAL DE INSTRUCCIONES Monitor automático de presión sanguínea con banda para el brazo ComFit HEM-790IT Modelo...
- Page 62 Antes de usar el monitor Introducción ..........4 Información de seguridad .
- Page 63 Cómo hacer una medición ........27 Uso del modo Guest .
-
Page 64: Antes De Usar El Monitor
Gracias por adquirir el monitor de presión sanguínea automático HEM-790IT IntelliSense Complete los siguientes datos para consultas futuras. FECHA DE COMPRA: _________________ NíMERO DE SERIE: ___________________ Abroche aquí su recibo de compra. Su nuevo monitor de presión sanguínea digital usa el método oscilométrico para la medición de la presión sanguínea. -
Page 65: Información De Seguridad
INFORMACIÓN DE SEGURIDAD Para garantizar el uso correcto del producto, siempre se deberán aplicar las medidas de seguridad básicas, incluyendo las advertencias y precauciones que se enumeran en este manual de instrucciones. SÍMBOLOS DE SEGURIDAD QUE SE UTILIZAN EN ESTE MANUAL DE INSTRUCCIONES ADVERTENCIA PRECAUCIÓN OPERACIÓN DEL DISPOSITIVO... - Page 66 INFORMACIÓN DE SEGURIDAD OPERACIÓN DEL DISPOSITIVO (continuación) Lea la sección sobre condiciones especiales (página 36) del manual de instrucciones si le consta que su presión sistólica es de más de 220 mmHg. Inflar el dispositivo a una presión más alta que la necesaria puede provocar magulladuras en el lugar donde se aplica la banda.
-
Page 67: Riesgo De Descarga Eléctrica
Guarde el dispositivo y los componentes en un lugar limpio y seguro. Los cambios o las modificaciones que no hayan sido aprobados por Omron Healthcare anularán la garantía del usuario. No desarme ni trate de reparar la unidad ni los componentes... -
Page 68: Antes De Hacer Una Medición
ANTES DE TOMAR UNA MEDICIÓN A fin de garantizar una lectura confiable, siga estas recomendaciones: 1. Evite comer, tomar bebidas alcohólicas, fumar, hacer ejercicio y bañarse durante 30 minutos antes de tomar una medición. Descanse durante al menos 15 minutos antes de tomar la medición. -
Page 69: Instrucciones De Funcionamiento
Instrucciones de funcionamiento CONOZCA SU UNIDAD Unidad principal: Botón ( Botones ( de promedio matutino/nocturno Botón SET (Configurar) Pantalla Interruptor de selección de la ID DE USUARIO Botón START/STOP (Inicio/Detener) Puerto USB Enchufe ) de memoria hembra del aire Compartimiento de las pilas Enchufe del adaptador de CA... - Page 70 CONOZCA SU UNIDAD Componentes: Bastidor Tubo de aire Cable Adaptador de CA Enchufe macho del aire (Se conecta al enchufe hembra del aire) Banda para el brazo Cuatro pilas “AA” Estuche Cable USB Guía rápida de inicio Manual de instrucciones...
-
Page 71: Pantalla De La Unidad
PANTALLA DE LA UNIDAD Presión sanguínea sistólica Símbolo de ID DEL USUARIO (A o B) Presión sanguínea diastólica Símbolo de hipertensión matutina Símbolo de latido cardíaco Símbolo de promedio matutino Símbolo de movimiento Símbolo de promedio nocturno Símbolo de latido cardíaco irregular Símbolo de valor promedio Símbolo de desinflado... -
Page 72: Símbolos De Visualización
SÍMBOLOS DE LA PANTALLA SÍMBOLO DE LATIDO CARDÍACO IRREGULAR ( Cuando el monitor detecta un ritmo irregular dos o más veces durante la medición, aparece en la pantalla el símbolo de latido cardíaco irregular ( ) con los valores de medición. El ritmo cardíaco irregular se define como un ritmo que es un 25% más lenta o 25% más rápida del ritmo promedio que se... -
Page 73: Símbolo De Hipertensión Matutina
Omron Healthcare le recomienda que se ponga en contacto con el médico si el SÍMBOLO DE HIPERTENSIÓN MATUTINA y/o el SÍMBOLO DE LATIDO CARDIACO aparecerán en la pantalla junto con los valores de medición. -
Page 74: Símbolo De Latido Cardíaco
SÍMBOLOS DE LA PANTALLA SÍMBOLO DEL LATIDO CARDÍACO ( CÓMO REALIZAR UNA MEDICIÓN El símbolo de la latido cardíaco parpadeará en la pantalla durante la medición. El símbolo de latido cardíaco parpadeará ante cada latido. Una vez que se complete la medición, el símbolo de latido cardíaco parpadeará... -
Page 75: Instalación De La Batería
COLOCACIÓN DE LAS PILAS 1. Presione el indicador cubierta de las pilas y deslice la cubierta en la dirección que indica la flecha. 2. Instale 4 pilas de tamaño “AA” de modo que las polaridades + (positiva) y - (negativa) conincidan con las polaridades que se indican en el compartimiento de las pilas. - Page 76 COLOCACIÓN DE LAS PILAS CAMBIO DE LAS PILAS Cuando el indicador de batería baja aparezca en la pantalla, apague el monitor y retire todas las pilas. Coloque cuatro pilas nuevas al mismo tiempo. Se recomienda usar pilas alcalinas de larga duración. PRECAUCIÓN En caso de que el fluido de las pilas entre en contacto con los ojos, enjuague de inmediato con abundante agua limpia.
-
Page 77: Uso Del Adaptador De Ca
USO DEL ADAPTADOR DE CA Únicamente utilice el adaptador de CA de Omron autorizado que ha sido diseñado para este monitor. Le recomendamos colocar las pilas incluso si utiliza el adaptador de CA. Si no hay pilas colocadas, es posible que necesite volver a configurar la fecha y hora si el adaptador de CA se desconecta. - Page 78 USO DEL ADAPTADOR DE CA CONEXIÓN DEL ADAPTADOR DE CA Inserte el enchufe macho del adaptador de CA en el enchufe hembra del adaptador de CA ubicado en la parte trasera del monitor como se indica en la ilustración. Enchufe el adaptador de CA a un tomacorrientes de 120 VCA (60 ciclos).
-
Page 79: Configuración De La Fecha Y Hora
CONFIGURACIÓN DE LA FECHA Y HORA Configure el monitor con la fecha y hora actuales antes de tomar una medición por primera vez. Si no configura la fecha y la hora correctamente, es posible que los valores de medición y los valores promedio no se guarden correctamente en la memoria. - Page 80 CONFIGURACIÓN DE LA FECHA Y HORA 2. CONFIGURACIÓN DEL AÑO El año se podrá configurar entre 2007 y 2030. Cuando la pantalla llegue a 2030, volverá a 2007. Presione el botón Memoria ( ) para avanzar con incrementos de un año. Presione el botón SET (Configurar) para establecer el año actual.
- Page 81 CONFIGURACIÓN DE LA FECHA Y HORA 4. CONFIGURACIÓN DEL DÍA Presione el botón Memoria ( ) para avanzar con incrementos de un día. Presione el botón SET (Configurar) para establecer el día actual. La hora parpadeará en la pantalla. 5. CONFIGURACIÓN DE LA HORA La hora se configura con AM o PM.
- Page 82 CONFIGURACIÓN DE LA FECHA Y HORA RECONFIGURACIÓN DE LA FECHA Y HORA Para ajustar la fecha u hora después de haberla configurado la primera vez que usa la unidad. Comience con el monitor en la posición apagado. 1. Presione y mantenga presionado el botón SET. El símbolo TruRead o apagado) aparecerán en la pantalla para la ID DE USUARIO seleccionada.
-
Page 83: Colocación De La Banda Para El Brazo
COLOCACIÓN DE LA BANDA PARA EL BRAZO PRECAUCIÓN Lea toda la información del manual de instrucciones y cualquier otro material impreso incluido en la caja antes de usar la unidad. PRECAUCIÓN Este dispositivo está destinado para medir la presión sanguínea y el pulso de los pacientes adultos. - Page 84 COLOCACIÓN DE LA BANDA PARA EL BRAZO 3. Siéntese en una silla con los pies apoyados en el piso. Coloque el brazo en una mesa de modo que la banda quede en el mismo nivel que el corazón. 4. Sostenga firmemente el soporte para el pulgar del brazalete con la mano derecha.
- Page 85 COLOCACIÓN DE LA BANDA PARA EL BRAZO 6. Coloque el brazalete en la parte superior del brazo izquierdo de modo que la tira azul quede en la parte interna del brazo y alineada con el dedo medio. El tubo de aire corre hacia abajo por la parte interna del brazo.
- Page 86 COLOCACIÓN DE LA BANDA PARA EL BRAZO COLOCACIÓN DE LA BANDA PARA EL BRAZO EN EL BRAZO DERECHO Cuando realice una medición en el brazo derecho, use estas instrucciones para el paso 6 de la página 25. Coloque la banda en la parte superior del brazo derecho de modo que el agarre para el pulgar quede centrado en la parte interna del brazo.
-
Page 87: Cómo Hacer Una Medición
CÓMO REALIZAR UNA MEDICIÓN El monitor ha sido diseñado para tomar mediciones y guardar los valores de medición en la memoria para dos personas, utilizando la ID DE USUARIO A e ID DE USUARIO B. El monitor también se podrá usar para tomar una sola medición a otras personas con el modo GUEST (Invitado). -
Page 88: Selección Del Id Del Usuario
CÓMO REALIZAR UNA MEDICIÓN 3. El inflado se detendrá y se iniciará la medición. Una vez que scomplete la medición, la presión sanguínea y el pulso aparecerán en la pantalla. SELECCIÓN DE LA ID DE USUARIO Seleccione su ID DE USUARIO. Use siempre la misma ID DE USUARIO al realizar una medición. -
Page 89: Selección Del Modo Truread
CÓMO REALIZAR UNA MEDICIÓN SELECCIÓN DEL MODO TruRead 1. Seleccione la ID DE USUARIO (A o B). 2. Presione y mantenga presionado el botón SET. El símbolo TruRead aparecerán en la pantalla. 3. Presione el botón Memoria ( para seleccionar on (encendido). NOTA: Presione el botón Memoria para alternar entre on (encendido) y oFF (apagado). - Page 90 CÓMO REALIZAR UNA MEDICIÓN 4. Presione el botón SET (Configurar) para confirmar el cambio. La cantidad de segundos entre cada medición aparecerán en pantalla. NOTA: El valor predeterminado entre cada medición es de 60 segundos. 5. Presione el botón MEMORY (Memoria) ( intervalo de tiempo entre cada medición.
-
Page 91: Uso Del Modo Single
CÓMO REALIZAR UNA MEDICIÓN 7. Si la fecha y la hora son correctas, presione el botón START/STOP (Inicio/Detener) para apagar el monitor. Para cambiar la fecha y la hora consulte la página 19, CONFIGURACIÓN DE LA FECHA Y HORA. PRECAUCIÓN No use teléfonos celulares cerca del dispositivo. - Page 92 CÓMO REALIZAR UNA MEDICIÓN 2. Presione el botón START/STOP (Inicio/Detener). Todos los símbolos aparecerán en la pantalla. El símbolo de la ID DE USUARIO que ha seleccionado parpadeará en la pantalla. La banda comenzará a inflarse automáticamente. A medida que la banda empiece a inflarse, el monitor determinará...
- Page 93 CÓMO REALIZAR UNA MEDICIÓN 4. Una vez que se haya completado la medición, la banda se desinflará por completo. Aparecerán la presión sanguínea y el pulso. 5. Presione el botón START/STOP (Inicio/Detener) para apagar el monitor. NOTA: El monitor se apagará automáticamente después de cinco minutos.
-
Page 94: Uso Del Modo Truread
CÓMO REALIZAR UNA MEDICIÓN USO DEL MODO TruRead 1. Seleccione la ID DE USUARIO (A o B). 2. Presione el botón START/STOP (Inicio/Detener). Todos los símbolos aparecerán en la pantalla. El símbolo de la ID DE USUARIO que ha seleccionado parpadeará en la pantalla. La banda comenzará... - Page 95 CÓMO REALIZAR UNA MEDICIÓN La segunda medición se ha completado, espere para iniciar la próxima medición. Las mediciones consecutivas se han completado. El promedio de las tres mediciones aparecerá en la pantalla. 5. Presione el botón SET (Configurar) para visualizar la presión sanguínea y el pulso de la primera medición.
-
Page 96: Condiciones Especiales
CÓMO REALIZAR UNA MEDICIÓN CONDICIONES ESPECIALES PRECAUCIÓN Inflar el dispositivo a una presión más alta que la necesaria puede provocar magulladuras en el lugar donde se aplique la banda. Si le consta que su presión sistólica es mayor que 220 mmHg, presione y mantenga presionado el botón START/STOP (Inicio/Detener) hasta que el monitor se infle de 30 a 40 mmHg más que su presión sistólica esperada. -
Page 97: Uso De La Función Memoria
USO DE LA FUNCIÓN MEMORIA El monitor ha sido diseñado para guardar la presión sanguínea y el pulso en la memoria para dos personas (USUARIO A y USUARIO B) cada vez que se complete una medición. El monitor guardará automáticamente hasta 84 conjuntos de valores de medición (presión sanguínea y pulso) para cada usuario (A y B). -
Page 98: Para Mostrar Los Valores De Medición
USO DE LA FUNCIÓN MEMORIA PARA MOSTRAR LOS VALORES DE MEDICIÓN 1. Seleccione la ID DE USUARIO (A o B). 2. Presione el botón Memoria ( El símbolo de Promedio ( ) aparecerá en la pantalla cuando aparezca la lectura promedio. - Page 99 USO DE LA FUNCIÓN MEMORIA 3. Presione el botón Memoria ( de medición más reciente en la pantalla. Los valores aparecerán desde el más reciente hasta el más antiguo. NOTA: La fecha y hora se visualizarán alternativamente con los valores de medición.
-
Page 100: Promedios Matutinos Y Nocturnos
USO DE LA FUNCIÓN MEMORIA PROMEDIOS MATUTINOS Y NOCTURNOS El monitor calculará y mostrará un promedio semanal para las mediciones que se realicen durante la mañana ( ) y la tarde ( ). El monitor guardará 8 semanas de promedios matutinos y 8 semanas de promedios nocturnos para cada usuario (A y B). -
Page 101: Para Mostrar Los Promedios Matutinosy Nocturnos
USO DE LA FUNCIÓN MEMORIA PARA MOSTRAR LOS PROMEDIOS MATUTINOS Y NOCTURNOS 1. Seleccione la ID DE USUARIO (A o B). 2. Presione el botón de promedio matutino ( ) o el botón de promedio nocturno ( El promedio para la semana actual “THIS WEEK”... -
Page 102: Combinaciones De Pantalla
USO DE LA FUNCIÓN MEMORIA COMBINACIONES DE PANTALLA Además de los símbolos de promedio matutino y promedio nocturno, el monitor también mostrará el símbolo de hipertensión matutina si el promedio matutino para esa semana es superior al de las pautas de la AHA. (Consulte la página 13 para obtener información más detallada.) Según los resultados de la medición, éstos se podrán mostrar dentro de las siguientes combinaciones. -
Page 103: Para Borrar Todos Los Valores Almacenados En La Memoria
USO DE LA FUNCIÓN MEMORIA El símbolo de hipertensión matutina semanal para las mediciones matutinas es superior a 135/85. En este caso, el símbolo de hipertensión matutina pantalla cuando se visualice el promedio nocturno, independientemente de los valores correspondientes al promedio nocturno. PARA BORRAR TODOS LOS VALORES QUE SE GUARDAN EN LA MEMORIA. -
Page 104: Instalación Del Software
INSTALACIÓN DEL SOFTWARE Instrucciones opcionales para Para instalar software, seleccione Microsoft® HealthVaultTM u Omron Health Management software. DESCARGA E INSTALACIÓN DE MICROSOFT® HEALTHVAULT HealthVault es una plataforma basada en Internet gratuita diseñada para que las personas tengan control sobre sus datos de salud. Los ayuda a recopilar, almacenar y compartir información sobre la salud con sus parientes y proveedores de atención médica participantes, y les da la alternativa de acceder a aplicaciones y dispositivos de terceros para... - Page 105 INSTALACIÓN DEL SOFTWARE REQUERIMIENTOS DE ENTORNO OPERATIVO Se requieren los siguientes entornos operativos para poder utilizar Microsoft HealthVault. ® Sistemas operativos compatibles*: HealthVault funciona mejor con los sistemas operativos HealthVault no funcionará con las versiones de Windows anteriores a Windows XP SP2, cualquier versión de Windows XP de 64 bits, Windows Vista Starter, ni con cualquier versión de Windows Server.
-
Page 106: Descarga E Instalación De Omron Health Management Software
INSTALACIÓN DEL SOFTWARE DESCARGA E INSTALACIÓN DE OMRON HEALTH MANAGEMENT SOFTWARE Omron Health Management Software le permite ver, procesar e imprimir datos sobre su presión arterial y caminata medidos con el monitor de la presión arterial y podómetro compatibles de Omron. •... - Page 107 INSTALACIÓN DEL SOFTWARE REQUISITOS DE ENTORNO OPERATIVO Se requieren los siguientes entornos operativos para poder utilizar Omron Health Management Software Sistemas operativos compatibles: Capacidad de memoria: 128MB o más Espacio en disco duro: Resolución de pantalla: Otros: Marca comercial y marca registrada •...
-
Page 108: Uso Del Software
USO DEL SOFTWARE Para obtener ayuda acerca del uso del software, haga doble click en el acceso directo al Manual del Usuario del Software para la Administración de la Salud de Omron.pdf [Omron Health Management Software Users Manual.pdf] en el escritorio, o haga click en Ayuda [Help] en este software luego de comenzar. - Page 109 USO DEL SOFTWARE 3. Ingrese su nombre en la casilla Registro de Nuevo usuario (ej., Chuck) y haga click en Aceptar [OK]. NOTAS: • El Software para la administración de la Salud de Omron podrá manejar información de múltiples usuarios. La información será controlada según el nombre de usuario.
- Page 110 USO DEL SOFTWARE Utilice sólo el cable USB autorizado por Omron, Modelo HHX-CABLE-USB2, incluído en esta unidad. PRECAUCIÓN Use sólo las piezas y los accesorios Omron autorizados. Las piezas y los accesorios que no hayan sido aprobados para el uso con el dispositivo pueden causar daños en la unidad.
- Page 111 USO DEL SOFTWARE Haga click en el ícono Descargar Información [Download Data] para importar la información. Aparecerá la ventana de Confirmación. Asegúrese de que su cable esté conectado, luego haga click en Sí [Yes]. Seleccione el monitor de presión sanguínea en uso y haga click en Aceptar [OK].
-
Page 112: Cuidado Y Mantenimiento
CUIDADO Y MANTENIMIENTO Para mantener el monitor de presión sanguínea digital en las mejores condiciones y proteger la unidad de modo que no se dañe, siga estas instrucciones: Guarde el monitor en el estuche cuando no esté en uso. Asegúrese de que el adaptador de CA esté... - Page 113 PRECAUCIÓN Los cambios o las modificaciones que no hayan sido aprobados por Omron Healthcare anularán la garantía del usuario. No desarme ni trate de reparar la unidad ni los componentes. PRECAUCIÓN Use sólo las piezas y los accesorios Omron autorizados. Las piezas y los accesorios que no hayan sido aprobados para el uso con el dispositivo pueden causar daños en la unidad.
-
Page 114: Indicadores De Error Y Solución De Problemas
INDICADORES DE ERROR Y SOLUCIÓN DE PROBLEMAS INDICADORES DE ERROR SÍMBOLO La banda no está lo suficientemente inflada. La banda no está colocada correctamente. La banda está inflada en exceso El monitor no pudo detectar el pulso. El enchufe macho del aire no está... - Page 115 INDICADORES DE ERROR Y SOLUCIÓN DE PROBLEMAS SUGERENCIAS PARA LA SOLUCIÓN DE PROBLEMAS PROBLEMA No hay alimentación eléctrica. No aparece ningún símbolo en la pantalla de la unidad. Los valores de medición parecen ser demasiado altos o demasiado bajos. CAUSAS Y SOLUCIONES Cambie las cuatro pilas por pilas nuevas.
-
Page 116: Declaración De La Fcc
DECLARACIÓN DE LA FCC NOTA: POTENCIAL DE INTERFERENCIA DE RADIO/TELEVISIÓN (para EE.UU. solamente) Este producto ha sido probado y cumple con los límites de un dispositivo digital de Clase B, de acuerdo con la sección 15 de las normas de la FCC. Estos límites fueron diseñados para proporcionar una protección razonable contra interferencias perjudiciales cuando utilice el equipo en una instalación residencial. -
Page 117: Garantía
GARANTÍA GARANTÍAS LIMITADAS El monitor de presión sanguínea automático Omron ® HEM-790IT IntelliSense ® salvo la banda para el brazo y el software OHMS, está garantizado como libre de defectos en materiales y mano de obra que se presenten dentro de los 5 años a partir de la fecha de compra, si se usa de acuerdo con las instrucciones que se suministran con el monitor. -
Page 118: Especificaciones
ESPECIFICACIONES Modelo: Pantalla: Límites de medición: Precisión/Calibración: Inflado: Desinflado: Liberación rápida de presión: Detección de presión: Método de medición: Detección del pulso: Fuente de alimentación: Vida útil de las pilas: Temperatura de funcionamiento /Humedad: Temperatura de almacenamiento /Humedad/Presión de aire: Peso de la unidad principal: Dimensiones de la unidad principal: Tamaño de la banda:... -
Page 119: Notas
NOTAS... - Page 120 Fabricado por OMRON HEALTHCARE Hecho en China Distribuido por: OMRON HEALTHCARE, INC. 1200 Lakeside Drive Bannockburn, Illinois 60015 www.omronhealthcare.com Copyright © 2009 Omron Healthcare, Inc. 5328271-1A...