Furuno FM-8900S Operator's Manual
Vhf radiotelephone
Hide thumbs
Also See for FM-8900S:
- Operator's manual (136 pages) ,
- Installation manual (61 pages) ,
- Gmdss manual (6 pages)
Table of Contents
Advertisement
Quick Links
Advertisement
Table of Contents
Troubleshooting

Related Manuals for Furuno FM-8900S


Summary of Contents for Furuno FM-8900S
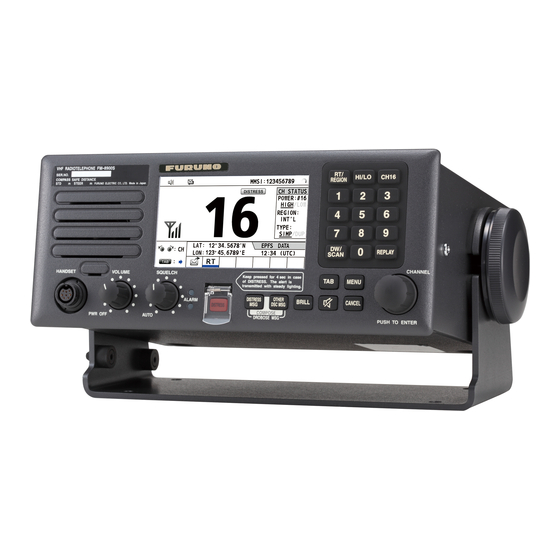
- Page 1 OPERATOR'S MANUAL VHF RADIOTELEPHONE FM-8900S Model www.furuno.com...
- Page 2 ・FURUNO Authorized Distributor/Dealer 9-52 Ashihara-cho, Nishinomiya, 662-8580, JAPAN A : APR 2012 Printed in Japan All rights reserved. E1 : OCT . 03, 2013 Pub. No. OME-56800-E1 ( GREG ) FM-8900S 0 0 0 1 7 6 1 9 9 1 4...
-
Page 3: Important Notices
How to discard a used battery Some FURUNO products have a battery(ies). To see if your product has a battery, see the chapter on Maintenance. Follow the instructions below if a battery is used. Tape the + and - terminals of battery before disposal to prevent fire, heat generation caused by short circuit. -
Page 4: Safety Instructions
Contact The antenna emits radio waves that a FURUNO dealer or agent for advice. can be harmful to the human body. Make sure no rain or water splash Distance Description RF power density on leaks into the equipment. - Page 5 Time of transmission WARNING LABELS Warning labels are attached to the equipment. Do not remove any label. If a label is missing or damaged, contact a FURUNO agent or dealer about replacement. Name: Warning Label 1 Name: Warning Label...
- Page 6 DISTRESS ALERT How to send a distress alert Below is the procedure for transmitting a distress alert via radiotelephone. Transmit the distress alert when a life-endangering situation occurs on your vessel. 1. Open the DISTRESS key cover then press and hold the DISTRESS key for four seconds. HI/LO CH16 REGION...
- Page 7 DISTRESS ALERT Note: If you do not receive the distress alert acknowledge call, the equipment automatically re- transmits the distress alert after 3 min 30 seconds to 4 min 30 seconds. Then the equipment awaits the distress alert acknowledge call. This is repeated until the distress alert is acknowl- edged.
-
Page 8: Table Of Contents
TABLE OF CONTENTS FOREWORD ........................ix SYSTEM CONFIGURATION ..................xi OPERATIONAL OVERVIEW .................1-1 1.1 Controls........................1-1 1.2 How to Turn On/Off the Power................... 1-2 1.3 Radiotelephone (RT) Screen ..................1-2 1.4 How to Adjust the Brilliance of the Display and Panel ..........1-3 1.5 How to Select the Channel Region, Channel............. - Page 9 TABLE OF CONTENTS 4.4 All Ships Call ......................4-11 4.4.1 How to send an all ships call ................4-11 4.4.2 How to receive an all ships call ..............4-12 4.5 Position Call......................4-13 4.5.1 How to request other ship's position.............4-13 4.5.2 Other ship requests your position..............4-15 4.6 How to Receive a Polling Request ................4-15 4.6.1 Automatic reply.....................4-15...
- Page 10 6.9 Intercom ........................6-5 6.10 How to Change the Terminal ID................. 6-6 6.11 Audio setting ......................6-7 6.12 How to Test FM-8900S from a Remote Handset ............6-8 6.13 How to Display the Program Versions ............... 6-8 6.14 Squelch ........................6-8 MAINTENANCE &...
-
Page 11: Foreword
Thank you for considering and purchasing FURUNO equipment. Features The FM-8900S is a cost-effective all-in-one marine VHF radio system consisting of a 25 W VHF radiotelephone, a DSC modem, and a CH70 watchkeeping receiver. It complies with GMDSS car- riage requirements for safety and general communications. - Page 12 • PSTN (Public Switched Telephone Network) capability standard • Log stores 50 each of latest general, distress and transmitted messages, in separate memory blocks. • Selectable an address from the AIS targets list with connection of FURUNO AIS Transponder/ Receiver • Voice communication •...
-
Page 13: System Configuration
SEM-21Q ANALOG WING PLOTTER HANDSET PRINTER JUNCTION TRANSCEIVER HS-6000FZ5/ MIC RECEPTACLE PP-520/ UNIT* HS-6000FZ11 BOX RBD-VHF (B) PP-8800A IF-8900 FM-8900S MIC RECEPTACLE ANALOG WING PRINTER BOX RBD-VHF (B) HANDSET INTERFACE HS-6000FZ5/ IF-8500 REMOTE STATION HS-6000FZ11 RB-8900/RB-8900-W REMOTE STATION PRINTER RB-8900/RB-8900-W... - Page 14 SYSTEM CONFIGURATION This page is intentionally left blank.
-
Page 15: Operational Overview
OPERATIONAL OVERVIEW Controls HI/LO CH16 REGION REPLAY SCAN CHANNEL HANDSET Keep pressed for 4 sec in case VOLUME SQUELCH of DISTRESS. The alert is MENU transmitted with steady lighting. DISTRESS OTHER ALARM BRILL CANCEL DSC MSG DISTRESS COMPOSE PWR OFF AUTO DROBOSE MSG PUSH TO ENTER... -
Page 16: How To Turn On/Off The Power
1. OPERATIONAL OVERVIEW Control Function RT/REGION key • Switches to the RT (radiotelephone) screen. • Opens/closes the option window for channel region. HI/LO key Changes the output power to high (25 W) or low (1 W). CH16 key Switches to the RT (radiotelephone) screen and sets CH16. 0 to 9 keys •... -
Page 17: How To Adjust The Brilliance Of The Display And Panel
1. OPERATIONAL OVERVIEW Meaning Spinner rotates when the equipment is functioning normally. This icon appears when the frequency is for distress. Channel Output power ([HIGH], [LOW]) Channel region ([INT’L], [USA], [CANADA], [INLAND-W], [PRIVATE]) Channel type ([SIMP]: Simplex, [DUP]: Duplex) Guidance: Rotate the CHANNEL/ENTER knob to select channel. Guidance: Press the TAB key to switch the session. -
Page 18: How To Select The Channel Region, Channel
1. OPERATIONAL OVERVIEW How to Select the Channel Region, Channel Channel region You can select the channel region by the RT/REGION key or the [REGION] menu. By the RT/REGION key 1. Press the RT/REGION key to open the [REGION] option on the RT screen. -
Page 19: Transmission
1. OPERATIONAL OVERVIEW Transmission How to transmit Press the PTT (push-to-talk) switch on the handset with off hook to talk, and release it to listen for a response. "TX" appears on the screen during transmission. [PTT] This icon switch appears during transmission. -
Page 20: How To Scan Dual Channels (Dw)
1. OPERATIONAL OVERVIEW How to Scan Dual Channels (DW) The DW function permits watch on CH16 and an operator-selected channel. CH16 and another channel are watched at intervals of 0.15 seconds and one second, re- spectively. 1. Select the other channel to watch then press the DW/SCAN key to show the [DW/SCAN] option. -
Page 21: How To Scan All Channels
1. OPERATIONAL OVERVIEW 1.10 How to Scan All Channels The receiver scans all channels at intervals of 0.15 seconds in the selected channel mode in ascending channel order, watching CH16 between channels as below: 04... 16... Note: TX is disabled when scanning. 1. -
Page 22: How To Set The Auto Acknowledgement
You can interrupt remote station operation at any time with the handset of the main unit. When you hook off the handset of the main unit, "OCCUPIED BY: FM-8900S" (Default. This can be changed.) is indicated on all remote stations. Each remote sta- tion has its own priority. -
Page 23: Intercom
1. OPERATIONAL OVERVIEW 1.13 Intercom The built-in intercom permits voice communications between two terminals. Calling You can call over the intercom in on or off hook condition. 1. Press the MENU key to open the [MENU] screen. 2. Rotate the CHANNEL/ENTER knob to select [INTERCOM] then push the knob. -
Page 24: Operation Of Session
1. OPERATIONAL OVERVIEW 1.14 Operation of Session Description of session There are two types of sessions: RT session and DSC session. When a session starts, the applicable icon for the session appears in the tab area. RT session DSC sessions Tab area How to finish a single session RT session... - Page 25 1. OPERATIONAL OVERVIEW How to start a new session When another session is active: • When sending the distress alert, all sessions except the distress alert TX session automatically close then the distress alert TX session starts. • When doing an RT session or sending a non-distress DSC message, the currently active session is put on hold then the RT session or non-distress DSC message TX session starts.
- Page 26 1. OPERATIONAL OVERVIEW Only the screen for the selected session appears. ACCEPT To finish this session, rotate the CHANNEL/ENTER knob to select A blue line is displayed [QUIT] then push the knob. for an active session. Note: When waiting for the ACK, that is, the session is in progress, the confirmation message appears.
-
Page 27: Replay Function
1. OPERATIONAL OVERVIEW 1.15 Replay Function You can replay a recorded voice, which has been received recently, for a total of 120 seconds. The recorded voices are saved in this equipment with the channel informa- tion, and deleted when turning the power off. The channel information is also dis- played on the replay screen. - Page 28 1. OPERATIONAL OVERVIEW This page is intentionally left blank. 1-14...
-
Page 29: Dsc Overview
DSC OVERVIEW What is DSC? DSC is an acronym meaning Digital Selective Calling. It is a digital distress and gen- eral calling system in the VHF band used by ships for transmitting distress alerts and general calls and by coast stations for transmitting the associated acknowledgements. For DSC distress, safety and urgency callings in the VHF band, the channel is 70. -
Page 30: Audio Alarms
2. DSC OVERVIEW Contents of a DSC call • Calling category DISTRESS: DISTRESS ALERT, DISTRESS RELAY ALL, DISTRESS RELAY IN- DIVIDUAL, DISTRESS RELAY AREA (Received only), DISTRESS ACK GENERAL: MEDICAL MSG, NEUTRAL MSG, INDIVIDUAL MSG, PSTN MSG, TEST MSG, GROUP MSG, ALL SHIPS MSG, POSITION MSG, POLLING MSG •... -
Page 31: Description Of Call Screens
2. DSC OVERVIEW Alarm When Frequency (interval) Ordinary The following sessions are received: The following set is repeated: alarm • Safety: all ships, individual, position, or test. 750 Hz (50 ms) and 650 Hz (50 ms); ten times → silent •... -
Page 32: Tx Calls
2. DSC OVERVIEW The characters "*", "-" appear on the DSC receiving screen in the following conditions: • "*" indicates a corrupt character in received data. • "-" indicates no info for position data after decimal point. Examples: 1) When there is no position data after decimal point, the indication is "LAT: 12°34’N". -
Page 33: Dsc Distress Operations
DSC DISTRESS OPERATIONS Distress operation overview 1. Press the DISTRESS key. 2. Wait for the distress alert acknowledgement. 3. Communicate with the coast station. Ship in distress (Your ship) Coast station (1) Ship in distress sends Distress Alert. (2) Coast station sends distress acknowledgement (DIST ACK). (3) Voice communication between ship in distress and coast station. - Page 34 3. DSC DISTRESS OPERATIONS The audio alarm sounds while pressing the key, and the key flashes in red. The countdown message appears on the screen while pressing the DISTRESS key (3s → 2s → 1s → 0s). Countdown message When the countdown shows 0s, the distress alert is sent. The audio alarm sounds for two seconds and the message "Sending DISTRESS ALERT."...
-
Page 35: How To Send A Distress Alert By Distress Key With Distress Information Edited
3. DSC DISTRESS OPERATIONS When the distress acknowledge call is received, the audio alarm sounds, the LED flashes in red, and the icon for DISTRESS transmission ( ) appears. The screen changes as below. 2. Press the CANCEL key to silence the audio alarm. Then, the LED stops flashing, and the pop-up message disappears. -
Page 36: How To Receive A Distress Alert
3. DSC DISTRESS OPERATIONS 2. With [NATURE] selected, push the CHANNEL/ENTER knob. 3. Rotate the CHANNEL/ENTER knob to select the nature of distress, among the following 11 selections, then push the knob. • UNDESIGNATED • FIRE • FLOODING • COLLISION •... - Page 37 3. DSC DISTRESS OPERATIONS HISTORY Press the CANCEL key to silence the audio alarm. Wait for the distress acknowledge call from a coast station. If you do not receive the distress acknowledge call from a coast station, which usually takes about five minutes from the time of receiving a dis- tress alert, follow the flow charts in this section to determine your action.
- Page 38 3. DSC DISTRESS OPERATIONS How to transmit a distress acknowledge call over CH16 Select VHF CH16 and transmit the distress acknowledge call to the ship in distress. Reply received No reply Transmit the distress acknowledge call Communicate with the ship in distress. to the ship in distress over DSC CH70.
- Page 39 3. DSC DISTRESS OPERATIONS How to send a distress acknowledge call When you receive a distress alert from a ship in distress, the audio alarm sounds and the LED flashes in red. If your ship meets the requirements necessary to transmit the distress acknowledge call, do the following: 1.
- Page 40 3. DSC DISTRESS OPERATIONS How to send a distress relay to a coast station You can send the distress relay to a coast station from the receiving screen for the distress alert. 1. Rotate the CHANNEL/ENTER knob to select [RELAY] in the user options area then push the knob.
- Page 41 3. DSC DISTRESS OPERATIONS How to send a distress relay all You can send the distress relay all from the receiving screen for the distress alert. 1. Rotate the CHANNEL/ENTER knob to select [RELAY] in the user options area then push the knob. If three minutes have not passed from the distress alert re- ceived, the following message appears.
-
Page 42: How To Send A Distress Relay On Behalf Of A Ship In Distress
3. DSC DISTRESS OPERATIONS How to Send a Distress Relay on Behalf of a Ship in Distress 3.3.1 How to send a distress relay to a coast station You can send the distress relay to a coast station on behalf of a ship in distress in the following cases: •... -
Page 43: How To Send A Distress Relay To All Ships
3. DSC DISTRESS OPERATIONS 10. Rotate the CHANNEL/ENTER knob to select [EPFS], [MANUAL] or [NO INFO] then push the knob. For [MANUAL], go to step 11. For others, go to step 12. 11. Use the numeric keys to enter latitude and longitude of the ship in distress. (If nec- essary, switch coordinates: 1 key to switch to North (East);... - Page 44 3. DSC DISTRESS OPERATIONS 2. Rotate the CHANNEL/ENTER knob to select [MSG TYPE] then push the knob. 3. Rotate the CHANNEL/ENTER knob to select [RELAY ALL] then push the knob. The following message appears. 4. Rotate the CHANNEL/ENTER knob to select [Yes] then push the knob. 5.
-
Page 45: How To Receive A Distress Relay
3. DSC DISTRESS OPERATIONS How to Receive a Distress Relay There are three types of distress relay messages: distress relay for all ships, distress relay area and distress relay from coast station. When you receive a distress relay message, continue monitoring CH16. The audio alarm sounds and the LED flashes in red. - Page 46 3. DSC DISTRESS OPERATIONS 2. Rotate the CHANNEL/ENTER knob to select [Yes] then push the knob to cancel the distress alert over CH70. After transmitting the distress cancel call, the follow- ing message appears on the screen. 3. Push the CHANNEL/ENTER knob to erase the message. The following message appears on the screen.
-
Page 47: Dsc General Message Calling, Receiving
DSC GENERAL MESSAGE CALLING, RECEIVING General procedure for non-distress DSC messages The procedure for sending and receiving non-distress DSC messages is similar among message types. The following is an example of the sequence for an individual call. 1. Send the individual message. 2. - Page 48 4. DSC GENERAL MESSAGE CALLING, RECEIVING 2. Rotate the CHANNEL/ENTER knob to select [MSG TYPE] then push the knob. 3. Rotate the CHANNEL/ENTER knob to select [INDIVIDUAL MSG] then push the knob. 4. With [TO] selected, push the CHANNEL/ENTER knob. 5.
- Page 49 4. DSC GENERAL MESSAGE CALLING, RECEIVING The timer starts counting up the time since the call was sent. After the call is sent, the equipment waits for acknowledgement of the call, showing the WAIT FOR ACK screen as below. When the ACK is received, the audio alarm sounds and the pop-up message "ROUTINE (or SAFETY, URGENCY) INDIVIDUAL ACK received! [CANCEL]: Stop alarm"...
-
Page 50: How To Receive An Individual Call
4. DSC GENERAL MESSAGE CALLING, RECEIVING Unable acknowledge call received 1) Press the CANCEL key to silence the audio alarm and erase the pop-up mes- sage. The reason for [UNABLE ACK] is displayed on the screen. REGIST Reason for unable to acknowledge •... - Page 51 4. DSC GENERAL MESSAGE CALLING, RECEIVING Send able/unable acknowledge manually When an individual call is received with the setting [MANUAL] on the [ACK SET- TINGS] menu, the audio alarm sounds and the pop-up message "ROUTINE (SAFE- TY, URGENCY) INDIVIDUAL message received! [CANCEL]: Stop alarm" appears on the screen as below.
-
Page 52: Group Call
4. DSC GENERAL MESSAGE CALLING, RECEIVING 3. Rotate the CHANNEL/ENTER knob to select the reason for unable then push the knob. 4. With [GO TO CALL] selected, push the CHANNEL/ENTER knob to send un- able acknowledge call. • How to send able acknowledge call and change channel 1. -
Page 53: How To Receive A Group Call
4. DSC GENERAL MESSAGE CALLING, RECEIVING 2. Rotate the CHANNEL/ENTER knob to select [MSG TYPE] then push the knob. 3. Rotate the CHANNEL/ENTER knob to select [GROUP MSG] then push the knob. 4. With [TO] selected, push the CHANNEL/ENTER knob. 5. -
Page 54: Pstn Call
4. DSC GENERAL MESSAGE CALLING, RECEIVING 1. Press the CANCEL key to silence the audio alarm and erase the pop-up mes- sage. The channel is automatically tuned to the received channel. 2. Watch on the working channel. Communicate by radiotelephone. 3. - Page 55 4. DSC GENERAL MESSAGE CALLING, RECEIVING 8. With [GO TO CALL] selected, push the CHANNEL/ENTER knob to send the PSTN call. After the call has been sent, the WAIT FOR ACK screen appears. The elapsed time since sending the call and the countdown for resending are dis- played.
-
Page 56: How To Receive A Pstn Call
4. DSC GENERAL MESSAGE CALLING, RECEIVING 4.3.2 How to receive a PSTN call When a PSTN call is received, the icon appears in the tab area. An able/unable acknowledge is sent automatically according to the setting of [PSTN] on the [ACK SETTINGS]. -
Page 57: All Ships Call
4. DSC GENERAL MESSAGE CALLING, RECEIVING All Ships Call When an urgent but not life-endangering situation arises on your ship, for example, engine trouble, send an all ships call to request assistance. After sending the call, you can communicate by radiotelephone. Do the following before beginning actual com- munications: URGENCY priority: Say "PAN"... -
Page 58: How To Receive An All Ships Call
4. DSC GENERAL MESSAGE CALLING, RECEIVING 7. Rotate the CHANNEL/ENTER knob to select [SELECT] or [MANUAL] then push the knob. [SELECT]: The options window appears. Rotate the CHANNEL/ENTER knob to select the channel then push the knob. [MANUAL]: Enter the channel then push the CHANNEL/ENTER knob. 8. -
Page 59: Position Call
4. DSC GENERAL MESSAGE CALLING, RECEIVING Position Call There are two types of position calls: your ship requests the position of another ship and other station requires your ship's position. Find position of other station (1) Position request call (2) Position Information Your Station Other Station Send your ship's position to other station... - Page 60 4. DSC GENERAL MESSAGE CALLING, RECEIVING 5. Rotate the CHANNEL/ENTER knob to select [DIRECT INPUT], [ADDRESS BOOK DATA] or [AIS TARGET DATA] then push the knob. [DIRECT INPUT]: Enter the MMSI of station, which you want to know its position, with the numeric keys then push the CHANNEL/ENTER knob.
-
Page 61: Other Ship Requests Your Position
4. DSC GENERAL MESSAGE CALLING, RECEIVING 4.5.2 Other ship requests your position You can turn automatic acknowledge of position request on with [POSITION MSG] on the [ACK SETTINGS] menu (see section 5.16). Automatic reply When another ship requests your position and the setting of [POSITION MSG] on the [ACK SETTINGS] menu is [AUTO], the equipment automatically transmits a reply. -
Page 62: Manual Reply
4. DSC GENERAL MESSAGE CALLING, RECEIVING 4.6.2 Manual reply When you receive a polling request message, the audio alarm sounds. The icon ( appears in the tab area, and the pop-up message shown below appears. The equip- ment is set up for manual acknowledge: [POLLING MSG] on the [ACK SETTINGS] menu is [MANUAL]. -
Page 63: How To Receive A Neutral Craft Call
4. DSC GENERAL MESSAGE CALLING, RECEIVING 4. Rotate the CHANNEL/ENTER knob to select [NEUTRAL MSG] then push the knob. [PRIORITY] is automatically selected to [URGENCY]. 5. With [COMM CH] selected, push the CHANNEL/ENTER knob. 6. Rotate the CHANNEL/ENTER knob to select [SELECT] or [MANUAL] then push the knob. -
Page 64: Medical Transport Call
4. DSC GENERAL MESSAGE CALLING, RECEIVING 1. Press the CANCEL key to silence the audio alarm and erase the pop-up mes- sage. 2. Watch on the working channel. Communicate by radiotelephone. 3. After you have completed communications, rotate the CHANNEL/ENTER knob to select [QUIT] in the user options area then push the knob. -
Page 65: How To Receive A Medical Transport Call
4. DSC GENERAL MESSAGE CALLING, RECEIVING 4. Rotate the CHANNEL/ENTER knob to select [MEDICAL MSG] then push the knob. [PRIORITY] is automatically selected to [URGENCY]. 5. With [COMM CH] selected, push the CHANNEL/ENTER knob. 6. Rotate the CHANNEL/ENTER knob to select [SELECT] or [MANUAL] then push the knob. - Page 66 4. DSC GENERAL MESSAGE CALLING, RECEIVING 1. Press the CANCEL key to silence the audio alarm and erase the pop-up mes- sage. 2. Watch on the working channel. Communicate by radiotelephone. 3. After you have completed communications, rotate the CHANNEL/ENTER knob to select [QUIT] in the user options area then push the knob.
-
Page 67: Menu Operation
MENU OPERATION The menu can be accessed from both the RT and DSC screens. Note: The menu can not be opened when awaiting acknowledgement of a distress alert. How to Open/Close the MENU Screen 1. Press the MENU key to open the [MENU] screen. These marks indicate additional menus. -
Page 68: Handset Volume Setting
5. MENU OPERATION Handset Volume Setting You can adjust the volume of the loudspeaker for the handset. 1. Rotate the CHANNEL/ENTER knob to select [HS VOL] on the [MENU] screen then push the knob. 2. Rotate the CHANNEL/ENTER knob to set the volume level then push the knob. -
Page 69: Memory Configuration
5. MENU OPERATION Memory Configuration You can turn on or off memory channels on the [MEMORY CONFIG] screen. You can not turn off CH 16. 1. Rotate the CHANNEL/ENTER knob to select [CH MODE] on the [MENU] screen then push the knob. 2. -
Page 70: How To Print Messages
5. MENU OPERATION How to Print Messages The [PRINT] menu enables/disables automatic printing of all transmitted and received calls and the results of the daily test. 1. Rotate the CHANNEL/ENTER knob to select [SYSTEM] on the [MENU] screen then push the knob. 2. -
Page 71: Date And Time Setting
5. MENU OPERATION Note: When the setting of [INPUT TYPE] is [MANUAL], the following message ap- pears to ask you to update position, when position data is more than four hours old. Date and Time Setting Set the date and time for the system. 1. -
Page 72: How To Name The Terminal For Intercom
5. MENU OPERATION 4. Rotate the CHANNEL/ENTER knob to select a time interval then push the knob. [NO TIMEOUT] leaves the menu screen and/or the inactive sessions open until you close them manually. Item Description Option [MENU END] Close the menu screen automatically. [10MIN], [NO TIMEOUT] Close the inactive sessions except the [15MIN], [NO TIMEOUT]... -
Page 73: Automatic Switch To Ch16
5. MENU OPERATION 4. Rotate the CHANNEL/ENTER knob to select the character to edit then press the appropriate numeric key. To delete a character, rotate the CHANNEL/ENTER knob to select the character to delete then press the CANCEL key. 1. Rotate the CHANNEL/ENTER knob to select “F”. 2. -
Page 74: External Alarm Setting
5. MENU OPERATION 5.11 External Alarm Setting The [EXTERNAL ALARM] menu enables/disables output of the contact signal for ur- gency, safety and routine messages to an external alarm system. 1. Rotate the CHANNEL/ENTER knob to select [SYSTEM] on the [MENU] screen then push the knob. -
Page 75: Address Book
5. MENU OPERATION 5.13 Address Book You can register a maximum of 50 MMSIs and address names (max. 20 letters) in the memory. 5.13.1 List for address data 1. Rotate the CHANNEL/ENTER knob to select [DSC] on the [MENU] screen then push the knob. -
Page 76: How To Edit Addresses
5. MENU OPERATION 2. Press the 5 key to open the [ADDRESS DATA ENTRY] screen. 3. With [NAME] selected, push the CHANNEL/ ENTER knob. 4. Enter the address name (max. 20 letters) with the numeric keys then push the CHAN- NEL/ENTER knob. -
Page 77: How To Delete Addresses
5. MENU OPERATION 2. Rotate the CHANNEL/ENTER knob to select the address to edit then push the knob. Push the CHANNEL/ENTER knob. 3. Rotate the CHANNEL/ENTER knob to select [NAME] or [MMSI] as appropriate then push the knob. 4. Enter the address name or MMSI with the numeric keys then push the CHANNEL/ ENTER knob. -
Page 78: How To Create A Dsc Message With Registered Address
5. MENU OPERATION 3. Rotate the CHANNEL/ENTER knob to select [Yes] then push the knob. Address by type 1. Press the 6 key several times to select desired type. 2. Press the 4 key. 3. Rotate the CHANNEL/ENTER knob to select [DELETE LIST] then push the knob. 4. - Page 79 5. MENU OPERATION 2. Rotate the CHANNEL/ENTER knob to select [MSG FILE] then push the knob. When 100 messages have been registered, this is grayed out. Key/knob Function CHANNEL/ • Move the cursor by rotating the CHANNEL/ENTER knob. ENTER • Open the detailed information screen for the selected message file by pushing the CHANNEL/ENTER knob (see the following "Detailed in- formation screen for message files").
-
Page 80: Individual Calls
5. MENU OPERATION • 4 key: Delete the selected message file. The confirmation message appears on the screen. Rotate the CHANNEL/ENTER knob to select [Yes] then push the knob. 5.14.2 Individual calls 1. Open the [MESSAGE FILE] list. 2. Press the 6 key several times to select the [INDIVIDUAL] type. 3. - Page 81 5. MENU OPERATION 2. Press the 6 key several times to select the [GROUP] type. 3. Press the 5 key to open the [MESSAGE FILE ENTRY] screen. 4. With [TO] selected, push the CHANNEL/ENTER knob. 5. Rotate the CHANNEL/ENTER knob to select [DIRECT INPUT] or [ADDRESS BOOK DATA] then push the knob.
-
Page 82: Pstn Calls
5. MENU OPERATION 5.14.4 PSTN calls 1. Open the [MESSAGE FILE] list. 2. Press the 6 key several times to select the [PSTN] type. 3. Press the 5 key to open the [MESSAGE FILE ENTRY] screen. 4. With [TO] selected, push the CHANNEL/ENTER knob. 5. -
Page 83: How To Edit Prepared Messages
5. MENU OPERATION 5. Rotate the CHANNEL/ENTER knob to select [DIRECT INPUT], [ADDRESS BOOK DATA] or [AIS TARGET DATA] then push the knob. [DIRECT INPUT]: Enter the MMSI where to send the test message with the nu- meric keys then push the CHANNEL/ENTER knob. [ADDRESS BOOK DATA]: Select an MMSI from the [ADDRESS BOOK] (see section 5.13) then push the CHANNEL/ENTER knob. -
Page 84: How To Delete Prepared Messages
5. MENU OPERATION 5.14.8 How to delete prepared messages Open the [MESSAGE FILE] list then follow the applicable procedure below. Individual prepared message 1. Rotate the CHANNEL/ENTER knob to select the file to de- lete then press the 4 key. 2. -
Page 85: How To Delete Log Files
5. MENU OPERATION 2. Rotate the CHANNEL/ENTER knob to select [LOG] then push the knob. Mode 15/APR/2012 23:09 INDIVIDUAL MSG 9 : 14/APR/2012 23:05 GROUP MSG 10 : 10/APR/2012 21:15 ALL SHIP MSG 11 : 09/APR/2012 10:32 INDIVIDUAL MSG 12 : 05/APR/2012 09:40 GROUP MSG 13 : 04/APR/2012... -
Page 86: How To Set The Auto Ack Details
5. MENU OPERATION Specify log files by mode 1. Press the 6 key several times to select [RX GENERAL] or [TX]. 2. Press the 4 key. 3. Rotate the CHANNEL/ENTER knob to select [DELETE LIST] then push the knob. 4. Rotate the CHANNEL/ENTER knob to select [Yes] then push the knob. All log files 1. -
Page 87: Special Messages
5. MENU OPERATION 5.17 Special Messages Permission to transmit NEUTRAL CRAFT and MEDICAL TRANSPORT is enabled or disabled as follows: 1. Rotate the CHANNEL/ENTER knob to select [DSC] on the [MENU] screen then push the knob. 2. Rotate the CHANNEL/ENTER knob to se- lect [SPECIAL MSG] then push the knob. -
Page 88: Sound Setting
5. MENU OPERATION 5.19 Sound Setting The [AUDIO] menu lets you set the volume for the following items: • Key click on (setting: [1] - [3]) or off (setting: [0]) (Two beeps sound when a key in- operative in the ON mode (setting: [1] - [3]) is operated.) •... -
Page 89: Alarm Lists
5. MENU OPERATION 5.20 Alarm Lists The [ALARM] menu shows all currently violated alarms. When an error occurs, a pop- up message and a flashing error icon appear on the screen. Press the CANCEL key to close the pop-up message and stop the flashing of the error icon. When the error is removed, the error icon disappears. - Page 90 5. MENU OPERATION This page is intentionally left blank. 5-24...
-
Page 91: Remote Handset
REMOTE HANDSET Controls DW HI/LO CH16 SCAN Keyboard ENTER CANCEL MENU HG-8900(-W) Handset hanger CONTRAST BRILL HS-8900(-W) Remote handset Remote station RB-8900(-W) (option) Description of controls for remote station (handset) Control Function DW key Turns the DW function on or off (see section 1.9). HI/LO key Changes the output power to high (25 W) or low (1 W). -
Page 92: How To Turn On/Off The Power
6. REMOTE HANDSET Control Function MENU key Opens/closes the menu. 0 to 9 keys • Enters the channel on the RT screen. • Selects the menu items. CONTRAST key Short press: Opens the contrast setup screen. Press the key to adjust the contrast. -
Page 93: How To Adjust The Brilliance And Contrast
6. REMOTE HANDSET How to Adjust the Brilliance and Contrast You can adjust the brilliance of the display and the panel for each remote handset sep- arately. Also, you can adjust the contrast for each remote handset. Brilliance 1. Press the BRILL key to show the [BRILL] setting window. 2. -
Page 94: Transmission
6. REMOTE HANDSET Note 1: Only permitted channel regions are displayed, which are set by the install- er of the equipment. Note 2: Private channels are available only where permitted by the authorities. The [USA], [CANADA], [INLAND-W], [PRIVATE] can also be set by a qualified service technician. -
Page 95: How To Turn On/Off The Loudspeaker
6. REMOTE HANDSET How to change the output power Press the HI/LO key to change the output power to high and low alter- nately. "HI" or "LO" appears on the screen depending on your selection. How to Turn On/Off the Loudspeaker You can turn the loudspeaker (other than DSC communication, error, and key beep) on or off. -
Page 96: How To Change The Terminal Id
6. REMOTE HANDSET 2. Press the key to select [INTERCOM] then press the ENTER key. 3. Press the key to select the called party’s terminal then press the ENTER key. The called party’s terminal and yours ring. To cancel calling, press the CANCEL key. 4. -
Page 97: Audio Setting
6. REMOTE HANDSET 6.11 Audio setting The [AUDIO] menu enables or disables key beep and adjusts the volume of the ear- piece and off hook loudspeaker. Key click 1. Press the MENU key to open the [MENU] screen. 2. Press the key to select [AUDIO] then press the EN- TER key. -
Page 98: How To Test Fm-8900S From A Remote Handset
6. REMOTE HANDSET 6.12 How to Test FM-8900S from a Remote Handset 1. Press the MENU key to open the [MENU] screen. 2. Press the key to select [DAILY TEST] then press the ENTER key. 3. Press the ENTER key to start the test. You can confirm the test results for FM- 8900S with the 1 or 3 key. -
Page 99: Maintenance & Troubleshooting
MAINTENANCE & TROUBLESHOOTING NOTICE WARNING WARNING Do not apply paint, anti-corrosive sealant ELECTRICAL SHOCK HAZARD Do not open the equipment. or contact spray to plastic parts or equipment coating. Only qualified personnel should work inside the Those items contain products that can equipment. -
Page 100: Maintenance
7. MAINTENANCE & TROUBLESHOOTING Maintenance Regular maintenance helps to keep your equipment in good condition and prevents future problems. Check the items shown in the table below. Item Check point Remedy/Remarks Antenna Check for physical damage and corrosion. Replace damaged parts. Transceiver •... -
Page 101: Warning And Caution Messages
7. MAINTENANCE & TROUBLESHOOTING Warning and Caution Messages The table below shows error messages, their meanings, and remedies. To delete the messages, press the CANCEL key. Message Meaning Remedy TX PLL unlock. Transmission is dis- Contact your dealer. abled. TX PLL unlock error. Transmission is Contact your dealer. -
Page 102: Test Call
7. MAINTENANCE & TROUBLESHOOTING Message Meaning Remedy Internal error. System is rebooted. System automatically restarts. If the problem occurs again, contact your dealer. You tried to send a DSC message Enter MMSI no. of but your MMSI has not been regis- your ship. -
Page 103: Appendix 1 Menu Tree
APPENDIX 1 MENU TREE Transceiver unit FM-8900S MENU key Bold: Default setting HS VOL (1 - 20, 15) TEST INTERCOM CH MODE REGION (INT’L, USA, CANADA, INLAND-W*, PRIVATE) MEMORY (ON, OFF) MEMORY CONFIG (Open memory config window) SYSTEM PRINT TX MSG (AUTO, MANUAL) - Page 104 EARPIECE LEVEL (1 - 3, 3) OFF HOOK SPEAKER (SP_ON, MUTE) DAILY TEST (Display the test results for FM-8900S) VERSION (Display the program versions for FM-8900S and HS-8900) *: This menu item appears according to the setting of the [SERVICE] menu in the FM-8900S.
-
Page 105: Appendix 2 Marine Vhf Channel Lists
APPENDIX 2 MARINE VHF CHANNEL LISTS International channels TX (MHz) RX (MHz) Remark TX (MHz) RX (MHz) Remark 156.050 160.650 156.025 160.625 156.100 160.700 156.075 160.675 156.150 160.750 156.125 160.725 156.200 160.800 156.175 160.775 156.250 160.850 156.225 160.825 156.300 156.300 156.275 160.875 156.350... - Page 106 APPENDIX 2 MARINE VHF CHANNEL LISTS USA channels TX (MHz) RX (MHz) Remark TX (MHz) RX (MHz) Remark 156.050 156.050 156.175 156.175 156.250 156.250 156.300 156.300 156.275 156.275 156.350 156.350 156.325 156.325 156.400 156.400 156.375 156.375 Low PWR 156.450 156.450 156.425 156.425 156.500...
- Page 107 APPENDIX 2 MARINE VHF CHANNEL LISTS Canadian channels TX (MHz) RX (MHz) Remark TX (MHz) RX (MHz) Remark 156.050 160.650 156.025 160.625 156.100 160.700 156.075 156.075 156.150 160.750 156.125 156.125 156.200 156.200 156.175 156.175 156.250 156.250 156.225 160.825 156.300 156.300 156.275 156.275 156.350...
- Page 108 APPENDIX 2 MARINE VHF CHANNEL LISTS Inland waterways (INLAND-W) channels TX (MHz) RX (MHz) Remark TX (MHz) RX (MHz) Remark 156.050 160.650 156.025 160.625 156.100 160.700 156.075 160.675 156.150 160.750 156.125 160.725 156.200 160.800 156.175 160.775 156.250 160.850 156.225 160.825 156.300 156.300 Low PWR...
- Page 109 APPENDIX 2 MARINE VHF CHANNEL LISTS Private channels TX (MHz) RX (MHz) CH no. (current) Remark Simplex/Semi-duplex Simplex Semi-duplex 155.000 155.000 159.600 155.025 155.025 159.625 155.050 155.050 159.650 155.075 155.075 159.675 155.100 155.100 159.700 155.125 155.125 159.725 155.150 155.150 159.750 155.175 155.175 159.775...
- Page 110 APPENDIX 2 MARINE VHF CHANNEL LISTS TX (MHz) RX (MHz) CH no. (current) Remark Simplex/Semi-duplex Simplex Semi-duplex 156.000 156.000 160.600 156.025 156.025 160.625 156.050 156.050 160.650 156.075 156.075 160.675 156.100 156.100 160.700 156.125 156.125 160.725 156.150 156.150 160.750 156.175 156.175 160.775 156.200 156.200...
- Page 111 APPENDIX 2 MARINE VHF CHANNEL LISTS TX (MHz) RX (MHz) CH no. (current) Remark Simplex/Semi-duplex Simplex Semi-duplex 157.125 157.125 161.725 157.150 157.150 161.750 157.175 157.175 161.775 157.200 157.200 161.800 157.225 157.225 161.825 157.250 157.250 161.850 157.275 157.275 161.875 157.300 157.300 161.900 157.325 157.325...
- Page 112 APPENDIX 2 MARINE VHF CHANNEL LISTS TX (MHz) RX (MHz) CH no. (current) Remark Simplex/Semi-duplex Simplex Semi-duplex 158.275 158.275 162.875 158.300 158.300 162.900 158.325 158.325 162.925 158.350 158.350 162.950 158.375 158.375 162.975 158.400 158.400 163.000 158.425 158.425 163.025 158.450 158.450 163.050 158.475 158.475...
- Page 113 APPENDIX 2 MARINE VHF CHANNEL LISTS TX (MHz) RX (MHz) CH no. (current) Remark Simplex/Semi-duplex Simplex Semi-duplex 159.425 159.425 164.025 159.450 159.450 164.050 159.475 159.475 164.075 159.500 159.500 164.100 159.525 159.525 164.125 159.550 159.550 164.150 159.575 159.575 164.175 159.600 159.600 164.200 159.625 159.625...
- Page 114 APPENDIX 2 MARINE VHF CHANNEL LISTS TX (MHz) RX (MHz) CH no. (current) Remark Simplex/Semi-duplex Simplex Semi-duplex 160.575 160.575 160.600 160.600 160.625 160.625 160.650 160.650 160.675 160.675 160.700 160.700 160.725 160.725 160.750 160.750 160.775 160.775 160.800 160.800 160.825 160.825 160.850 160.850 160.875 160.875...
-
Page 115: Appendix 3 Abbreviations List
APPENDIX 3 ABBREVIATIONS LIST Abbreviations Abbreviation Term Abbreviation Term Acknowledge June Automatic Identification System Latitude ALARM Alarm Alert Management System Antenna Longitude Application Level April March August Memory AUTO Automatic MENU Menu BRILL Brilliance Minute(s) CAN’T Cannot MMSI Maritime Mobile Services Identity Channel Message... - Page 116 APPENDIX 3 ABBREVIATIONS LIST Abbreviation Term Abbreviation Term United States of America Volume Coordinated Universal Time/ Uni- Watchkeeping Receiver versal Time, Coordinated Voyage Data Recorder — Icons Icon Meaning Icon Meaning Speaker ON Number keys Speaker OFF CHANNEL/ENTER knob Unread message Name of the ship registered in address book Auto ACK for individual mes-...
-
Page 117: Appendix 4 Digital Interface (Iec 61162-1
APPENDIX 4 DIGITAL INTERFACE (IEC 61162-1) I/O Sentences Input sentences (IEC 61162-1) GGA, GLL, ZDA, GNS, RMC, VDM Input sentence description • GGA - Global positioning system (GPS) fix data $**GGA,hhmmss.ss,llll.lll,a,yyyyy.yy,a,x,xx,x.x,x.x,M,x.x,M,x.x,xxxx*hh<CR><LF> 5 6 7 8 9 10 11 12 13 14 1. - Page 118 APPENDIX 4 DIGITAL INTERFACE (IEC 61162-1) • GNS - GNSS fix data $**GNS,hhmmss.ss,llll.ll,a,yyyyy.yy,a,c--c,xx,x.x,x.x,x.x,x.x,x.x,a*hh<CR><LF> 7 8 9 10 11 12 13 1. UTC of position (000000.00 - 235959.99) 2. Latitude (0000.0000 - 9000.0000) 3. N/S 4. Longitude (00000.0000 - 18000.0000) 5. E/W 6.
- Page 119 APPENDIX 4 DIGITAL INTERFACE (IEC 61162-1) Output sentences (IEC 61162-1) DSC, DSE, TLL Output sentence description • DSC - Digital selective calling information $CVDSC,xx,xxxxxxxxxx,xx,xx,xx,x.x,x.x,xxxxxxxxxx,xx,a,a*hh<CR><LF> 3 4 5 6 9 10 11 1. Format specifier (2 digits) 2. Address (10 digits) 3.
-
Page 120: Schematic Diagram
APPENDIX 4 DIGITAL INTERFACE (IEC 61162-1) P - sentences pireq, pidat, CVdmr, CVdma P - sentence description • PFEC,pireq - Equipment information request $ PFEC, pireq, sentence When this sentence is input, the equipment outputs the PFEC,pidat sentence. • PFEC,pidat - Equipment information $ PFEC, pidat, sentence •... - Page 121 APPENDIX 4 DIGITAL INTERFACE (IEC 61162-1) +3.3V [MULTI_SIO] 0.1µ RS422_RXD RS422_TXD Z_149_3P 100px4 SN65HVD30DR RS-422 IEC61162-1 (default) Z_149_3P RS-422 IEC61162-1 (default) +3.3V +3.3V (Not mount) (Not mount) 0.1µ NMEA_RXD 5 PC400 J1 JUNCTION MULTI_TD-A MULTI_TD-B MULTI_RD-A MULTI_RD-B Load requirements as a listener Isolation: Optocoupler Input impedance: 430Ω...
-
Page 122: Appendix 5 Parts List
This equipment contains complex modules in which fault diagnosis and repair down to component level are not practical (IMO A.694(17)/8.3.1). Only some discrete components are used. FURUNO Electric Co., Ltd. Believes identifying these components is of no value for shipboard maintenance;... - Page 123 APPENDIX 5 PARTS LIST Junction Box IF-8900 ELECTRICAL PARTS LIST Unit Junction Box IF-8900 PRINTED CIRCUIT BOARD Code No. 05P0850, JUNCTION AP-21...
-
Page 124: Appendix 6 Parts Location
APPENDIX 6 PARTS LOCATION Transceiver unit FM-8900S 05P0849 05P0843 MAIN 05P0841 TRX_WR Top cover removed Bottom cover removed 05P0882 PANEL Back side of front panel Handset HS-2003 05P0780 HANDSET AP-22... - Page 125 APPENDIX 6 PARTS LOCATION Remote station RB-8900 (HS-8900, HG-8900) / RB-8900-W (HS-8900-W, HG-8900- (Rear side) 05P0715 05P0781B 05P0798 (Handset) (Hanger) HS CONT HS-8900 HG-8900 HS-8900-W HG-8900-W Junction box IF-8900 (ANALOG WING(LEFT)/VDR) (REMOTE1) (ALARM SYSTEM/ INS/AIS/PLOTTER) (REMOTE3) 05P0850 JUNCTION Lug for connection (ALARM UNIT) (REMOTE 4) of shield of...
-
Page 126: Appendix 7 Thermal Printer Utp-58E
APPENDIX 7 THERMAL PRINTER UTP-58E Printer usage cautions • Do not disassemble or attempt to repair the printer. • Do not allow water to enter the printer. • Do not drop or jar the printer. • Fix a paper jam after turning off the power. •... - Page 127 APPENDIX 7 THERMAL PRINTER UTP-58E How to set the DIP switch The DIP switch functions to change printer specifications. Default specifications are shown as bold and italic face in the table below. Pin no. Function 1 to 4 Communication system See table 1.
- Page 128 APPENDIX 7 THERMAL PRINTER UTP-58E UTP-58E for RC-8900 (Rack Console) and PP-8800A (Printer) Press the power switch and the power lamp goes on. When the lamp is on, the data received from the radiotelephone is printed. After completion of printing, feed paper out by pressing the line feed button.
- Page 129 FURUNO FM-8900S SPECIFICATIONS OF MARINE VHF RADIOTELEPHONE FM-8900S GENERAL Number of channels INTL: 57 USA: 50 Weather: 10 Canada: 57 INLAND-WA: 57 Private: 20 Memory CH: 50 Frequency stability Within ±1.5kHz Communication system Simplex/Semi-duplex Class of emission 16K0G3E (F3E) Voice, 16K0G2B (F2B) DSC...
- Page 130 1.3A max. ENVIRONMENTAL CONDITION Ambient temperature -15°C to +55°C Relative humidity 93% or less at +40°C Degree of protection Transceiver unit (FM-8900S) IP20 (IP22: option) Handset/Hanger (HS-2003/FP05-05510) IP24 Remote station RB-8900: IP22, RB-8900-W: IP56 Junction box IP20, IP22 (bulkhead mount, option) Vibration IEC 60945 Ed.4...
-
Page 131: Index
INDEX Individual message receiving ..........4-4 Abbreviation ..........AP-13 sending............ 4-1 Address book Individual message preparation ....5-14 deleting..........5-11 Intercom ..........1-9 editing............ 5-10 list............5-9 registration ..........5-9 Log file Alarm lists..........5-23 deleting..........5-19 All ships message opening ..........5-18 receiving .......... - Page 132 INDEX Sound setting remote handset ........6-7 transceiver unit........5-22 Speaker remote handset ........6-5 transceiver unit.........1-5 Special message........5-21 Test call............7-4 Test message preparation .......5-16 Timeout setting ..........5-5 Transmission remote handset ........6-4 transceiver unit.........1-5 Troubleshooting .........7-2 UTP-58E ..........AP-24 VHF channel lists ........AP-3 IN-2...