
Related Manuals for Nortel 413X


Summary of Contents for Nortel 413X
- Page 1 Nortel DECT Handset 413X and 414X User Guide www.nortel.com © 2005 Nortel Networks N0028550 01.1 Printed in Denmark Return to Menu...
- Page 2 2 = (1900 - 1920 MHz frequency band) 3 = (1880 - 1895 MHz frequency band) 5 = (1880 - 1900 MHz frequency band) The handset 413X/414X will provide you with the greatest possible degree of flexibility and mobility due to high battery capacity, practi- cal weight, size and design.
- Page 3 Please note that the handset 413X/414X is for use with the following Nortel host sys- tems: • Norstar MICS 7.0 or greater (Modular Integrated Communications System) • Norstar CICS 7.0 or greater (Compact Integrated Communications System) • BCM 3.7 or greater (Business...
-
Page 5: Table Of Contents
Battery disposal ....12 About your 413X/414X handset . . . 13 Handset display ....15 Display softkeys . -
Page 7: Getting Started
Handset information Ensure that the adapter voltage is the same as the electrical outlet voltage. The 413X/414X handset uses radio signals and does not guarantee a connection in all circumstances. Do not rely on a cordless handset to make emergency calls. -
Page 8: Battery Information
Nortel Networks approved charger and the proper batteries. • Only use battery type NT7B65LD in the 413X/414X handset. Do not use these batteries with other products. These batteries were designed specifically for use with the 413X/414X handset and the 413X/414X charger ONLY. -
Page 9: Installing Battery
Installing battery The battery is connected to the hand- set when it is shipped from the fac- tory. 1 To change the battery unscrew the plate on the rear of the handset to access the battery compartment. Use a normal screw driver. -
Page 10: Charging Battery
Charging battery When charging the battery for the first time, it is necessary to leave the handset in the charger for 14-16 hours for the battery to be fully charged. During normal operation, it takes approximately 3.5 hours to charge the handset from fully discharged to its full capacity. -
Page 11: Checking Battery Capacity
If the handset is turned off when placed in charger, only the LED indicates the charging. When handset is turned off, the LED flashes at a low frequency while charging and lights constantly when the charging is finished. There will be no reaction for incoming calls. -
Page 12: Battery Disposal
3 Press system, or press MENU ( quit. The indication on the display is not necessarily an exact reflection on the remaining speech time, but only an indication of the voltage on the bat- tery. Battery disposal Defective batteries must be returned to a collection point for chemical waste disposal. -
Page 13: About Your 413X/414X Handset
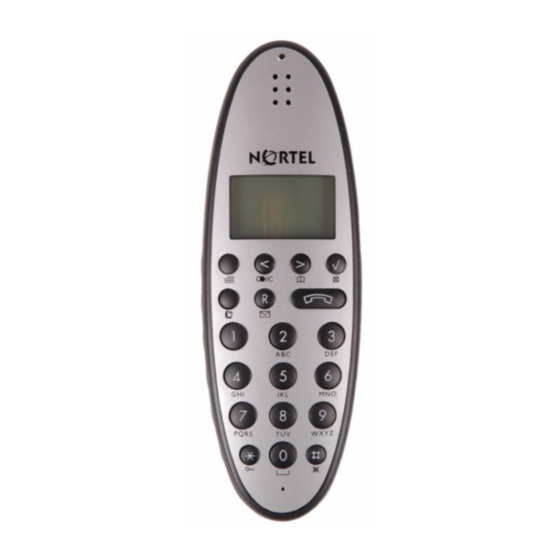
About your 413X/414X handset Message indicator light Flashes when you have a message waiting. Volume control Adjusts the handset and ringer volume. Display Shows call information, handset status icons, and guides you through features and option menus. Headset connector Only available on handset 414X. - Page 14 Enters the Redial List menu. (idle) Off hook Activates a feature option. (active) > ( ) key On hook Enters the Telephone Book menu. (idle) Off hook Activates a feature option. (active) ( ) key On hook Turns the handset off with...
-
Page 15: Handset Display
Off hook Starts or ends a feature session. (active) Turns the loud speaker on with a long key press (only available on handset 414X). ) key On hook Opens your message list with a short key press. (idle) Enters the text message (MSF-MAIL) menu with a long (three second) key press. - Page 16 The envelope icon indicates a new text message (MSF-MAIL). Left and right arrow icons appear on the display when you access Handset option menus. The telephone icon indicates a call is active. Note: The icon flashes when a call connection is in progress.
-
Page 17: Display Softkeys
Display softkeys Three display softkeys are used to activate feature options that appear on the third line of the display. The following graphic shows the softkey mapping for feature options on the third line of the display. Display softkey mapping example Display s NEXT CALL... -
Page 18: Basic Handset Options
Basic handset options Turning the handset ON/OFF Press When the handset is turned on the radio signal display icon is shown in the lower left corner of the display, if the handset is subscribed to a sys- tem. Press ( ) for 4 seconds. Adjusting speaker volume 1 Press 2 Use the two keys placed at the... -
Page 19: Customizing Handset
4 Press MENU ( structure. Figure 1 on page Customizing handset The handset has one user-defined profile (set up), and a mode where all sounds are disabled (SILENT). • Press MENU ( show the profile. All settings have to be defined under the profile. - Page 20 414X). Auto- ANSWER Can be turned on/off using < and >. Confirm with . When turned on, the telephone auto- matically goes off hook when ringing. TART VOL Start volume can be adjusted using < and >. Confirm with .
- Page 21 UTO KEYLOCK The auto keylock function can be turned on/off using < and >. Confirm with . With auto keylock turned on the hand- set will automatically lock the keys after 60 seconds. Press MENU ( then press again. Language: Choose between predefined lan- guages using <...
-
Page 22: Making And Answering Calls
For external calls, dial the external code (or line pool code) to access an external line, then dial the external telephone number. (Contact your sys- tem administrator to confirm what external code or line pool code to use). Dial directly 1 Press flashes until the call is connected. -
Page 23: Dial From Your Phone Book
4 Press Note: Use the Redial list or the Last Number Redial Feature ( automatically redial the last external telephone number that you called. ) to enter the , the display icon again to end the call. -
Page 24: Answering Calls
Answering calls Depending on the system hardware/ software configuration, Call Display information (CLID) for incoming exter- nal calls will appear on the display. Your system administrator must enable the CLID feature for your handset in system programming. To answer a call: •... -
Page 25: Making Or Answering A Second Call
To hold a call and make a second call 1 Press R ( hold. 2 Dial the telephone number of the second call. To return to the first call • Press R ( first call. The second call is automatically put on hold. -
Page 26: Replying To Messages
The red LED on your handset flashes when you receive a message from an internal voice message center or another telephone on your system. This is the message waiting indica- tion. To view, reply and listen to your messages... -
Page 27: More Handset Options
More handset options Moving around in the Menu Press MENU ( menu structure. It has to be used if a “NO” or “CLEAR” is wanted in the menu structure. Press to jump to a lower level in the menu. When the lowest menu level is reached, it will store the setting and jump to a higher level. - Page 28 < or > to scroll to the name/ number, and then press The name/number is now deleted. If the number is stored, it is moved to the telephone book. It is possible to add prefixes to the redial numbers. • Find the number you wish to edit and press the digits you want to add to the number, e.g.
- Page 29 MENU LOGIN For more information on this menu option, contact your system adminis- trator. MENU MSF FUNCTION MSF Functions are special functions, which are based on MSF (Message Service Function). The functions require special software in the main system. Note: The PHONE BOOK MENU, REDIAL MENU and MSF-MAIL MENU can be accessed directly.
-
Page 30: Using Phone Book
Using phone book You can store telephone numbers and names in your telephone book. The telephone book can store up to 80 numbers with name. A maximum of 23 digits, including spaces, is allowed for each number. A maximum of 24 digits, including spaces, is allowed for each name. -
Page 31: Storing A Number
>, and then press . 2 Enter a name (max. 24 digits), and then press number. After storing, the telephone will go back to standby mode. Small letter ? ! 1 - + * / = & ( ) % ¿ ¡... - Page 32 Storing from Redial list 1 While on hook, use the < -key to find the number in the redial list to be stored in the telephone book. 2 Press , then >, and then press again. 3 Enter a name, and then press to store the redial list number in the telephone book.
- Page 33 4 Press MENU ( telephone book. Note: Viewing and editing the telephone book can also be done while in conversation (off hook) by pressing > ( Figure 6 on page Changing numbers 1 While on hook, press > ( enter the telephone book.
-
Page 34: Using Text Messages (Msf)
Deleting numbers 1 While on hook, press > ( enter the telephone book. 2 Use the < > -keys to find the number to be deleted, press twice. Figure 6 on page Deleting from Redial list • While on hook, press < ( use the <... - Page 35 • If the message contains a callback number, this will be displayed on the bottom line of the display. As long as the callback number is in the display, it is possible to activate the number by pressing • 1st letter in the display, in front of the timestamp, shows the message status: read (R), unread (N) or locked (L).
- Page 36 Replying a MSF mail 1 While on hook, press R ( open the mail, then , press again and use the < > -keys to find the reply feature, press you are now able to reply the mail. 2 After writing your reply, press confirm.
- Page 37 Locking/unlocking a MSF mail When locking a message, the mes- sage will not automatically be over- written when receiving a new message. If unlocked, the oldest mes- sage will be deleted when receiving a new message. 1 While on hook, press R ( open the mail again and use the <...
-
Page 38: Shortcuts
“MSF-MAIL”: Long Press R ( ) in on hook. MUTE temporarily the ringer: Press ( ) when the telephone is ringing. Alternatively, you can also press one of the volume control buttons to mute the ringing signal. MUTE the microphone: Press when the telephone is off hook. -
Page 39: General Information
General information Troubleshooting The telephone freezes. Remove and replace the battery pack. Press to turn on the telephone. The telephone does not ring. Check whether the ringer is SILENT or RINGER VOL. is OFF. Not possible to turn on the telephone. -
Page 40: Product Information
Do not use liquid cleaners or aerosol cleaners. Use damp cloth for cleaning 4. Do not install the telephone equip- ment in the bathroom or near a wash bowl, kitchen sink, or laundry tub, in a wet basement, or near a swimming pool 5. - Page 41 There may be a risk of electrical shock from light- ning 12.Do not use the telephone to report a gas leak in the vicinity of the leak 13.Do not place the base or charger near microwave ovens, radio equipment, or non-ground con- nected televisions.
- Page 42 non-approved parts cannot be guar- anteed and may even cause damage. Power failure In the event of a power failure or flat battery, you cannot use the handset to make or receive calls Battery Precautions 1. Periodically clean the charge con- tacts on both the charger and handset.
- Page 43 If they do and it is possible, you will be notified in advance to give you an opportunity to maintain uninterrupted telephone ser- vice.
- Page 44 Power Outage: In the event of a power outage, your cordless tele- phone will not operate. The cordless telephone requires electricity for oper- ation. You should have a telephone which does not require electricity available for use during power out- ages.
- Page 51 14125000-HD ED1...