
Related Manuals for Jensen JTA-215


Summary of Contents for Jensen JTA-215
-
Page 1: User Manual
® JTA-215 AM/FM STEREO TURNTABLE USER MANUAL PLEASE READ THIS OPERATING MANUAL COMPLETELY BEFORE OPERATING THIS UNIT AND RETAIN THIS BOOKLET FOR FUTURE REFERENCE. - Page 2 The serial number of this product is found on its back cover. You should note the serial number of this unit in the space provided as a permanent record of your purchase to aid in identification in the event of theft of loss. Model Number: JTA-215 Serial Number: ____________________...
-
Page 3: Important Safety Instructions
WARNING TO PREVENT FIRE OR SHOCK HAZARD, DO NOT USE THIS PLUG WITH AN EXTENSION CORD, RECEPTACLE OR OTHER OUTLET UNLESS THE BLADES CAN BE FULLY INSERTED TO PREVENT BLADE EXPOSURE. TO REDUCE THE RISK OF FIRE OR SHOCK HAZARD, DO NOT EXPOSE THIS APPLIANCE TO RAIN OR MOISTURE. -
Page 4: Important Notes
PRECAUTION FORE USE • UNPACK ALL PARTS AND REMOVE PROTECTIVE MATERIAL. • DO NOT CONNECT THE UNIT TO THE MAINS BEFORE CHECKING THE MAINS VOLTAGE AND ALL OTHER CONNECTIONS HAVE BEEN MADE. • DO NOT COVER ANY VENTS AND MAKE SURE THAT THERE IS A SPACE OF SEVERAL CENTIMETERS AROUND THE UNIT FOR VENTILATION. -
Page 5: Location Of Controls
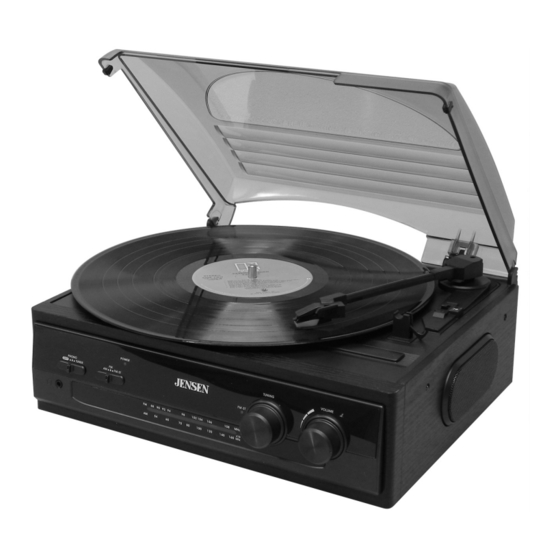
LOCATION OF CONTROLS 1) Dust Cover 2) Left Speaker 3) Dial Pointer 4) 3.5mm Headphone Jack 5) Power Indicator 6) Power/Function Selector (OFF-PHONO-TUNER) Band Selector (AM-FM-FM ST) 8) Right Speaker 9) Rotary Volume Control 10) Tuning Control 11) FM Stereo Led Indicator 12) 45 RPM Adaptor 13) 33/45/78 RPM Speed Selector 14) Tone Arm Clamp... -
Page 6: Power Source
POWER SOURCE This unit is designed to operate on normal 240V~ 50Hz AC power only. Do not attempt to operate the unit on any other power source. You could cause damage to the unit. GETTING STARTED TOP COVER ASSEMBLY 1. Push the metal bracket to rear side. 2. - Page 7 HINTS FOR BEST RECEPTION AM: The unit has built-in AM antenna, to obtain the best reception, you may have to move or slightly rotate the main unit. FM: The receiver has a wire antenna located at the rear cabinet. This wire should be totally unraveled and extended for best reception.
-
Page 8: Using Headphones (Not Included)
LINE OUT OPERATION You can connect the JTA-215 to an external Hi-Fi system by connecting the LINE OUT Socket (15) on the back of JTA-215 to the AUX IN Socket of your Hi-Fi system with RCA cables (Not included). Remark: The sound from the JTA-215 built-in speakers will not be disabled when using the LINE OUT socket. -
Page 9: Troubleshooting Guide
All necessary care is taken at the point of manufacture to ensure this unit will perform to Jensen’s high quality standards. However if this unit becomes faulty within the warranty period please return it to the point of purchase with your proof of purchase for a replacement.