NordicTrack 1500 Owner's Manual
Nordictrack owners manual treadmill 1500
Hide thumbs
Also See for 1500:
- User manual (36 pages) ,
- Manual (32 pages) ,
- Manuel de l'utilisateur (36 pages)
Table of Contents
Advertisement
Model No. 831.298801
Serial No.
Find the serial number in the location
shown below. Write the serial number
in the space above for reference.
Questions?
As a manufacturer, we are com-
mitted to providing complete
customer satisfaction. If you
have questions, or if there are
missing or damaged parts, we
will guarantee complete satis-
faction through direct assistance
from our factory.
TO AVOID UNNECESSARY
DELAYS, PLEASE CALL DIRECT
TO OUR TOLL-FREE CUSTOMER
HOT LINE. The trained techni-
cians on our Customer Hot Line
will provide immediate assis-
tance, free of charge to you.
CUSTOMER HOT LINE:
1-888-825-2588
Mon.ÐFri., 6 a.m.Ð6 p.m. MST
CAUTION
Read all precautions and instruc-
tions in this manual before using
this equipment. Save this manual
for future reference.
Serial
Number
Decal
SEARS, ROEBUCK AND CO., HOFFMAN ESTATES, IL 60179
OWNER'S GUIDE
Advertisement
Table of Contents

Related Manuals for NordicTrack 1500


Summary of Contents for NordicTrack 1500
- Page 1 Model No. 831.298801 Serial No. Find the serial number in the location shown below. Write the serial number in the space above for reference. Serial Number Decal Questions? As a manufacturer, we are com- mitted to providing complete customer satisfaction. If you have questions, or if there are missing or damaged parts, we will guarantee complete satis-...
-
Page 2: Table Of Contents
How to Fold and Move the Treadmill ........ -
Page 3: Important Precautions
WARNING: To reduce the risk of burns, fire, electric shock, or injury to persons, read the following important precautions and information before operating the treadmill. 1. It is the responsibility of the owner to ensure that all users of this treadmill are adequately informed of all warnings and precautions. - Page 4 The decals shown below have been placed on your treadmill. If one of the decals is missing, or if it is not legible, please call our Customer Service Department toll-free to order a free replacement decal (see the back cover of this manual).
-
Page 5: Before You Begin
Roller Guards Rear Roller Adjustment Bolts *IMPORTANT: Always wear the clip while operating the treadmill. If the key is pulled from the console, the walking belt will stop. at 1-888-825-2588, Monday through Friday, 6 a.m. until 6 p.m. Mountain Time (excluding holidays). To help us assist you, please note the product model number and serial number before calling. -
Page 6: Assembly
Assembly Assembly requires two people. Set the treadmill in a cleared area and remove all packing materials. Assembly requires a phillips screwdriver 1. With the help of a second person, carefully raise the Uprights (70) until the Wheels (30) are resting flat on the floor. -
Page 7: Treadmill Operation
Treadmill Operation THE PERFORMANT LUBE WALKING BELT Your treadmill features a walking belt coated with PERFORMANT LUBE , a high-performance lubricant. IMPORTANT: Never apply silicone spray or other substances to the walking belt or the walking plat- form. Such substances will deteriorate the walking belt and cause excessive wear. - Page 8 When the console is in the manual mode, the speed and incline of the treadmill can be changed with a touch of a button. As you exercise, four displays will provide continuous exercise feedback. In addition, three preset programs will automatically control the incline of the treadmill as they guide you through effective workouts.
- Page 9 The incline setting is shown in the INCLINE/ DISTANCE display. Note: After the INCLINE buttons are pressed, it may take a few seconds for the treadmill to reach the selected incline setting. When you are finished exercising, change the incline of the treadmill to 1.5%.
- Page 10 Step onto the foot rails and press the STOP button. Change the incline of the treadmill to 1.5%. The incline must be at 1.5% before the treadmill is folded to the storage position or the treadmill may be damaged.
- Page 11 1.0 mph. Hold the handrails and begin walking. As you exercise, the incline of the treadmill will peri- odically change as indicated by the graphs labeled P2, P3, and P4 on the console. The speed of the walking belt can be changed as desired during the program with the SPEED buttons.
- Page 12 Notes...
-
Page 13: How To Fold And Move The Treadmill
1. Hold the handrails of the treadmill as shown. Place one foot on the base in the indicated location. 2. Tilt the treadmill back until it rolls freely on the front wheels. Carefully move the treadmill to the desired location. Never move the treadmill without tipping it back, or the base pads may come off. - Page 14 HOW TO LOWER THE TREADMILL FOR USE 1. Hold the upper end of the treadmill with your right hand as shown. Using your left thumb, press the storage latch to the left. Pivot the treadmill until the frame and foot rails are past the storage latch.
-
Page 15: Maintenance And Trouble-Shooting
2. SYMPTOM: THE POWER TURNS OFF DURING USE a. Check the circuit breaker located on the treadmill frame near the power cord (see 1. c. above). If the circuit breaker has tripped, wait for five minutes and then press the switch back in. - Page 16 3 to 4 inches off the walking plat- form. Be careful to keep the walking belt centered. Plug in the power cord, insert the key and run the treadmill for a few min- utes. Repeat until the walking belt is properly tightened.
- Page 17 Magnet and the Reed Switch. If necessary, loosen the Screw (90) and move the Reed Switch slightly. Retighten the Screw. Re-attach the hood, and run the treadmill for a few min- utes to check for a correct speed reading.
-
Page 18: Conditioning Guidelines
The following nine steps for designing your exercise program were developed by exercise physiologists at NordicTrack. The actual exercise you perform is only a part of a safe and effective training program. There are many other aspects to developing a life-long commitment to physical fitness. - Page 19 WEIGHT LOSS TIPS At least four, 30-minute workouts per week, along with a reduced-calorie diet, are recommended if you are trying to lose weight. However, be sure to stay within your target heart rate zone and exercise a maximum of 5 days per week for 60 minutes per workout.
- Page 20 ¥ Healthy stress relief from a pressure-packed ¥ Greater intellectual capacity and productivity Get FIT with the PowerTread 1500. Effective aerobic exercise has three major parts: frequency, intensity, and time. The acronym "FIT" may help you to remember these three parts: ÒFÓ...
- Page 21 Below are some tips that will help ease you into your new NordicTrack routine. ¥ Begin and end each exercise session with the stretches on page 19. Stretch in a smooth, controlled manner.
-
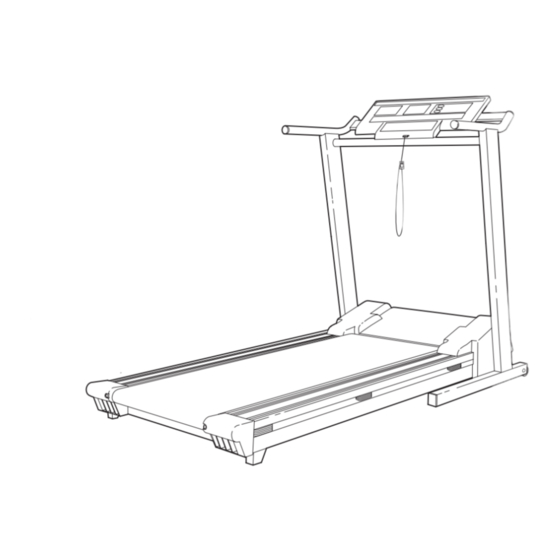
Page 22: Part List
Part ListÑModel No. 831.298801 To find the parts listed below, refer to the Exploded Drawing attached in the center of this ownerÕs guide. Key No. Qty. Description Rear Roller Adj. Bolt Front Roller Adj. Bolt Rear Roller Guard On/Off Switch Storage Latch Isolator Ground Wire Screw... -
Page 23: Ordering Replacement Parts
¥ The MODEL NUMBER OF THE PRODUCT (831.298801). ¥ The NAME OF THE PRODUCT (NordicTrack PowerTreadª 1500). ¥ The SERIAL NUMBER OF THE PRODUCT (see the front cover of this manual). ¥ The KEY NUMBER AND DESCRIPTION OF THE PART(S) (see the EXPLODED DRAWING attached to the center of this manual, and the PART LIST on pages 22 and 23). -
Page 26: Limited Warranty
Limited Warranty WHAT IS COVEREDÑThe entire NordicTrack PowerTreadª 1500 (ÒProductÓ) is warranted to be free of all defects in material and workmanship. WHO IS COVEREDÑThe original purchaser or any person receiving the Product as a gift from the original purchaser.