
Related Manuals for dbx 260


Summary of Contents for dbx 260
- Page 1 DriveRack ® Complete Equalization & Loudspeaker Management System Featuring Custom Tunings User Manual...
-
Page 2: Table Of Contents
Table of Contents TABLE OF CONTENTS Introduction 4.9 Compressor/Limiter ............33 4.10 Alignment Delay ............36 0.1 Defining the DriveRack 260 System .........1 4.11 Input Routing (IN) ............36 0.2 Service Contact Info ............2 4.12 Output ................37 0.3 Warranty ................3 Section 5 – Utilities/Meters Section 1 –... -
Page 3: Introduction
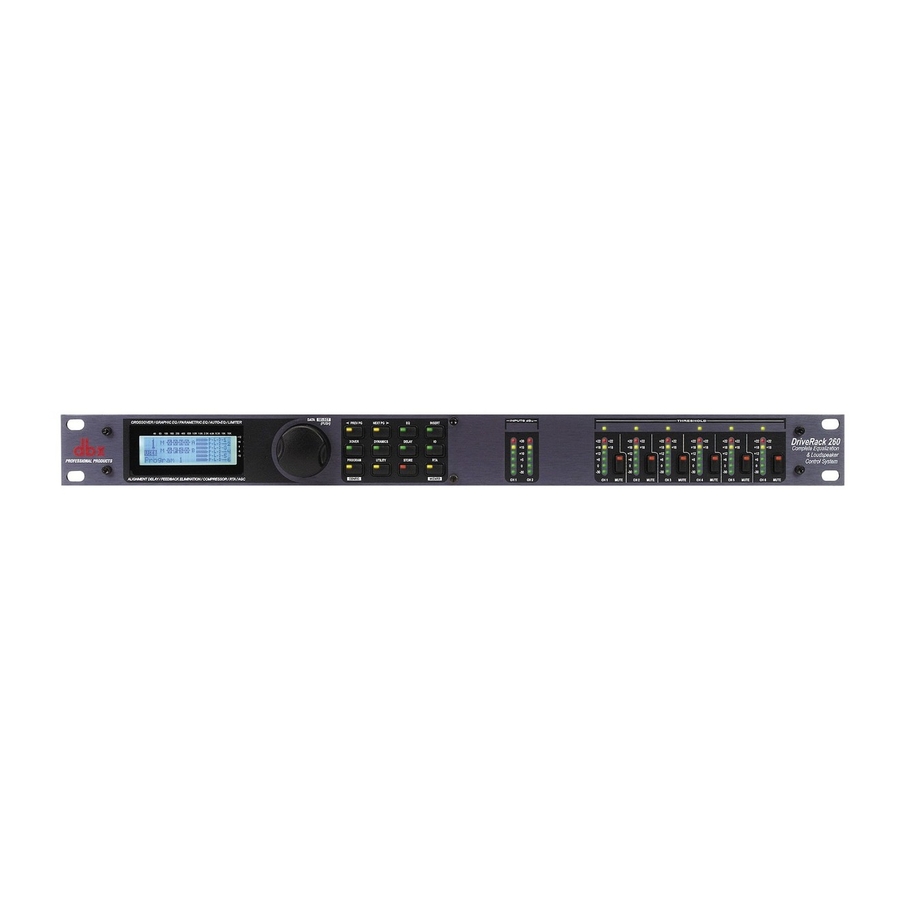
0.1 Defining the DriveRack 260 System The dbx DriveRack 260 is the most effective way to manage all aspects of post mixer processing and signal routing. The DriveRack 260 essentially becomes the only device that you will need between the mixer and the power amps. The following are just some of the features of the DriveRack 260. -
Page 4: Service Contact Info
® Introduction In addition to the amazing menu of processors available, the 260 also affords you the luxury of utilizing dbx Zone- Controller series wall-mounted control panels that will allow you to remotely control various parameters of the 260. The ZC-1 offers remote programmable Volume control to any installation using the DriveRack 260. The ZC-2 provides programmable Volume and Mute control. -
Page 5: Warranty
A Return Authorization Number must first be obtained from dbx. The company shall not be liable for any consequential damage as a result of the product’s use in any circuit or assembly. -
Page 6: Section 1 - Getting Started
Power Switch The Power Switch turns the DriveRack 260 on and off. Note: dbx Professional Products recommends that power amplifiers connected to the DriveRack 260, should be powered down prior to cycling the power on the DriveRack 260. PC Connection This DB-9 type connection is used to send and receive information to and from the GUI interface and for firmware updates. -
Page 7: Front Panel
LCD Display The backlit LCD display of the DriveRack 260 provides the user with all of the vital processing information of the DriveRack 260 including: signal routing, effect block editing and Wizard Setup functions. The display will also notify the user if any internal clipping is taking place within the unit by displaying “CLIP”... -
Page 8: Quick Start
3-Way - Outputs 1 & 2 (highs), Outputs 3 & 4 (midrange), Outputs 5 & 6 (lows) Of course you do have options to configure the DriveRack 260 differently than the examples listed above. However, for the novice user, adhering to the above connection examples will lower the probability of improper configuration. - Page 9 DriveRack ® Section 1 Getting Started Step-by-step Setup Procedure DriveRack® 260 User Manual...
- Page 10 DriveRack ® Section 1 Getting Started DriveRack® 260 User Manual...
- Page 11 DriveRack ® Section 1 Getting Started DriveRack® 260 User Manual...
- Page 12 DriveRack ® Section 1 Getting Started DriveRack® 260 User Manual...
- Page 13 DriveRack ® Section 1 Getting Started DriveRack® 260 User Manual...
- Page 14 DriveRack ® Section 1 Getting Started DriveRack® 260 User Manual...
- Page 15 DriveRack ® Section 1 Getting Started DriveRack® 260 User Manual...
- Page 16 DriveRack ® Section 1 Getting Started DriveRack® 260 User Manual...
-
Page 17: Section 2 - Editing Functions
2.1 Basic Navigation Modes Navigational aspects of the DriveRack 260 are simple and as follows. 1. FX buttons - This array of 12 FX buttons is your primary mode of directly accessing any effect module. 2. NEXT PG & PREV PG buttons - Successive presses of the NEXT PG or PREV PG buttons will move the user between pages within an effect block. -
Page 18: Navigating The Pre-Eq Section (Geq And Peq)
Slope - BS, BW, LR Slope - BS, BW, LR the XOVER used in (6,12,18,24,36,48) (6,12,18,24,36,48) each channel of the selected program menu. Successive presses of the Data wheel will select effect parameters within the currently selected page. DriveRack® 260 User Manual... -
Page 19: Navigating The Other Section
Window 1 to 10dB AGC(Post) Release 30 to 1.0dB/s Target -20-20dBu Hold 30 to 200ms Gain 1 to 20dB Low Thresh -60to-30dB Successive presses of the Data wheel will select effect parameters within the currently selected page. DriveRack® 260 User Manual... -
Page 20: Navigating The Delay Section
Output Trims AGC- Successive presses of the Data wheel will select effect parameters within the currently selected page. Successive presses of the Data wheel will select effect parameters within the currently selected page. DriveRack® 260 User Manual Navigating the WIZARD Section... -
Page 21: Navigating The Wizard Section
From program mode, press the Other button. Successive presses of the Other button will move you to each of the various insert modules available. Navigating the Other Section Pressing the Data Wheel will select the effect parameter to be edited. DriveRack® 260 User Manual OTHER <PREV PG... -
Page 22: Section 3 - Configuration Functions
Configuration Functions SECTION 3 – CONFIGURATION FUNCTIONS The Configuring section of the DriveRack 260 will be your key to successful navigation of the configuration functions of the DriveRack. The following information provides, descriptions about program functions and in depth configuration options of the DriveRack 260. -
Page 23: Editing Factory Programs
DATA wheel until the cursor is next to the parameter that you wish to edit. NAME: ROCK V <DATA> - SELECTS COMP THR -50 -30 -12 -5 0 <PREV/NEXTPG> - Compressor Delays PRESS <STORE> TO Over Easy DriveRack® 260 User Manual... -
Page 24: Saving Factory Program Changes
USER program by pressing the STORE button. The first time you press the STORE button the DriveRack 260 will ask you if you want to store or delete the program. Just press the STORE button a second time to advance and store the program. -
Page 25: Creating A User Configuration
Parametric EQ, Dynamics, post Delay, Output Gain and Phase. The following information contain a standard block diagram of the signal path in the DriveRack 260 which can be used as a reference map, as well as step-by-step instructions for creating custom user configurations. - Page 26 Crossover module). You can route either Input A, Input B or a sum of the Inputs (A+B) to any mono input crossover. As previously mentioned, a stereo crossover selection is indicated with the letters DriveRack® 260 User Manual...
- Page 27 Note that you can only link like type Dynamics modules. Use the PREV PG and NEXT PG buttons to move through outputs 1-6, selecting and linking/unlinking these modules as necessary, and then to the next module screen which will appear something like this: IMITER MONO DLY 20 MS OUTPUT CH2 810 ms Unused Route Select Select NAME Output Ch2 Link/Unlink Link/Unlink <STORE>-EDIT NAME DriveRack® 260 User Manual...
-
Page 28: Saving Configuration Changes
Once your Configuration edits have been loaded, these new changes can be saved. Please see section 3.4 ‘Saving Factory Program Changes’ for information on how to store and rename the program. You can then make necessary processing parameter changes (i.e. crossover, EQ, Delay adjustments, etc.). DriveRack® 260 User Manual... -
Page 29: Section 4 - Detailed Parameters
The following section will provide you with descriptions and explanations of all parameters within the DriveRack 260. 4.1 Pre-Crossover EQ (28-Band GEQ or 9-Band PEQ) The DriveRack 260’s Pre-Crossover EQ section may be configured as a single or linkable 28 band graphic EQ or 9-Band Parametric EQ. EQ On/Off Turns the EQ on and off. -
Page 30: Feedback Eliminator
(instead of taking out large sections of your sound). The AFS module of the DriveRack 260 allows the user to optimize the elimination of feedback. -
Page 31: Subharmonic Synthesizer
Sub-Harmonic Synth - On/Off Turns the Subharmonic Synth module on and off. Sub-Harmonics Synth - 0 to 100% This parameter sets the overall level of the Subharmonic Synthesizer. DriveRack® 260 User Manual... -
Page 32: Gate
Release sets the speed at which the gate “closes” or attenuates when the end of the Hold time is reached. Max ATT 0 to Inf. dB This sets the maximum amount of attenuation for the gate. DriveRack® 260 User Manual... -
Page 33: Automatic Gain Control (Agc)
Attack: 0.20 to 5 Seconds Adjusts how fast AGC will reduce gain when the signal level is above target. Release: 30.0 to 1 dB/Second Adjusts the rate of gain increase when the signal level drops below target. DriveRack® 260 User Manual... -
Page 34: Notch Filters
The DriveRack 260 Crossover can be configured as a 2x2, 3, 4, 5, or 6 (stereo configurations) or 1x1, 2, 3, 4, 5 or 6 (mono configurations). -
Page 35: Compressor/Limiter
Sets the slope rate when using a low or high shelf type filter. 4.9 Compressor/Limiter The DriveRack 260 also offers Compression and Limiting modules. The Compressor is a full bandwidth Stereo Compressor inserted prior to the Crossover. The Compressor is the perfect tool for tightening uneven signal sources, providing a more even mix. - Page 36 Release 360 dB / Sec to 5 dB / Sec Release is how fast the 260 comes out of compression. The release is in dB per second. For example, if release is set to 5 dB /sec, and the signal is at 10dB of gain reduction, the release time is 2 seconds. Too fast a release time can result in an audible volume jump, while too slow a release time can result in compression of signal that is not above threshold.
- Page 37 Attack .01 to 200 m Sec (per band or global) This is the speed at which the 260 limiter starts to limit the signal once it has crossed the threshold. Set the attack time longer for lower frequency bands, and shorter for higher frequency bands.
-
Page 38: Alignment Delay
4.11 Input Routing (IN) The signal routing begins at the INPUT ROUTING block of the 260. There are two input routing mixers; they are ‘A’ and ‘B’. These input routing mixers allow you to mix any combination of input channels, 1 and 2, for greater flexibility in routing. -
Page 39: Output
4.12 Output The output section of the DriveRack 260 provides the user with the ability to control output levels of the unit and adjust phase compensation of loudspeakers within the signal path. The output level control is located in the signal path before the limiters;... -
Page 40: Section 5 - Utilities/Meters
EQs, etc. The PUP Mute option provides two selectable parameters: Current - With this option selected the 260 will power up with all output mutes set to the same state as they • were when the unit was powered down.. -
Page 41: Zc Setup
This feature gives you the ability to control various parameters of the 260 such as Output Levels, Mute and Program Changes. Up to six ZC panels can be connected to a DriveRack 260. To program a ZC panel, proceed with the following instructions. - Page 42 No Change Boost 0dB Cut 0dB Output 1 3 5 • Selecting a ZC-3 gives the ability to assign switches A-D to call up any preset in the 260. Once a ZC-3 has been 2 4 6 selected, the display will appear something like this: ower Up Modes ZC Setup Set Security Level...
-
Page 43: Security
“ZC-Zone Controllers”. 5.4 Security The DriveRack 260 does provide a quick front panel System Lockout feature (see Appendix A.2 “Power Up Quick Key Options” for information on this feature). However, this System Lockout feature requires that the processor be power cycled to lock/unlock the device. - Page 44 Turn the DATA wheel until ‘Low’ is selected. Press the STORE button to change the overall device level to low. • The DriveRack 260 should now be locked out. To log back in to a particular access level, please follow this procedure: NAME: ROCK VENUE From Program mode, press the UTILITY button.
-
Page 45: Program List/Program Change
5.5 Program List/Program Change The DriveRack 260 allows you to set the unit to either scroll through programs in a sequential manner, or create custom program lists from within the Utility menu. This list makes it convenient for restricting access to a small list of programs. -
Page 46: Meters
Programs. All program numbers from the set number and below will be locked and cannot be overwritten. 5.6 Meters To meter various aspects of the 260, press and hold the UTILITY button until the display enters the Metering section. Use the PREV PG or NEXT PG button to move to the page that appears as follows: •... - Page 47 ZC wall panels. Use the PREV PG or NEXT PG button to move to the page that appears as follows: Output Trims Output Trims Zone Controllers Panel 4 Trim 0.0 Net 0.0 dB Trim 0.0 Net Panel 5 Trim 0.0 Net 0.0 dB Trim 0.0 Net Panel 6 Trim 0.0 Net 0.0 dB Trim 0.0 Net This (as well as the next) page displays the Trim and Net (Crossover gains + ZC gains) levels within the output section. DriveRack® 260 User Manual...
-
Page 48: Section 6 - Remote Control
Remote Control SECTION 6 – REMOTE CONTROL To make operation of the DriveRack 260 even more convenient, dbx includes the option of using the DriveRack PC GUI software (DriveWare™) and/or Zone Controllers (sold separately). The following section contains some basic information regarding the utilization of the DriveWare™... - Page 49 CONFIGURATION 2 • Boot up your computer and launch the DriveWare software application. The icon of the DriveRack 260 should automatically appear in the upper left-hand corner of the main window (meaning you are online with the device). If the DriveRack 260 icon does not appear, within DriveWare, go to File>Preferences.
- Page 50 Double left click on the DriveRack 260 icon in the upper left-hand corner of the main DriveWare window. • You will now see your 260 device Edit Window where you can program and control the DriveRack 260 device. • To edit modules, double-left-click on the desired module block.
- Page 51 To enter the Utility Menu, Right-Click-hold on the top bar of the program edit window. Select ‘Utilities’ from the menu items list. The Utility Menus will appear as follows: For more comprehensive information on using DriveWare, please visit the Training section and FAQs section at http:// dbxpro.com/en-US/support. DriveRack® 260 User Manual...
-
Page 52: Zc-Zone Controllers
The Zone Controllers offer additional utility to the DriveRack 260. They allow real-time adjustment of output levels, mutes and program changes from simple wall panel interfaces. On the 260, a maximum number of six Zone Controllers may be used and they may be nested, in other words, one controller may be used for a single zone and then another controller may be used for the entire venue or system. - Page 53 ‘Program’ will be loaded when this Switch Combination is triggered from the custom switches, which are connected to the ZC-4 5. Repeat steps 3 and 4 for all remaining Switch Combinations. DriveRack® 260 User Manual...
- Page 54 ZONE CONTROLLER WIRING The DriveRack 260 Zone Controllers, (ZC-1, ZC-2, ZC-3, ZC-4) can be wired serially or in parallel. To wire in series each Zone Controller must have an identification or zone number chosen using the DIP switches on the side of the controller (see diagram A).
- Page 55 DriveRack ® Section 6 Remote Control Diagram C ZC-BOB ZC-1 ZC-2 ZC-3 ZC-4 DriveRack® 260 User Manual...
- Page 56 When connecting Zone Controllers, in series, the following cable length restrictions apply: • If using a single ZC, the ZC may be connected directly to the DriveRack 260. The maximum cable length for a single ZC connected to the DriveRack 260 cannot exceed 1000 feet.
-
Page 57: Section 7 - Application Guide
SECTION 7 – APPLICATION GUIDE This Application guide section is provided to offer suggested installation applications of the DriveRack 260 that will allow you to optimize peak performance of the processor. Note that the six included applications represent the extensive flexibility of the DriveRack units. -
Page 58: Stereo Tri-Amp
1. Select a program (Factory: 2x6 Stereo) as a template. 2. Load the program by pressing the PROG/CONFIG button. 3. Adjust the individual parameters for the system by pressing the Processing Module buttons Left Right MA-5002VZ JBL SR4731X JBL 4719X DriveRack® 260 User Manual... -
Page 59: Stereo W/ Four Aux Zones
2. Connect the outputs of the DriveRack and run to the selected speaker amplifier. 3. Making sure that all outputs are muted, apply power to the mixer and amplifiers. 4. Make connections between the Zone Controllers (see Section 6.2 “ZC-Zone Controllers”) and the 260. Software 1. -
Page 60: Stereo Bi-Amp W/ Dual Delay
2. Connect the outputs of the DriveRack and run to the selected speaker amplifier. 3. Making sure that all outputs are muted, apply power to the mixer and amplifiers. 4. Make connections between the Zone Controllers (see section “6.2 ZC-Zone Controllers”) and the 260. Software 1. -
Page 61: Appendix
A.1 Factory Reset In the event that a reset is required, the DriveRack 260 offers you the option of performing a “Soft” or “Hard” reset. The Soft Reset resets all operating parameters except user programs. The Hard Reset Procedure will reset all programmable information back to the factory defaults. -
Page 62: Specifications
Alignment Delay: Total of 2.7 seconds available for allocation amongst all delay modules (1.3 seconds maximum delay time) A/D Performance: Type: dbx Type IV conversion system Dynamic Range: >107 dB unweighted, >110 dB A-weighted Type IV dynamic range: 123 dB with transient material, A-weighted, 22kHz BW 121 dB with transient material, unweighted, 22kHz BW 115 dB... -
Page 63: Auto Eq Optimization Tips
Note: If using a ‘Custom’ configuration, meaning any of your amplifiers/and or speakers were not selectable in the System Setup Wizard, it is recommend to properly tune some of the parameters within the DriveRack 260 before using the Auto EQ feature. Failing to do so could yield undesirable results. Therefore, it is highly recommended that the... -
Page 64: Crossover Diagrams
DriveRack ® Appendix Appendix A.5 Crossover Diagrams 1X1(1-band) 1X2(2-band) 1X3(3-band) 1X4(4-band) 1X6(4-band) 1X5(4-band) 2X3(2-band) L Mono 2X5 (3-band) 2X4(2-band) 2X6 (3-band) L Mono DriveRack® 260 User Manual... -
Page 65: Program List
® Appendix Appendix A.6 Program List User Factory Program Name 2x3w/3Zones LCRw/Cluster 1x4w/2Zones 2x5w/1Zone 2x4Tri-Amped 2x4w/2Zones LCRw/Monitor STw/2Delays Multi-Zone 2x3w/Bal&Dly AM4315/64 AC2215/64 SRX738 AM6340/95 EON15G2 AM4212/95 MRX512M PRX525 AC2212/00 AM6315/64 AC2215/00 JRX125 SRX712M AC2212/95 AM6212/64 1 DriveRack® 260 User Manual... -
Page 66: Block Diagram
DriveRack ® Appendix Appendix A.7 Block Diagram DriveRack® 260 User Manual... -
Page 67: Input And Output Diagrams
DriveRack ® Appendix Appendix A.8 Input and Output Diagrams XLR 1 Input 1 Gain DSP Input 1 Input 2 Gain Input 1 Gain XLR 2 DSP Input 2 Input 2 Gain Euroblock DriveRack® 260 User Manual... -
Page 68: Gain Level Jumpers
In the DriveRack 260 we have included a Wizard setup tool to help in system setup. If you use the Wizard to set up your DriveRack 260 it will automatically set the limiters for some amplifier selections. - Page 69 With the amplifiers clipping, now go to the Limiter page of the DriveRack 260 and turn the limiter for each output band on. Make sure that the threshold is all the way up to +20dB.
- Page 70 Phone: (801) 566-8800 Website: dbxpro.com Support: dbxpro.com/en-US/support dbx Professional Products is a registered trademark of Harman © 2015 Harman All rights reserved DriverRack ® 260 Owner’s Manual PN: 5059585-A...