Motorola WT4090 User Manual
Wearable terminal
Hide thumbs
Also See for WT4090:
- Quick start manual (2 pages) ,
- Integrator manual (206 pages) ,
- User manual (114 pages)
Table of Contents
Advertisement
Advertisement
Table of Contents
Troubleshooting

Related Manuals for Motorola WT4090


Summary of Contents for Motorola WT4090
- Page 1 WT4070/90 Wearable Terminal User Guide...
- Page 3 WT4070/90 Wearable Terminal User Guide 72E-87633-03 Rev. A May 2008...
-
Page 4: Patents
Motorola. No right to copy a licensed program in whole or in part is granted, except as permitted under copyright law. The user shall not modify, merge, or incorporate any form or portion of a licensed program with other program material, create a derivative work from a licensed program, or use a licensed program in a network without written permission from Motorola. -
Page 5: Revision History
Revision History Changes to the original manual are listed below: Change Date -01 Rev. A 09/25/2006 -02 Rev. A 02/22/2007 -03 Rev. A 05/06/2008 Description Initial Release Add new start up windows, Fusion 2.5 information, 128 MB Flash configuration. Add OEM version 05.30.000 information. Add freezer pouch information. - Page 6 WT4070/90 Wearable Terminal User Guide...
-
Page 7: Table Of Contents
Table of Contents Patents... ii Revision History... iii About This Guide Introduction ... ix Documentation Set Configurations... x Software Versions Chapter Descriptions ... xii Notational Conventions... xii Related Documents and Software ... xii Service Information... xiii Chapter 1: Getting Started Introduction ... - Page 8 WT4070/90 Wearable Terminal User Guide Keypads ... 2-3 Two-color Alphanumeric Keypad ... 2-3 Triple-Tap Alphanumeric Keypad ... 2-5 Display ... 2-9 Start Up Window ... 2-9 Windows CE 5.0 Desktop ... 2-10 Status Icons ... 2-10 Using the Keypad to Navigate Applications ... 2-11 Key Combinations ...
- Page 9 Chapter 4: Maintenance & Troubleshooting Introduction ... 4-1 Maintaining the Wearable Terminal ... 4-1 Wrist Mount Cleaning Instructions ... 4-1 Battery Safety Guidelines ... 4-2 Troubleshooting ... 4-3 Wearable Terminal ... 4-3 Four Slot Ethernet Cradle ... 4-6 Four Slot Spare Battery Charger ... 4-7 Single Slot USB Cradle ...
- Page 10 viii WT4070/90 Wearable Terminal User Guide...
-
Page 11: About This Guide
About This Guide Introduction This guide provides information about using the WT4070/90 family of mobile terminals and accessories. NOTE Screens and windows pictured in this guide are samples and can differ from actual screens. Documentation Set The documentation set for the WT4070/90 is divided into guides that provide information for specific user needs. •... -
Page 12: Configurations
WT4090 Wearable Terminal User Guide Configurations This guide covers the following configurations: Configuration Radios WT4070 WLAN: 802.11b/g WPAN: Bluetooth WT4090 WLAN: 802.11a/b/g WPAN: Bluetooth Data Display Memory Capture 2.8” QVGA 128 MB RAM/ Optional Color 64 MB Flash accessory 2.8” QVGA... -
Page 13: Software Versions
Software Versions This guide covers various software configurations and references are made to operating system or software versions for: • OEM version • Fusion version. OEM Software To determine the OEM software version: Press and then to open the CTRL Using the navigation keys, select Press the Blue key and the down arrow to open the Press... -
Page 14: Chapter Descriptions
• Sequential lists (e.g., those that describe step-by-step procedures) appear as numbered lists. Related Documents and Software The following documents provide more information about the WT4090 wearable terminals. • WT4090 Quick Start Guide, p/n 72-86717-xx Terminal, explains how to use the wearable terminal. This includes... -
Page 15: Service Information
Software type and version number Motorola responds to calls by email, telephone or fax within the time limits set forth in support agreements. If your problem cannot be solved by Motorola Enterprise Mobility Support, you may need to return your equipment for servicing and will be given specific directions. - Page 16 WT4090 Wearable Terminal User Guide...
-
Page 17: Chapter 1 Getting Started
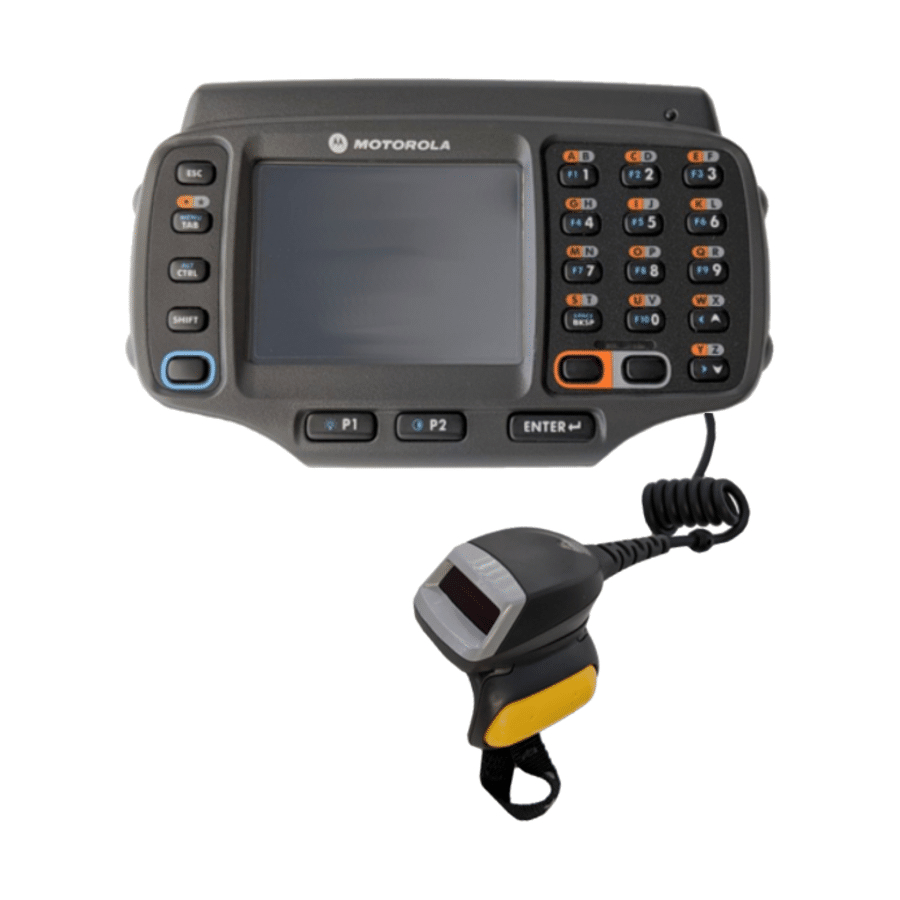
Chapter 1 Getting Started Introduction This chapter lists the parts and accessories for the wearable terminal and explains how to install and charge the batteries and start the wearable terminal for the first time. Display Application Keypad Action Keypad Interface Connector Rubber Plug Cradle Connector WT4070/90 Wearable Terminal... -
Page 18: Unpacking The Wearable Terminal
1 - 2 WT4070/90 Wearable Terminal User Guide Parts of the WT4070/90 Table 1-1 Item Display Power Button Charge Status LED Speaker Keypads Battery Interface Connector Cradle Connector Battery Release Cleat Unpacking the Wearable Terminal Carefully remove all protective material from around the wearable terminal and save the shipping container for later storage and shipping. -
Page 19: Accessories
Accessories Table 1-2 lists the major accessories available for the wearable terminal: Wearable Terminal Accessories Table 1-2 Accessory Single Slot USB Cradle Four Slot Ethernet Cradle Four Slot Spare Battery Charger RS409 Scanner RS309 Scanner Wrist Mount Hip Mount Headset Headset Adapter Replacement Batteries Software... - Page 20 1 - 4 WT4070/90 Wearable Terminal User Guide Scan LED Protective Cap Trigger Connector Interface Connector Exit Window Trigger Cable Scan Button Interface Cable RS309 Scanner Figure 1-3...
-
Page 21: Getting Started
Getting Started In order to start using the wearable terminal for the first time: • Install the main battery • Charge the main battery and backup battery • Install the wearable terminal onto the wrist mount • Install an optional scanner •... -
Page 22: Charging The Battery
1 - 6 WT4070/90 Wearable Terminal User Guide Charging the Battery CAUTION Ensure that you follow the guidelines for battery safety described in Charging the Main Battery and Memory Backup Battery Before using the wearable terminal for the first time, charge the main battery until the amber Charge Status LED remains lit (see Table 1-3 on page 1-6 The wearable terminal is equipped with a memory backup battery which automatically charges from the main... -
Page 23: Charging Spare Batteries
Charging Spare Batteries Use the following accessories to charge spare batteries: • Single Slot USB Cradle • Four Slot Spare Battery Charger. To charge a spare battery: Ensure the accessory used to charge the spare battery is connected to the appropriate power source. Insert the spare battery into the accessory’s spare battery charging slot with the charging contacts facing down (over the charging pins) and gently press down on the battery to ensure proper contact. -
Page 24: Installing The Wrist Mount
1 - 8 WT4070/90 Wearable Terminal User Guide Installing the Wrist Mount The wrist mount provides the mounting of the wearable terminal on the forearm for hands-free applications. Refer to the Wrist Mount Installation Guide for information on the wrist mount. Release Lever Wrist Mount Figure 1-6... - Page 25 Wearable Terminal and Wrist Mount Figure 1-8 To remove the wearable terminal from the wrist mount, press down on the release lever and slide the wearable terminal out. Release Lever Wearable Terminal Removal Figure 1-9 Getting Started 1 - 9...
-
Page 26: Connecting A Scanner
1 - 10 WT4070/90 Wearable Terminal User Guide Connecting a Scanner The RS309 and RS409 scanners can be used with the wearable terminal. Refer to RS409 Scanner on page 3-7 Starting the Wearable Terminal Press the Power button to turn on the wearable terminal. If the wearable terminal does not power on, perform a cold boot. -
Page 27: Chapter 2 Using The Wearable Terminal
Chapter 2 Using the Wearable Terminal Introduction This chapter explains the physical buttons and controls on the wearable terminal, and provides basic instructions for using the wearable terminal, including powering on and resetting the wearable terminal, using a headset, entering information and scanning. This chapter also details the operation of the Windows CE 5.0 operating system including the desktop, applications and settings. -
Page 28: Led Indicators
2 - 2 WT4070/90 Wearable Terminal User Guide LED Indicators The Charge Status LED indicates the WT4090 charging status when the WT4090 is in a cradle. describes the Charge Status LED indications. Charge Status LED Figure 2-2 Charge Status LED Indications... -
Page 29: Keypads
• Two-color alphanumeric keypad • Triple-tap (cell phone like) alphanumeric keypad. Two-color Alphanumeric Keypad The two-color alphanumeric keypad contains application keys, scroll keys and function keys. The keypad is color-coded to indicate the alternate function keys (blue, orange and gray). Note that keypad functions can be changed by an application so the wearable terminal’s keypad may not function exactly as described. - Page 30 2 - 4 WT4070/90 Wearable Terminal User Guide Two-color Alphanumeric Keypad Descriptions (Continued) Table 2-2 Scroll Keys Moves up or down from one item to another or increases/decreases specified values. Moves left or right from one item to another when used with the Blue key. For each left or right scroll, the Blue key must be pressed first.
-
Page 31: Triple-Tap Alphanumeric Keypad
Triple-Tap Alphanumeric Keypad The triple-tap alphanumeric keypad contains application keys, scroll keys and function keys. The keypad is color-coded to indicate the alternate function keys (blue and orange). Note that keypad functions can be changed by an application so the wearable terminal’s keypad may not function exactly as described. See for key and button descriptions and Triple-tap Alphanumeric Keypad Figure 2-4... - Page 32 2 - 6 WT4070/90 Wearable Terminal User Guide Triple-tap Alphanumeric Keypad Descriptions (Continued) Table 2-3 Alphanumeric In default state, produces the numeric value on the key. In Alpha state, produces the lower case alphabetic characters shown in orange text. For example, press and release the Orange key and then press the lowercase letter ‘k’.
- Page 33 Special Character Generation Map (Continued) Table 2-4 Special Character Blue - Orange - (period) Orange - Blue - Orange - 8 (semi-colon) Blue - Orange - 9 (equal sign) Blue - Orange - Tab (dash) Shift - 1 (exclamation point) Shift - 2 (at sign) Shift - 3...
- Page 34 2 - 8 WT4070/90 Wearable Terminal User Guide Special Character Generation Map (Continued) Table 2-4 Special Character (close curly bracket) (pipe) (tilde) < (less than sign) > (greater than sign) (colon) (plus sign) (underscore) Two-color Keypad Shift - Blue - Orange - 3 Shift - Blue - Orange - 4 Shift - Blue - Orange - 5 Shift - Blue - Orange - 6...
-
Page 35: Display
Display The wearable terminal is factory installed with the Windows CE 5.0 operating system. When the wearable terminal starts, it automatically launches the Start Up application. A customer specific application can be configured to automatically start-up and the Windows CE NOTE 5.0 desktop and Start Up application might not be visible or accessible. -
Page 36: Windows Ce 5.0 Desktop
2 - 10 WT4070/90 Wearable Terminal User Guide Windows CE 5.0 Desktop The following paragraphs describe the Windows CE 5.0 desktop. Depending upon the customer’s configuration of the wearable terminal, the desktop may not be available. Status Icons The Taskbar at the bottom of the window displays the active programs, current time, battery status and communication status. -
Page 37: Using The Keypad To Navigate Applications
Status Icons (Continued) Table 2-6 Status Icon Wireless connection status icon. Indicates WLAN signal strength. Indicates that the SHIFT key is selected. Indicates that the Blue key is selected. Indicates that the CTRL key is selected. Indicates that the ALT key is selected. Indicates that the Orange key is selected. -
Page 38: Selecting Items
2 - 12 WT4070/90 Wearable Terminal User Guide Press the up arrow until the Press the Blue key and the down arrow to open the Press the down arrow until Press key to launch ENTER Selecting Items When using the navigation keys to perform tasks in an application, the active item is highlighted using either a color background and/or a dashed box. -
Page 39: Navigating Fields
Navigating Tabs Figure 2-9 Navigating Fields To navigate from one field to another, press the cursor through the fields in the window. Selecting Checkboxes and Radio Buttons To select or deselect checkboxes and radio buttons press the TAB key until the field is highlighted. Press (SPACE) to select or deselect the checkbox or radio button. -
Page 40: Resetting The Wearable Terminal
2 - 14 WT4070/90 Wearable Terminal User Guide Repeat step 3 to move to the desired item. Press SPACE to highlight the item. Repeat steps 3 through 5 until all items are selected. Perform the desired function. Resetting the Wearable Terminal There are two types of resets, warm boot and cold boot. -
Page 41: Data Capture
Data Capture Wearable terminals used with an optional wearable laser scanner allow collection of data by scanning one dimensional bar codes. Laser Scanning Wearable terminals with an optional wearable laser scanner have the following features: • Reading of a variety of bar code symbologies, including the most popular linear, postal, and 1-D code types. •... -
Page 42: Scanning Tips
2 - 16 WT4070/90 Wearable Terminal User Guide Laser Scanner Aiming Pattern Figure 2-11 Release the trigger. Scanning Tips Optimal scanning distance varies with bar code density and scanner optics. • Hold the scanner farther away for larger symbols. • Move the scanner closer for symbols with bars that are close together. -
Page 43: Waking The Wearable Terminal
Waking the Wearable Terminal The wake up conditions define what actions wake up the wearable terminal after it has gone into suspend mode. The wearable terminal can go into suspend mode by either pressing the Power button or automatically by control panel time-out settings. - Page 44 2 - 18 WT4070/90 Wearable Terminal User Guide...
-
Page 45: Chapter 3: Accessories
Chapter 3 Accessories Introduction The wearable terminal accessories provide a variety of product support capabilities. Accessories include cradles, cables and scanners. Cradles • Single Slot USB cradle charges the wearable terminal main battery and a spare battery. It also synchronizes the wearable terminal with a host computer through either a serial or a USB connection. -
Page 46: Single Slot Usb Cradle
CAUTION Ensure that you follow the guidelines for battery safety described in This section describes how to use a Single Slot USB cradle communication setup procedures refer to the WT4090 Integrator Guide. Spare Battery Charging LED Single Slot USB Cradle... -
Page 47: Battery Charging Indicators
• Synchronizes information between the wearable terminal and a host computer. (With customized or third party software, it can also be used to synchronize the wearable terminal with corporate databases.) • Charges the wearable terminal’s battery and a spare battery. •... -
Page 48: Four Slot Ethernet Cradle
CAUTION Ensure that you follow the guidelines for battery safety described in This section describes how to use a Four Slot Ethernet cradle communication setup procedures refer to the WT4090 Integrator Guide. Four Slot Ethernet Cradle Figure 3-2 The Four Slot Ethernet cradle: •... -
Page 49: Battery Charging
Battery Charging The four slot Ethernet cradle can charge up to four wearable terminals simultaneously. To charge the wearable terminal: Slide the wearable terminal into the wearable terminal slot. The wearable terminal amber Charge Status LED indicates the wearable terminal battery charging status. The Standard Battery usually charges in less than four hours.See When charging is complete, remove the wearable terminal from the cradle. -
Page 50: Four Slot Spare Battery Charger
3 - 6 WT4070/90 Wearable Terminal User Guide Four Slot Spare Battery Charger CAUTION Ensure that you follow the guidelines for battery safety described in This section describes how to use the Four Slot Spare Battery Charger to charge up to four wearable terminal spare batteries. -
Page 51: Rs409 Scanner
Cable Clip Installation Figure 3-5 Rotate the trigger assembly to the correct position for the hand that the scanner mounts to. mounted on the arm. The extended cable configuration connects the RS409 to the WT4090 Interface Connector Accessories 3 - 7... - Page 52 3 - 8 WT4070/90 Wearable Terminal User Guide Slide the RS409 onto the index finger with the scan trigger next to the thumb. Place the RS409 on Index Finger Figure 3-6 Tighten the finger strap. Tightening Straps Figure 3-7 If required, cut excess finger strap material. After connecting the scanner, warm boot the wearable terminal.
-
Page 53: Rs309 Scanner
RS309 Scanner The RS309 connects to the wearable terminal and mounts on the back of either hand using the RS309 glove. Remove the rubber plug from the wearable terminal interface connector. Connect the RS309 trigger cable to the back of the RS309. Trigger Connector Connecting Trigger Cable to RS309 Figure 3-8... - Page 54 3 - 10 WT4070/90 Wearable Terminal User Guide Interface Connector Connecting Interface Cable to RS309 Figure 3-10 Mount the RS309 on the RS309 glove. Refer to the RS309 Glove Installation Guide for information on mounting the RS309. Route the trigger cable around the side of the RS309, next to the index finger. Slide the trigger mount on the index finger, with the button positioned next to the thumb, and adjust the velcro strap.
-
Page 55: Hip Mount
Hip Mount The hip mount allows the user to mount the wearable terminal on the hip for use in voice picking applications. An RS309 or RS409 scanner with an extended cable is required when using the hip mount. Slide the wearable terminal into the hip mount. Insert Wearable Terminal into Hip Mount Figure 3-12 Close the front flap followed by the back flap. -
Page 56: Routing An Extended Cable Scanner
Motorola offers for sale cable clips, which attach to clothing and hold the scanner cable so that the cable does not interfere with the user. The cable clips are similar to badge clips and can be purchased at any office supply store as well. - Page 57 Accessories 3 - 13 Routing RS309 Scanner Cable from Hip to Hand Figure 3-16...
-
Page 58: Freezer Pouch
Furthermore, if batteries were left in wearable terminals stored in the freezer, the batteries themselves could freeze, which could damage them. At the least, they would not function while frozen. • Batteries cannot be charged below 0°C (32°F). Motorola cradles and battery chargers have an automatic shut-off to insure this. •... - Page 59 Insert Wearable Terminal into Freezer Pouch Figure 3-17 Close the front flap followed by the back flap. Close Freezer Pouch Flaps Figure 3-18 Slide a belt through the belt loop on the back of the freezer pouch. The wearable terminal can be mounted right-side up or up-side down depending upon user preference or application.
-
Page 60: Wired Headset
3 - 16 WT4070/90 Wearable Terminal User Guide Wired Headset You can use a mono headset with a microphone for audio communication with an audio enabled application. The Headset Adapter is required to connect a headset with a standard 2.5 mm jack to the wearable terminal. Typical Headset Connected to Headset Adapter Figure 3-19 Refer to the WT4070/90 Integrator Guide for instructions on assembling the headset and Headset Adapter. -
Page 61: Chapter 4 Maintenance & Troubleshooting
Chapter 4 Maintenance & Troubleshooting Introduction This chapter includes instructions on cleaning and storing the wearable terminal, and provides troubleshooting solutions for potential problems during wearable terminal operation. Maintaining the Wearable Terminal For trouble-free service, observe the following tips when using the wearable terminal: •... -
Page 62: Battery Safety Guidelines
In the event of a battery leak, do not allow the liquid to come in contact with the skin or eyes. If contact has been made, wash the affected area with large amounts of water and seek medical advice. • If you suspect damage to your equipment or battery, contact Motorola Enterprise Mobility support to arrange for inspection. Replaceable Pad... -
Page 63: Troubleshooting
Replace the wearable terminal in the cradle, or reattach the Synchronization cable and re-transmit. See the System Administrator. Perform setup. Refer to the WT4090 Integrator Guide for details. Ensure that Microsoft ActiveSync 4.1 or greater is installed on the host computer. - Page 64 4 - 4 WT4090 Wearable Terminal User Guide Troubleshooting the Wearable Terminal (Continued) Table 4-1 Problem Wearable terminal Wearable terminal turns itself off. is inactive. Battery is depleted. Battery is not inserted properly. The wearable terminal’s battery is low and it powers down to protect memory content.
- Page 65 Note: If the scanner is still not reading symbols, contact the distributor or Motorola. Disconnect the headset adapter prior to performing a cold boot. Do not press trigger during a cold boot.
-
Page 66: Four Slot Ethernet Cradle
4 - 6 WT4090 Wearable Terminal User Guide Four Slot Ethernet Cradle Troubleshooting the Four Slot Ethernet Cradle Table 4-2 Problem Wearable terminal amber Charge Status LED does not light when wearable terminal inserted. Wearable terminal battery is not charging. -
Page 67: Four Slot Spare Battery Charger
Four Slot Spare Battery Charger Troubleshooting The Four Slot Spare Battery Charger Table 4-3 Symptom Possible Cause Batteries not Battery was removed charging. from the charger or charger was unplugged from AC power too soon. Battery is faulty. Battery contacts not connected to charger. -
Page 68: Single Slot Usb Cradle
4 - 8 WT4090 Wearable Terminal User Guide Single Slot USB Cradle Troubleshooting the Single Slot USB Cradle Table 4-4 Symptom Possible Cause Charge Status Cradle is not receiving LEDs do not light power. when wearable Wearable terminal is terminal or spare... - Page 69 Solution Replace wearable terminal in cradle and retransmit. See the System Administrator. Perform setup as described in the WT4090 Integrator Guide. Ensure that Microsoft ActiveSync 4.1 or greater is installed on the host computer. Ensure that the cable has a USB A connector on one end and a USB mini B connector on the other end.
- Page 70 4 - 10 WT4090 Wearable Terminal User Guide...
-
Page 71: Appendix A Specifications
Appendix A Specifications Technical Specifications The following tables summarize the wearable terminal’s intended operating environment and general technical hardware specifications. Wearable Terminal The following table summarizes the wearable terminal’s intended operating environment. Technical Specifications Table A-1 Item Physical and Environmental Characteristics Dimensions Weight (including battery) Keyboard... - Page 72 A - 2 WT4090 Wearable Terminal User Guide Technical Specifications (Continued) Table A-1 Item User Environment Operating Temperature Storage Temperature Battery Charging Temperature Humidity Drop Specification Tumble Environmental Sealing WLAN Wireless Data Communications WLAN radio Operating Channels Security Voice Communication...
-
Page 73: Rs309 Scanner
Technical Specifications (Continued) Table A-1 Item Peripherals and Accessories Cradles Printers Charger Other Accessories Regulatory Electrical Safety RS309 Scanner RS309 Technical Specifications Table A-2 Item Physical and Environmental Characteristics Dimensions (standard version without cables attached) Weight (standard version without cables attached) Current Standby Current Voltage... -
Page 74: Rs409 Scanner
A - 4 WT4090 Wearable Terminal User Guide RS309 Technical Specifications (Continued) Table A-2 Item Pitch User Environment Operating Temperature Storage Temperature Humidity Drop Specification Environmental Sealing Ambient Light Immunity Regulatory Electrical Safety EMI/RFI Laser Safety Laser Decode Capability RS409 Scanner... - Page 75 RS409 Technical Specifications (Continued) Table A-3 Item Scan Rate 104 (± 12) scans/sec (bidirectional) Nominal Working Density5 mil Distance Code Type39 39 Far (inches)4.758.75 13.25 Far (inches)8.7514.25 ± 50 degrees from normal Roll ± 35 degrees from vertical Pitch ± 65 degrees from normal User Environment Operating Temperature -4 °F to 122 °F (-20 °C to 50 °C)
-
Page 76: Cradles
A - 6 WT4090 Wearable Terminal User Guide Cradles Accessory Specifications Table A-4 Single Slot USB Cradle Operating 32 °F to 122 °F Temperature (0 °C to +50 °C) Storage -40 °F to 158 °F Temperature (-40 °C to 70 °C) 32 °F to 104 °F... -
Page 77: Appendix B Regulatory Information
Appendix B Regulatory Information Introduction This appendix contains the accessory power supply regulatory compliance statements. Accessory Power Supply Regulatory Compliance Accessory Power Supplies, Regulatory Compliance Statements Table B-1 Accessory Single Slot USB Cradle Power Supply Four Slot Battery Charger Power Supply Four Slot Ethernet Cradle Power Supply... - Page 78 B - 2 WT4090 Wearable Terminal User Guide...
- Page 79 Glossary API. An interface by means of which one software component communicates with or controls another. Usually used to refer to services provided by one software component to another, usually via software interrupts or function calls Application Programming Interface. See API. ANSI Terminal.
- Page 80 Glossary - 2 WT4090 Wearable Terminal User Guide Byte. On an addressable boundary, eight adjacent binary digits (0 and 1) combined in a pattern to represent a specific character or numeric value. Bits are numbered from the right, 0 through 7, with bit 0 the low-order bit. One byte in memory is used to store one ASCII character.
- Page 81 Decode Algorithm. A decoding scheme that converts pulse widths into data representation of the letters or numbers encoded within a bar code symbol. Decryption. Decryption is the decoding and unscrambling of received encrypted data. Also see, Encryption and Key. Depth of Field. The range between minimum and maximum distances at which a scanner can read a symbol with a certain minimum element width.
- Page 82 Glossary - 4 WT4090 Wearable Terminal User Guide Host Computer. A computer that serves other terminals in a network, providing such services as computation, database access, supervisory programs and network control. IEC. International Electrotechnical Commission. This international agency regulates laser safety by specifying various laser operation classes based on power output during operation.
- Page 83 IS-95. Interim Standard 95. The EIA/TIA standard that governs the operation of CDMA cellular service. Versions include IS-95A and IS-95B. See CDMA. Key. A key is the specific code used by the algorithm to encrypt or decrypt the data. Also see, Encryption and Decrypting. laser scanner.
- Page 84 Glossary - 6 WT4090 Wearable Terminal User Guide Open Data-Link Interface (ODI). Novell’s driver specification for an interface between network hardware and higher-level protocols. It supports multiple protocols on a single NIC (Network Interface Controller). It is capable of understanding and translating any network information or request sent by any other ODI-compatible protocol into something a NetWare client can understand and process.
- Page 85 RS-232. An Electronic Industries Association (EIA) standard that defines the connector, connector pins, and signals used to transfer data serially from one device to another. Scan Area. Area intended to contain a symbol. Scanner. An electronic device used to scan bar code symbols and produce a digitized pattern that corresponds to the bars and spaces of the symbol.
- Page 86 Terminal. See Wearable Terminal. Terminal Emulation. A “terminal emulation” emulates a character-based mainframe session on a remote non-mainframe terminal, including all display features, commands and function keys. The WT4090 Series supports Terminal Emulations in 3270, 5250 and VT220. TFTP. (Trivial File Transfer Protocol) A version of the TCP/IP FTP (File Transfer Protocol) protocol that has no directory or password capability.
- Page 87 Warm Boot. A warm boot restarts the wearable terminal by closing all running programs. All data that is not saved to flash memory is lost. Wearable Terminal. In this text, wearable terminal refers to the Symbol WT4090 that can be set up to communicate with a network, using wireless radio technology.
- Page 88 Glossary - 10 WT4090 Wearable Terminal User Guide...
- Page 89 Index Numerics 1-D bar codes ......2-15 28-key keypad ......2-5 accessories .
- Page 90 Index - 2 WT4090 Wearable Terminal User Guide current time ....... 2-10 data capture .
- Page 91 scan status ....... 2-16 scan status See also data capture scanning bar codes .
- Page 92 Index - 4 WT4090 Wearable Terminal User Guide...
- Page 94 1-800-927-9626 http://www.symbol.com MOTOROLA and the Stylized M Logo and Symbol and the Symbol logo are registered in the U.S. Patent and Trademark Office. All other product or service names are the property of their registered owners. © Motorola, Inc. 2008...