
Related Manuals for Motorola DTR SERIES DTR550


Summary of Contents for Motorola DTR SERIES DTR550
-
Page 1: User Guide
® DTR Series Title Page DTR550 & DTR650 User Guide Motorola, Inc. 8000 West Sunrise Boulevard Fort Lauderdale, Florida 33322 9980384R89-O... -
Page 2: Foreword
No duplication or distribution of this document or any portion thereof shall take place without the express written permission of Motorola. No part of this manual may be reproduced, distributed, or transmitted in any form or by any means, electronic or mechanical, for any purpose without the express written permission of Motorola. -
Page 3: Table Of Contents
Table of Contents Foreword ...inside cover FCC Licensing Information ...v Chapter 1 Introduction ... 1-1 Notations Used in This Manual... 1-1 Your DTR Series Radio ... 1-3 Getting Started ... 1-4 Menu Icons ... 1-4 Status Icons ... 1-4 Text Area ... 1-5 Display Options... - Page 4 Call Alerts ... 2-4 Sending Call Alerts ... 2-4 Receiving a Call Alert... 2-4 Text Messaging ... 2-5 Receiving a Message... 2-5 Reading from the Inbox... 2-5 Replying to a Received Message ... 2-6 Sending a Text Message ... 2-7 Composing a Message Using the Mini Keyboard ...
- Page 5 Cloning Using the Cloning Cable... 5-1 Cloning by Sending a Contact ... 5-3 Chapter 6 Troubleshooting... 6-1 Chapter 7 Motorola Limited Warranty for the United States and Canada... 7-3 What Does this Warranty Cover?... 7-3 Products and Accessories ... 7-3 Exclusions... 7-3 Software...
- Page 6 Table of Contents February 10, 2005 9980384R89-O...
-
Page 7: Fcc Licensing Information
Read this manual carefully and make sure you know how to properly operate radio before use. Changes or modifications not expressly approved by Motorola may void the user’s authority granted by the FCC to operate this radio and should not be made. To comply with FCC requirements, transmitter adjustments should be made only by or under the supervision of a person certified as technically qualified to perform transmitter maintenance and repairs. - Page 8 Notes February 10, 2005 9980384R89-O...
-
Page 9: Chapter 1 Introduction
The DTR Series radios provide cost-effective communications for businesses such as retail stores, restaurants, schools, construction sites, manufacturing, property and hotel management, and more. Motorola professional two-way radios are the perfect communications solution for all of today’s fast-paced industries. - Page 10 Your model number is shown on the radio lens above the display, and tells you the following information: PublicGroups Available PrivateGroups Available PrivateCall SMS Messaging Vibracall® Clock/Alarm Scroll List Call Forwarding Remote Disable Remote Monitor Remote Time Battery Life Charging Time Drop in Charging Tray February 15, 2005 Introduction: Notations Used in This Manual...
-
Page 11: Your Dtr Series Radio
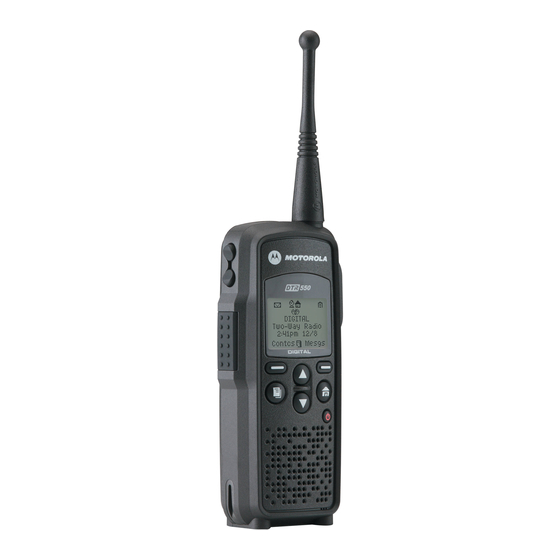
Introduction: Your DTR Series Radio Your DTR Series Radio Volume Controls Push-to-Talk (PTT) Button Menu Key Speaker Plug-in Charging and Connect Data Accessories 9980384R89-O Antenna Audio Jack Connect audio accessories Option Keys Use to select display options Home Key Use to exit the current menu and return to the idle screen Power Button Navigation Keys... -
Page 12: Getting Started
Getting Started Any time your radio is powered on, the display provides you with information and options. Text Area 5:49pm 11/14 Contcs The display shown is in idle. The idle screen appears when your radio is on, but not engaged in any activity. -
Page 13: Text Area
WARNING: Do not attempt to change or charge the battery in a hazardous atmosphere. To charge the battery, place the battery (with or without the radio) in a Motorola-approved charger. 9980384R89-O keys. -
Page 14: Charging The Radio
Charging the Radio While the radio is charging, the display lights and the battery status icon flashes to show the status. The battery will charge in approximately 1-3 hours, and battery gauge will show all segments and stop flashing when fully charged. Charging using the Drop-in Charging Tray NOTE: Use of the Drop-in Charging Tray is recommended for daily use. -
Page 15: Charging A Radio And Battery Using A Multi-Unit Charger
Introduction: Attaching the Battery Charging a Radio and Battery using a Multi-Unit Charger A Multi-Unit Charger (MUC) is available separately (RPN4040) which will charge up to 6 radios, batteries, or a combination of the two at the same time. When charging a radio in the MUC, the battery icon on the radio display shows the charging status. When charging a battery, the LED in front of the pocket indicates charging status. -
Page 16: Swivel Belt Holster
Swivel Belt Holster 1. Slide the bottom of radio into the holster and push the top of the radio against it until it snaps into place. 2. To remove, push the tab located on top of the holster and pull the radio from it. NOTE: In case of loss, please contact your point-of-sale to request replacement part number RLN5713. -
Page 17: Entering Text With The Mini Keyboard
Introduction: Mini Keyboard Entering Text with the Mini Keyboard If you have attached the mini keyboard correctly and the keyboard bezel is installed on the keyboard base you can begin. Here are some important points to remember when using the mini keyboard. •... -
Page 18: Standard Yellow Function Green Function
1-10 Standard Yellow Function Green Function Standard February 10, 2005 Yellow Function Green Function APOSTROPHE " ACCENT < > UP ARROW DOWN ARROW & LEFT ARROW RIGHT ARROW ¡ Å ß Þ Æ ¿ Introduction: Mini Keyboard 9980384R89-O... -
Page 19: Using Mini Keyboard Key Shortcuts
Introduction: Mini Keyboard Using Mini Keyboard Key Shortcuts You can perform most of your radio’s functions using the keys on the Motorola mini keyboard. Radio Key Left Option Right Option Extended Character Set The mini keyboard lets you enter special characters using a combination of keystrokes. -
Page 20: Other Special Characters
1-12 Other Special Characters To create other special characters, enter the keystrokes listed in the table below. Accent Example ß Æ ç or Ç Þ ðor Ð ø or Ø ¿ ¡ Accessories The DTR Series radios comes with a High Capacity Lithium-Ion battery and a Drop-in Charging Tray. Various accessories are available for use with your DTR Series radio, including holsters, hands-free accessories, headset accessories, a mini keyboard, and more. -
Page 21: Chapter 2 General Radio Operations
Press to turn your radio on. The radio chirps and the display briefly shows Motorola. The display shows the radio Unit ID or Name, current Scroll list setting, time, date, and the available Option key selections. If the radio has been assigned a unique Unit Name, the name will display rather than the Unit ID for both the radio and any Contacts. -
Page 22: Selecting A Scroll List Contact
Selecting a Scroll List Contact In idle mode, use for one-touch communication. Viewing a Contact 1. From the main screen, press The Contact List screen appears with the first contact highlighted in the list. 2. Scroll to highlight the desired contact. 3. -
Page 23: Receiving And Making Calls
General Radio Operations: Receiving and Making Calls Receiving and Making Calls NOTE: Your DTR Series radio must be programmed to be fully compatible with other DTR Series radios and fully utilize all radio features. Refer to Chapter 3 - Advanced Radio Operations. Types of Calls Your radio can make and receive three different types of voice calls: •... -
Page 24: Call Alerts
Call Alerts Sending a call alert lets the recipient know you want to talk to him or her. When you send a call alert, the recipient's radio emits a series of beeps, or vibrates, and displays your Unit Name or ID along with the time and date. -
Page 25: Text Messaging
General Radio Operations: Text Messaging Text Messaging Your radio can send and receive short text messages to Private or Group contacts. Your radio must be on and within range to receive text messages. Receiving a Message When you receive a text message, “New Message Received” appears on the display. The sender and group (if applicable) are also indicated. -
Page 26: Replying To A Received Message
Replying to a Received Message Your radio has a number of pre-programmed Quick Notes available, or the mini keyboard can be used to create a response. Additional Quick Notes can be created and the existing ones modified/ deleted with the mini keyboard by selecting Text Messaging while in Programming Mode. 1. -
Page 27: Sending A Text Message
General Radio Operations: Text Messaging Sending a Text Message Your radio can send and receive short text messages to Private or Group contacts, and has several pre-programmed Quick Notes available. The mini keyboard can be used to change, add additional, or delete these messages while in Programming Mode. -
Page 28: Composing A Message Using The Mini Keyboard
5. Press under Select to choose the message. The display shows the Contact and the message you want to send 6. To change the Contact you are sending to, press the Contact List. Scroll to select the correct Contact and press 7. -
Page 29: Deleting A Message
General Radio Operations: Text Messaging 4. Scroll to highlight the Mesg: option. Press 5. The Mesg: screen appears. Use the mini keyboard to enter your message. NOTE: The under Delete can be used to erase characters. Holding message. 6. Once the message is completed, press 7. -
Page 30: Accessing The Main Menu
2-10 Accessing the Main Menu 1. Press to access the Main Menu. The Main Menu appears. 2. Scroll through the available menu options. Highlight the desired menu option and press under Select. Main Menu Navigation Chart Recent Calls Main Menu Settings My Info to enter main menu... -
Page 31: Recent Calls
General Radio Operations: Recent Calls Recent Calls This menu lists recent calls received and allows the user to view, alert or delete recent calls on the list. From the Main Menu, scroll to highlight Recent Calls and press Viewing a Recent Call 1. -
Page 32: Deleting Recent Calls
2-12 Deleting Recent Calls 1. Scroll to highlight a recent call from the list. 2. Press . The Rec. Call Menu appears. NOTE: View only appears as a menu option for Private calls. 3. Scroll to highlight Delete to remove only the one call or Delete All to delete all recent calls and press 4. -
Page 33: Setting The Display
General Radio Operations: Settings Setting the Display From the Settings menu, scroll to highlight Display and press menu appears. From the Display menu, you can adjust the contrast and backlight time. Adjusting the Contrast 1. From the Display menu, scroll to highlight Contrast and press Contrast screen appears. -
Page 34: Setting Vibracall
2-14 Setting VibraCall VibraCall allows you to set the radio to vibrate with no audio alert tones when text messages or call alerts are received. NOTE: This does not mute the audio for voice calls. 1. From the Settings menu, scroll to highlight VibraCall and press raCall screen appears. - Page 35 General Radio Operations: Settings Setting the Time 1. From the Clock/Alarm Menu scroll to highlight Time and press Time screen is displayed. 2. Scroll to select the desired hour. NOTE: Press and hold 3. Press under --> to move to the minutes and scroll to select the desired minutes. 4.
-
Page 36: Set Alarm
2-16 Setting the Alarm Your DTR Series radio has an alarm feature that can be set to remind you of a recurring daily event. From the Clock/Alarm menu, scroll to highlight Set Alarm and press Alarm menu appears. The Set Alarm menu allows the Alarm to be turned Off or On and to set the Alarm Time. 1. -
Page 37: Setting The Volume
General Radio Operations: Settings 7. After completing the time setting press return to the previous menu. Setting the Volume The functions of the various selections are as follows: Ringer: volume level for all data status alerts such as Alert Tones and incoming SMS Messages. Turning VibraCall on changes this level to 0. -
Page 38: My Info
2-18 Setting the Speaker Volume 1. From the Volume menu, scroll to highlight Speaker and press Speaker screen appears. 2. Use the Volume Control keys to adjust the Speaker Volume as necessary and then press under OK to save the selection and return to the previous menu. Setting the Keypad Volume 1. -
Page 39: Chapter 3 Advanced Radio Operations
Chapter 3 Advanced Radio Operations Accessing the Advanced Menu The Advanced features are for managing your Scroll List, Call Forwarding, Remote Disable, Remote Monitor, and Remote Time. NOTE: Remote Disable, Remote Monitor, and Remote Time are not available, unless Manager Mode has been enabled in Programming Mode (DTR650 model only). -
Page 40: Enabling Call Forwarding
Enabling Call Forwarding Call Forwarding allows a user to notify anyone contacting them that they are not available and suggest a manager or third party to be contacted in their absence. The user contacting them can then choose to transmit to the third party by simply pressing the PTT button. NOTE: Your radio must be on and within range to use this feature while you are away. -
Page 41: Remote Disabling (Dtr650 Models Only)
Advanced Radio Operations: Accessing the Advanced Menu Remote Disabling (DTR650 Models Only) NOTE: Manager Mode must be enabled in order for a user to use this feature. Refer to page 4-9. Remote Disabling allows a user to remotely enable or disable another DTR Series radio on their channel. -
Page 42: Remote Monitoring (Dtr650 Models Only)
Remote Monitoring (DTR650 Models Only) NOTE: Manager Mode must be enabled in order to use this feature. Refer to page 4-9. Remote Monitoring allows you to monitor a selected radio either for training purposes or if the target radio user is unable to press the PTT button. 1. -
Page 43: Chapter 4 Radio Programming
Chapter 4 Radio Programming Program Menu Navigation Chart Contacts Program Menu Text Messaging Settings to scroll through list to select display option to exit Program menu * DTR650 radio only. Display VibraCall Clock/Alarm Scroll List Volume Call Forward Advanced Radio History Manager Mode* Language... -
Page 44: Entering Programming Mode
Although factory programmed with default PublicGroups, DTR Series radios require user-specific programming in order to fully benefit from their digital features. This occurs in a separate programming mode which allows access to modify and add contacts, update existing and add new quick notes, and access manager features (DTR650 only) such as Remote Disable and Remote Monitoring. -
Page 45: Adding Contacts
Radio Programming: Adding Contacts Adding Contacts 1. From the Program Menu, scroll to select Contacts and press tacts screen appears. 2. Scroll to select [New Contact] and press Call Type 1. From the Private screen, scroll to select Type and press screen appears. -
Page 46: Channel 1
Channel Your radio operates using frequency-hopping technology. Each "Channel" is a group of 50 frequencies. Your radio can transmit and receive on up to 10 channels, but Group messages will not be heard unless you are on the same channel. The home icon on the display indicates that your current scroll list setting is on your channel. -
Page 47: Programming A Unit Id (Private Calls Only)
Radio Programming: Adding Contacts Programming a Unit ID (Private Calls Only) The unit ID of a private contact can be read over the air or entered using the mini keyboard. 1. Scroll to select ID and press 2. Use the mini keyboard to enter an 11 digit ID. When the mini keyboard is connected, the left becomes Change. -
Page 48: Selecting Group Only
Selecting Group Only NOTE: Selecting Group Only on a radio prohibits the user from initiating PrivateCalls. 1. Scroll to select Group Only and press appears. NOTE: A next to an selection indicates the present selection. 2. Scroll to select the desired entry and press previous screen with the new Group Only entered. -
Page 49: Entering A Ringer Type (Private Calls Only)
Radio Programming: Text Messaging Entering a Ringer Type (Private Calls Only) A unique alert tone can be identified for each radio in your contact list. There are 12 ringer tones that can be selected. When a ringer tone is highlighted, the audio ringer tone sounds to help in making a selection. -
Page 50: Settings
2. Scroll to select [Create Quick.. and press 3. Use the mini keyboard to enter the new message. When the first letter is entered, the left changes to Save and the right 4. If an error is made while entering the data, ters one at a time. -
Page 51: Radio History
Radio Programming: Settings 3. Scroll to select Radio History and press TX is the total amount of transmit time. RX is the total amount of receive time. IDL is the total time the radio has been turned on but not receiving or transmitting. Manager Mode Manager Mode provides access to Remote Disable, Remote Monitor, and Remote Time functions in the User Menu. - Page 52 4-10 Radio Programming: Settings February 10, 2005 9980384R89-O...
-
Page 53: Chapter 5 Cloning Mode
Chapter 5 Cloning Mode Cloning mode is used to either add contacts wirelessly to other radios (Private or Groups) or duplicate all radio settings to new radios (using the optional cloning cable). Entering Cloning Mode 1. Press to turn the source radio on. 2. - Page 54 2. Connect the cloning cable to both radios. NOTE: The target radio must be turned on, but does not need to be in cloning mode. 3. Press under Clone to start the cloning. The “Cloning in Progress” screen is displayed followed by the “Cloning Successful”...
-
Page 55: Cloning By Sending A Contact
Cloning Mode: Cloning by Sending a Contact Cloning by Sending a Contact 1. From the Clone menu scroll to select Send Contact. Press Contact screen is displayed. 2. Scroll to select ADD:. 3. Press under Change to display the list of contacts. 4. -
Page 56: Send Contact
8. Scroll to the contact to receive the new contact. 9. Press under Select to select the contact. 10. Press under Prgm. The screen is displayed showing the Add: and To: selections. If these are correct press are not correct press 11. -
Page 57: Chapter 6 Troubleshooting
Chapter 6 Troubleshooting Symptom Display shows "User Not Available" when PTT pressed No Power Message not transmitted Cannot receive Private calls Cannot receive Public Group Cannot access Remote Monitor, Time or Remote Disable (DTR650 only) Time Update not received Limited talk range Message not received Poor audio quality Low batteries... - Page 58 Troubleshooting: February 10, 2005 9980384R89-O...
-
Page 59: Chapter 7 Motorola Limited Warranty For The United States And Canada
(d) other acts which are not the fault of Motorola, are excluded from coverage. Use of Non-Motorola Products and Accessories. Defects or damage that result from the use of Non-Motorola branded or certified Products, Accessories, Software or other peripheral equipment are excluded from coverage. -
Page 60: Software
Furthermore, the purchase of the Motorola products shall not be deemed to grant either directly or by implication, estoppel, or otherwise, any license under the copyrights, patents, or patent applications of Motorola or any third party software provider, except for the normal, non-exclusive, royalty-free license to use that arises by operation of law in the sale of a product. -
Page 61: Patent Notice
Motorola Limited Warranty for the United States and Canada: Patent Notice Patent Notice This product is covered by one or more of the following United States patents. 5896277 5894292 5864752 5699006 5742484 D408396 D399821 D387758 D389158 5894592 5893027 5789098 5734975 5861850 D395882 D383745... - Page 62 Motorola Limited Warranty for the United States and Canada: Export Law Assurances Notes February 10, 2005 9980384R89-O...
- Page 63 INDEX Accent Marks ............... . 1-11 Accessing Advanced Menu .
- Page 64 Using the Cloning Cable............. . .5-1 Sending a Contact .
- Page 65 INDEX: Icons ................1-4 Menu .
- Page 66 Navigation Keys ...............1-5 Notations Used in This Manual .
- Page 67 INDEX: Sending an Alert ..............2-4 Setting the Clock/Alarm .
- Page 68 INDEX: Yellow/Lock Key Functionality ............1-9 Your DTR series Radio.