Table of Contents
Advertisement
KDC-X500
KDC-BT565U
KMR-D765BT
CD-RECEIVER
INSTRUCTION MANUAL
AMPLI-TUNER LECTEUR DE CD
MODE D'EMPLOI
REPRODUCTOR DE DISCOS COMPACTOS RECEPTOR DE FM/AM
MANUAL DE INSTRUCCIONES
For your records
Record the serial number, found on the back of the unit, in the spaces designated on the warranty card, and in the space provided below.
Refer to the model and serial numbers whenever you call upon your Kenwood dealer for information or service on the product.
Model KDC-X500/ KDC-BT565U/ KMR-D765BT
Serial number
US Residents Only
Register Online
Register your Kenwood product at www.Kenwoodusa.com
© 2015 JVC KENWOOD Corporation
B5A-0887-10 (KW)
JS_KWD_KDC_X500_KW_C10_FF.indd 1
12/10/2015 10:18:11 AM
Advertisement
Table of Contents

Related Manuals for Kenwood KDC-X500


Summary of Contents for Kenwood KDC-X500
-
Page 1: Instruction Manual
Record the serial number, found on the back of the unit, in the spaces designated on the warranty card, and in the space provided below. Refer to the model and serial numbers whenever you call upon your Kenwood dealer for information or service on the product. - Page 2 Los equipos eléctricos y electrónicos al final de la vida útil, deberán ser reciclados en instalaciones JVC KENWOOD Corporation que puedan dar el tratamiento adecuado a estos productos y a sus 2967-3, ISHIKAWA-MACHI, subproductos residuales correspondientes.
- Page 3 IC (Industry Canada) Notice CAUTION This device complies with Industry Canada licence-exempt RSS standard(s). This equipment complies with FCC/IC radiation exposure limits set forth for an uncontrolled Operation is subject to the following two conditions: environment and meets the FCC radio frequency (RF) Exposure Guidelines in Supplement C (1) This device may not cause interference, and to OET65 and RSS-102 of the IC radio frequency (RF) Exposure rules.
- Page 4 SOFTWARE LICENSE AGREEMENT Article 3 Conditions for Grant of License 1. When the User transfers the Product, it may also transfer the license to use the Licensed Software The software embedded in the Product (hereinafter the "Licensed Software") provided by Licensor embedded in the Product (including any related materials, updates and upgrades) on condition is copyrighted to or sublicensable by the Licensor, and this Agreement provides for the terms and that no original, copies or related materials continue in the possession of the User, and that the...
- Page 5 Important Notice concerning the Software Article 8 Termination In case the User falls under any of the events described in the following items, the Licensor may immediately terminate -jansson this Agreement or claim that the User compensates for the damage incurred by the Licensor due to such event: (1) when the User violated any provision of this Agreement;...
-
Page 6: Table Of Contents
CONTENTS BEFORE USE BEFORE USE IMPORTANT • To ensure proper use, please read through this manual before using this product. It is especially important BASICS that you read and observe Warning and Caution in this manual. • Please keep the manual in a safe and accessible place for future reference. GETTING STARTED 1 Select the display language Warning... -
Page 7: Basics
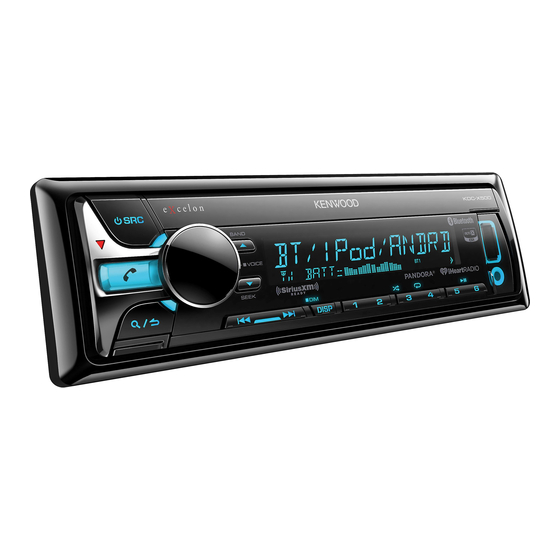
BASICS Faceplate Remote control (RC-406) ( supplied for Volume knob Display window Remote sensor (Do not expose to bright sunlight.) Pull out the insulation sheet when using for the first time. Detach button USB cable from the rear of the unit Remote control functions are not available for Attach Detach... -
Page 8: Getting Started
GETTING STARTED To set the date Turn the volume knob to select [DATE FORMAT], then press the knob. Turn the volume knob to select [DD/MM/YY] or [MM/DD/YY], then press the knob. Turn the volume knob to select [DATE SET], then press the knob. Turn the volume knob to make the settings, then press the knob. - Page 9 UPDATE SYSTEM F/W UP xx.xx YES: Starts upgrading the firmware. ; NO: Cancels (upgrading is not activated). For details on how to update the firmware, see: www.kenwood.com/cs/ce/ FACTORY RESET YES: Resets the settings to default (except the stored station). ; NO: Cancels. REM SETTING* (for REMOTE ID SET Remote control ID list is displayed.
-
Page 10: Radio
RADIO Other settings Press the volume knob to enter [FUNCTION]. Turn the volume knob to select an item (see the following table), then press the knob. Repeat step until the desired item is selected or activated. Press and hold to exit. To return to the previous setting item, press Search for a station Default: XX... -
Page 11: Cd / Usb / Ipod / Android
ALL RANDOM. * Press and hold When connecting an Android device, “Press [VIEW] to install KENWOOD MUSIC PLAY APP” is shown. Follow the Micro USB 2.0 cable * instructions to install the application. You can also install the latest version of KENWOOD MUSIC PLAY application (commercially available) on your Android device before connecting. - Page 12 BROWSE MODE : Control Android device from this unit via Press S / T to search at a preset skip search ratio. ( 9, [SKIP SEARCH]) KENWOOD MUSIC PLAY application installed in • Pressing and holding S / T searches at a 10% ratio.
-
Page 13: Aux
CD / USB / iPod / ANDROID Preparation: Listen to TuneIn Radio/ TuneIn Radio Pro/ Aupeo Select [ON] for [BUILT-IN AUX]. ( 5) While listening to TuneIn Radio, TuneIn Radio Pro or Aupeo, connect the Start listening iPod/iPhone to the USB input terminal of the unit. •... -
Page 14: Pandora
Pandora® Preparation: Create and save a new station Install the latest version of the Pandora application on your device Press (iPhone/ iPod touch), then create an account and log in to Pandora. Turn the volume knob to select [NEW STATION], then press the knob. •... -
Page 15: Iheartradio
iHeartRadio® Pandora® Preparation: Delete a station Install the latest version of iHeartAuto application on your device (iPhone/ iPod touch), then While listening to PANDORA/ PANDORA FRONT/ create an account and log in to iHeartRadio. PANDORA REAR... • Select [ON] for [IHEART SRC]. ( 5) Press the volume knob to enter [FUNCTION]. -
Page 16: Siriusxm® Radio
SiriusXM® Radio iHeartRadio® Only SiriusXM® brings you more of what you love to listen to, all in one place. Get over Search and store a station 140 channels, including commercial-free music plus the best sports, news, talk, comedy Press and entertainment. Welcome to the world of satellite radio. A SiriusXM Vehicle Tuner and Turn the volume knob to select a category, Subscription are required. - Page 17 SiriusXM® Radio Turn the volume knob to select a channel, then press When channel keymode is selected... the knob. On the faceplate On the remote control (or) Press S / T to search for a channel manually. Press S / T. Press S / Select a channel •...
- Page 18 SiriusXM® Radio Default: XX TuneScan™ CHANNEL LOCK To unlock settings: You can get a short preview of the songs that you have missed 1 Turn the volume knob to select a number. on each of your SmartFavorite music channels or currently 2 Press S / T to move to the entry position.
-
Page 19: Bluetooth
Secure using cord clamps (not – [AUTO PAIRING] is set to [ON]. ( 19) supplied) if necessary. – KENWOOD MUSIC PLAY application is installed on the Android device ( 7) and [BROWSE MODE] is selected ( 8). ENGLISH JS_KWD_KDC_X500_KW_EN_00_2.indd 15... - Page 20 BLUETOOTH® BLUETOOTH — Mobile phone Connect with a remote device by One-touch (NFC) (for Near Field Communication (NFC) enables short-range wireless communication between the unit and remote devices. By holding an NFC-compatible remote device near to the N-Mark on the unit (volume knob), the unit and remote device proceed to complete pairing and established the BLUETOOTH connection automatically.
- Page 21 BLUETOOTH® Default: XX On the faceplate On the remote control MIC GAIN –10 — +10 (–4): The sensitivity of the While talking on the first incoming call... microphone increases as the number increased. Answer another incoming Press Press NR LEVEL –5 — +5 (0): Adjust the noise reduction level call and hold the current call until the least noise is being heard during a Reject another incoming call...
- Page 22 BLUETOOTH® Make a call NUMBER DIAL 1 Turn the volume knob to select a number (0 to 9) or character ( , #, +). You can make a call from the call history, phonebook, or dialing the number. Call by 2 Press S / T to move the entry position.
- Page 23 BLUETOOTH® Default: XX Settings in memory BT MODE Store a contact in memory PHONE SELECT Selects the phone or audio device to connect or disconnect. You can store up to 6 contacts into the number buttons (1 to 6). “ ”...
-
Page 24: Bluetooth Audio
BLUETOOTH® BLUETOOTH — Audio Bluetooth test mode You can check the connectivity of the supported profile between the Bluetooth device and the unit. • Make sure there is no Bluetooth device paired. Press and hold “PLEASE PAIR YOUR PHONE PIN 0000” appears. Search and select this unit model name (KDC-X5 / KDC-BT5... -
Page 25: Internet Radio Via Bluetooth
AUDIO SETTINGS BLUETOOTH® While listening to any source... Internet radio via Bluetooth Press the volume knob to enter [FUNCTION]. Listen to Pandora Turn the volume knob to select [AUDIO CONTROL], then press the knob. Turn the volume knob to select an item (see the following table), then press the knob. You can listen to Pandora on the Android device via Repeat step until the desired item is selected or activated. - Page 26 AUDIO SETTINGS VOLUME OFFSET –15 to +6 (0): Preset the initial volume level of each source. X ' OVER (Before adjustment, select the source you want to adjust.) TWEETER 1KHZ/ 1.6KHZ/ 2.5KHZ/ 4KHZ/ 5KHZ/ 6.3KHZ/ 8KHZ/ 10KHZ/ SOUND EFFECT 12.5KHZ: Adjusts the crossover frequency for the tweeter speaker. SOUND RECNSTR (Not applicable for TUNER source, AUX source and SIRIUS XM source.) GAIN LEFT...
-
Page 27: Display Settings
DISPLAY SETTINGS Default: XX COLOR SELECT VARIABLE SCAN/ CUSTOM R/G/B/ preset colors*: Selects your preferred button and display illumination color. To make your own color, select [CUSTOM R/G/B]. The color you have made will be stored in [CUSTOM R/G/B]. 1 Press the volume knob to enter the detailed color adjustment. 2 Press S / T to select the color (R/ G/ B) to adjust. -
Page 28: References
– Any other latest information - iPhone 3G, 3GS, 4, 4S, 5, 5S, 5C, 6, 6 Plus • You cannot operate iPod if “KENWOOD” or “ ” is displayed on iPod. General • Depending on the version of the operating system of the iPod/iPhone, some functions may not operate on •... - Page 29 REFERENCES About Pandora Change the display information Each time you press DISP, the display information changes. • Pandora is only available in certain countries. Please visit • If the information is unavailable or not recorded, “NO TEXT”, “NO INFO”, or other information (eg. station name, playing time) <http://www.pandora.com/legal>...
-
Page 30: Troubleshooting
TROUBLESHOOTING Symptom Remedy Symptom Remedy • Adjust the volume to the optimum level. Sound cannot be heard. “LOADING” appears when This unit is still preparing the iPod/iPhone music list. It may • Check the cords and connections. you enter search mode by take some time to load, try again later. - Page 31 TROUBLESHOOTING Symptom Remedy Symptom Remedy • Make sure KENWOOD MUSIC PLAY APP is installed on Cannot playback at iHeartRadio station If “Explicit Content” in [Account Settings] is checked in [BROWSE MODE]. the Android device. ( 7) cannot be selected. the web version of iHeartRADIO, custom stations become •...
- Page 32 SPECIFICATIONS TROUBLESHOOTING Symptom Remedy FM Frequency Range 87.9 MHz — 107.9 MHz (200 kHz space) • Adjust the microphone unit’s position. ( 15) Echo or noise is heard during • Check the [ECHO CANCEL] setting. ( 17) a phone conversation. Usable Sensitivity 8.2 dBf (0.71 μV/75 Ω) (S/N = 26 dB) •...
- Page 33 SPECIFICATIONS MP3 Decode Compliant with MPEG-1/2 Audio Layer-3 Maximum Output Power 50 W × 4 WMA Decode Compliant with Windows Media Audio Full Bandwidth Power 22 W × 4 (at less than 1 % THD) AAC Decode AAC-LC “.aac” files Speaker Impedance 4 Ω — 8 Ω USB Standard USB 1.1, USB 2.0 (Full speed) Tone Action Band 1: 62.5 Hz ±9 dB...
-
Page 34: Installing/Removing Unit
INSTALLATION / CONNECTION Warning Installing the unit (in-dash mounting) • The unit can only be used with a 12 V DC power supply, negative ground. • Disconnect the battery’s negative terminal before wiring and mounting. • Do not connect Battery wire (yellow) and Ignition wire (red) to the Do the required wiring. -
Page 35: Wiring Connection
If no connections are made, do not let the wire come out from the tab. (C) Mounting sleeve To front speaker (left) White/Black Gray Brown To connect the Kenwood navigation To front speaker (right) Gray/Black (Mute control wire) system, refer your navigations manual Green... - Page 36 White If no connections are made, do not let the wire come out from the tab. To front speaker (left) White/Black Gray To Kenwood Wired Marine Remote Control unit (optional Light blue/yellow accessory) To front speaker (right) Gray/Black (Marine remote control...
- Page 37 • The Bluetooth® word mark and logos are registered trademarks owned by Bluetooth SIG, Inc. BE LIABLE FOR ANY DIRECT, INDIRECT, INCIDENTAL, SPECIAL, EXEMPLARY, OR and any use of such marks by JVC KENWOOD Corporation is under license. Other trademarks and CONSEQUENTIAL DAMAGES (INCLUDING, BUT NOT LIMITED TO, PROCUREMENT OF trade names are those of their respective owners.