Mitel 5360 User Manual
Hide thumbs
Also See for 5360:
- User manual (115 pages) ,
- Quick reference manual (3 pages) ,
- Quick referenc manual (2 pages)
Table of Contents
Advertisement
Quick Links
Advertisement
Table of Contents

Related Manuals for Mitel 5360


Summary of Contents for Mitel 5360
- Page 1 MITEL Communications Director 5360 IP Phone User Guide...
- Page 2 Mitel logos and wordmarks, along with legal disclaimers and copyright information, contained in these documents must NOT be removed. Mitel provides this documents as is. No support is available from Mitel or its subsidiaries to assist the user with the modification, printing, distribution, or other processes pertaining to the use of these documents.
-
Page 3: Table Of Contents
Ring/Message Indicators ..................... 4 For Users on Resilient 3300 ICP Systems ................4 Mitel Line Interface Module....................4 Using Your IP Phone with Mitel Unified Communicator Express......... 4 HTML Applications....................... 5 TIPS FOR YOUR COMFORT AND SAFETY ..............5 Don't Cradle the Handset!....................5 Protect your Hearing...................... - Page 4 5360 IP Phone – User Guide Enable PC Connectivity ..................... 14 Cleaning Your 5360 IP Phone ................... 15 Text Entry .......................... 16 Keyboards ............................. 18 Text Manipulation Control Keys ....................17 SETTING UP YOUR CONTACT LIST..............20 Adding Names to Your Contact List ....................20 Editing Information in Your Contact List..................
- Page 5 5360 IP Phone – User Guide PROGRAMING FEATURES ON YOUR KEYS ............33 Tips on Programming Features ..................33 Features available for programming on programmable keys............33 Applications available for programming on programmable keys ..........35 Program Feature Keys Using the Settings Application............35 Clear Programming from a Key ..................
- Page 6 5360 IP Phone – User Guide Call Forward - Remote (I'm Here)..................46 Call Forward - End Chaining....................47 Call Forward - Forced ......................47 Call Forward - Override ..................... 48 Call Park ..........................48 Call Pickup......................... 49 Campon ..........................49 Direct Paging ........................
- Page 7 5360 IP Phone – User Guide Night Answer ........................67 Override (Intrude) ......................67 Paging..........................67 Phone Lock........................68 User PIN ..........................69 Record a Call ........................70 Reminder ........................... 71 Speak@Ease........................72 Speed Call ......................... 72 Contact Presence.......................... 72 Tag Call ..........................
- Page 8 5360 IP Phone – User Guide USING THE CORDLESS HANDSET ..............82 Elements of the Cordless Handset ..................82 Answer a Call........................83 Hang up ..........................83 Dialing – Auto Dial Disabled ....................83 Dialing – Auto Dial Enabled ....................83 Alerting Tones and LEDs....................
-
Page 9: About Your Phone
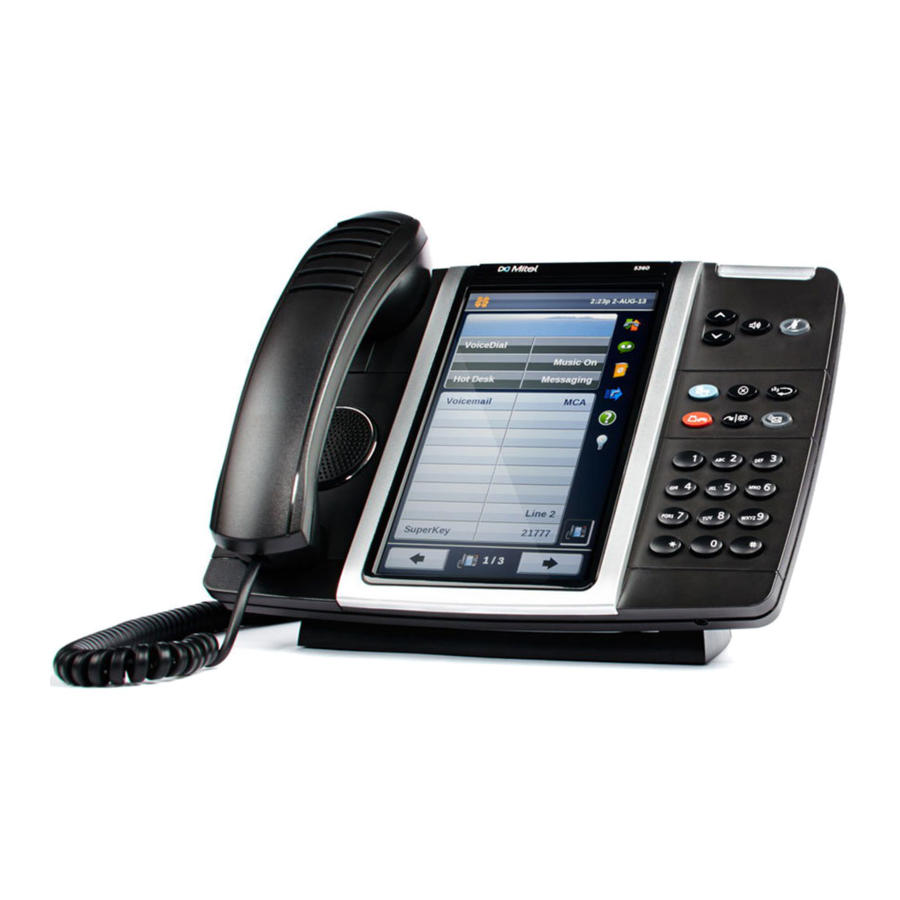
5360 IP Phone – User Guide ABOUT YOUR PHONE The 5360 IP Phone is a high-end color phone with a touch display that delivers graphically rich applications. It is a full-feature enterprise-class telephone that provides a large color backlit graphics display with 48 programmable self-labeling keys, six intuitive call state sensitive softkeys, superior sound quality, and a built-in HTML toolkit for desktop applications development. - Page 10 The 5360 IP Phone - 2 -...
-
Page 11: Elements Of Your Phone
5360 IP Phone – User Guide Elements of Your Phone Feature Function 1) Display Provides a large, high-resolution touch screen that assists you in selecting and using phone features and applications. The display area provides 48 self-labeling buttons that can be programmed as speed call keys, fixed function keys, hard keys, applications, or line appearance keys, according to your communication needs. -
Page 12: Ring/Message Indicators
Using Your IP Phone with Mitel Unified Communicator Express When used with Unified Communicator® Express or Unified Communicator Advanced 3.0 applications, the 5360 IP Phone becomes a powerful communications tool that helps customers streamline communications between people and organizations. This leads to improved productivity, enhanced customer service, reduced costs, and ultimately improved business process integration. -
Page 13: Html Applications
5360 IP Phone – User Guide HTML Applications Your 5360 IP Phone may have HTML Applications available for your customized use. The HTML Desktop Toolkit enables simple, intuitive development of customized applications that are easily integrated with telephony functions of your 5360 IP Phone. -
Page 14: Using Your Default Phone Window
USING YOUR DEFAULT PHONE WINDOW The 5360 IP Phone default phone window and Gadget Sidebar are shown and described below. The Phone window provides access to programmable keys and the main phone interface. Getting Started with Your Phone When you receive your phone, you may need to program features and applications. Press the Menu key to access your phone’s applications. -
Page 15: 5360 Ip Phone Default Window
Allow you to access specific call control features, which are context sensitive. These are non-programmable feature keys, which are specific to the application or state of the set. The 5360 IP Phone provides six softkeys or eight softkeys, depending on the application. -
Page 16: Gadget Sidebar On The 5360 Ip Phone
Gadget Sidebar on the 5360 IP Phone The Gadget Sidebar is a vertical bar that runs down the right side of the 5360 IP Phone’s display. The Gadget Sidebar contains a series of icons that provide one-touch access to the most commonly accessed phone applications and features, including HTML applications. -
Page 17: Using Applications On The 5360 Ip Phone
5360 IP Phone – User Guide USING APPLICATIONS ON THE 5360 IP PHONE Your 5360 IP Phone provides applications that simplify the use of your phone. This table describes the applications that you may have on your 5360 IP Phone. The associated icon appears on the Gadget Sidebar or as a context icon in the navigation area. -
Page 18: Accessing Your Phone Applications
Press Tips for Setting up Your Phone and Touch Screen After you receive your 5360 IP Phone, use the options in the Settings application to customize your phone. Calibrate your display for maximum touch accuracy. You may also want to turn on the button beep to receive an audible tone that indicates you have engaged the button or icon. -
Page 19: Customizing Your Phone
ICP programming. Text Size: Allows you to specify the font size (large or small) for the 5360 IP Phone. Call Notification: Use to specify the Phone application behavior when incoming or outgoing calls occur. -
Page 20: Specify Language
3. Select the appropriate language and press Save. The phone displays your chosen language. Note: Languages supported on the 5360 IP Phone may differ from those supported on the ICP. If the phone is configured for an unsupported language, the prompts may appear in your selected language but the Application language for the phone defaults to English. -
Page 21: Adjust Display Brightness
5360 IP Phone – User Guide Adjust Display Brightness To adjust the display brightness use the Settings application: 1. Press Settings. 2. Press Brightness. 3. Press the + or - keys to adjust the brightness of your screen. Press Save. -
Page 22: Specify Audio Feedback Options
Specify Audio Feedback Options The error beep volume in the phone is related to the volume of the speaker. You can set the beep volume using this procedure; however, adjusting the speaker volume also affects the beep volume. To adjust the volume of the audio feedback: 1. -
Page 23: Adjust The Ringer
5360 IP Phone – User Guide Note: You can use the UC Express for easy PC-based programming of the labels on your phone. For more information on setting up the UC Express Application, see the Unified Communicator Express User’s Guide on www.edocs.mitel.com. -
Page 24: Text Entry
Cleaning Your 5360 IP Phone You can wipe clean the touch screen of your 5360 IP Phone without causing touch-sensitive controls to be activated. 1. Launch Applications. 2. Press Clean Mode. 3. Clean the screen of your phone. 4. Press the Menu key to end Clean Mode. -
Page 25: Text Manipulation Control Keys
5360 IP Phone – User Guide Status Line The Text Entry window’s Status Line displays either a text string or the time and date and this depends on the application that requires text entry. Input Area The Input area lets you see the text as you enter it, either in the name or number field. -
Page 26: Keyboards
The Clear ( ) key removes all characters from the Input Field. The Delete Digit ( ) key deletes a character to the right of the cursor in the Input Field. If there is no character following the cursor the Backspace key is ignored. Note: In some applications a Delete Digit key will be displayed instead of the Clear key. - Page 27 5360 IP Phone – User Guide Numeric Keyboard The numeric keyboard interface is used when the Input Field requires phone numbers or other numerical input. The numeric keyboard provides nineteen character keys that represent the standard dial pad on a telephone: the numbers 0 through 9, the * key and the # key.
-
Page 28: Setting Up Your Contact List
Setting Up Your Contact List Use the People application to set up your contact list. Adding Names to Your Contact List You can add a name to your contact list by entering it directly using the People application or by copying a number using the To People from Call Info, Visual Voice Mail and Call History. To add a name to your contact list using the People application: 1. -
Page 29: Visual Voice Mail
5360 IP Phone – User Guide VISUAL VOICE MAIL Use the Visual Voice Mail application to manage and listen to voice mail messages. Set Up your Mailbox Before you can use voice mail, you must first set up your mailbox. -
Page 30: Log Into Your Mailbox From Your Own Extension
Log Into Your Mailbox From Your Own Extension To login to your mailbox from your extension: 1. Open the Voice mail application. Note: The mailbox number assigned to the prime extension of this phone is displayed. If this is not your mailbox number, see Log into your mailbox from another extension. -
Page 31: Log Out Of Your Mailbox
5360 IP Phone – User Guide Log Out Of Your Mailbox To logout of your mailbox: Press Logout. This closes the Voice Mail application. Note: After five minutes of inactivity, you are automatically logged out of your mailbox and the Voice Mail application closes. When you close the Voice Mail application, you are not automatically logged out of your mailbox. -
Page 32: Display Message Details
The Voice Mail Application Main Window The Voice Mail application main window contains a reverse chronological list of the voice messages in your mailbox, with the newest message listed first. Use the Navigation keys to scroll through the messages. By default, only new messages are listed when the main screen opens. - Page 33 5360 IP Phone – User Guide Message Details The Message Details Window In this window, you can save (Keep), play, or delete (Discard) the message. You can send the voicemail to your email if the To Email feature is enabled or Give it to another user.
-
Page 34: Play A Voice Message
Play a Voice Message 1. Open the Voice mail application. 2. Login to your mailbox. 3. Select a message in your message list. 4. Press Play. Control the play of the message via the following command buttons: Stop ( Pause ( rewind the message by five seconds ( Skip) fast forward the message by five seconds (Skip... -
Page 35: Save A Message
5360 IP Phone – User Guide Pressing Dial will display the Phone application if open on Made calls is enabled in the Call Notification preferences in the Settings application. Save a Message To save a message: 1. Open the Voice mail application. -
Page 36: Forward A Message To Another Mailbox
Forward a Message to Another Mailbox You can only forward messages to internal mailboxes. Confidential messages cannot be forwarded. To forward a message to another mailbox: 1. Open the Voice mail application. 2. Login to your mailbox. 3. Select a message in your message list. 4. -
Page 37: Using The Call History Application
5360 IP Phone – User Guide Using the Call History Application Use the Call History application to display logs of your most recent 50 calls. After the 50- call limit has been reached, the oldest log is replaced each time a new call is missed, made, or answered. -
Page 38: Review Call Log Icons
5. Do one of the following: If necessary, use the keypad cursor left, cursor right, Delete, and Backspace keys to modify the number. If an outgoing prefix is required to access an external trunk, you must add the digit(s). Press Dial to call the number or press To People to save the contact details to the People application. -
Page 39: Call Forwarding
5360 IP Phone – User Guide Call Forwarding Use Call Forwarding to redirect incoming calls to an alternate number when your phone is busy when you're not answering, or all the time. You can program, activate, and deactivate Call Forward Always quickly using the Call... -
Page 40: Programming Call Forwarding Defaults
PROGRAMMING CALL FORWARDING DEFAULTS You can create default Call Forward settings that identify where to send your incoming calls if Call Forward Always is not active. 1. Press Call Forwarding. 2. Press Edit Default. 3. Select the desired type of Call Forwarding: Busy Internal: forwards internal phone calls after several rings if your line is busy Busy External: forwards external phone calls after several rings if your line is busy No Answer Int: forwards internal phone calls redirects your calls after several rings if... -
Page 41: Programing Features On Your Keys
5360 IP Phone – User Guide PROGRAMING FEATURES ON YOUR KEYS Tips on Programming Features You can program your phone's programmable keys to enable features. To program your keys, you can use: Settings application Unified Communicator Express application You can assign the following to a programmable Key:... - Page 42 Feature Default Label Single Flash Flash Double Flash Dbl Flash Meet Me Answer Meet Me Message Waiting Indicator Msg Waiting Emergency Call Emergency Tag Call Tag Call Privacy Release Privacy Rls Swap Swap Rec Call Rec Call Release Release Call History Call Hist Call Park Call Park...
-
Page 43: Applications Available For Programming On Programmable Keys
5360 IP Phone – User Guide Applications available for programming on programmable keys Application Default Label People People Voicemail Voicemail Call History Call Hist Call Forwarding Forwarding Conference Unit Conf Unit Settings Settings Call Info Call Info Cordless Devices Cordless Devs... - Page 44 To program a Phone Application: 1. Press Settings. 2. Press Programmable Keys. 3. Press the key you wish to program. 4. If Features are displayed, press View Applications. 5. Use the Page Navigation keys to move through the Applications list. 6.
-
Page 45: Clear Programming From A Key
5360 IP Phone – User Guide Clear Programming from a Key You may wish to clear the programming from a key if you are no longer using it. To clear the feature or application programming from a key: 1. Press Settings. -
Page 46: Making And Answering Calls
MAKING AND ANSWERING CALLS You can make a call using one of the following methods: Dial a number from the People application. Press the programmed key associated with the party you want to call. For more information about programming keys, see Programming Features On Your Keys. Dial the number using the dialpad. -
Page 47: Answer A Call
5360 IP Phone – User Guide If the system option “Phonebook Lookup – Default to User Location” is enabled for your phone, the search is limited to names that share your location; otherwise, the entire directory is searched. If the system option “Phonebook Lookup – Display User Location” is enabled, after the phonebook search function displays the matching name and directory number, the user’s location is displayed. -
Page 48: Redial - Saved Number
Redial - Saved Number To save the last number that you manually dialed: 1. Lift the handset. 2. Dial the appropriate feature access code. To Redial a saved number: 1. Lift the handset. 2. Dial the appropriate feature access code. Handsfree Operation To use Handsfree to make a call: 1. -
Page 49: Auto-Answer
5360 IP Phone – User Guide To return to Handsfree operation: 1. Press (SPEAKER). 2. Hang up the handset. Auto-Answer When the Auto-Answer feature is active, incoming calls ring briefly, and then the phone answers the call in Handsfree mode. You can continue the call handsfree or use the handset. -
Page 50: Call Handling
CALL HANDLING Hold To place a call on Hold: 1. Press (HOLD). 2. Press the key that you have programmed as Hold. The indicator flashes on the line that has the held call. Note: You can only retrieve a call from hold when the phone is idle. To retrieve a call from Hold, do one of the following: Lift the handset and press the flashing line key or Float Key (see page 55). -
Page 51: Transfer
5360 IP Phone – User Guide Transfer To Transfer an active call: 1. Press (TRANS/CONF). 2. Dial the number of the third party. 3. Do one of the following: To complete the Transfer, hang up. To announce the Transfer, wait for an answer, consult, and hang up. -
Page 52: Add Held
Add Held To move a call on hold to another line appearance: 1. Press an available line key. 2. Press the AddHeld softkey. 3. Press the flashing line key. To add a call on Hold to an existing conversation or conference: 1. -
Page 53: Using Other Features
5360 IP Phone – User Guide USING OTHER FEATURES Account Codes An account code is a series of digits that you assign to your calls, usually for accounting purposes. The code identifies the account in the call records that your system generates. A forced account code is usually entered from another extension, enabling you to use features or make calls that the extension otherwise could not. -
Page 54: Attendant Call Hold - Remote Retrieve
Attendant Call Hold - Remote Retrieve To retrieve a call placed on Hold by the attendant: 1. Lift the handset. 2. Dial the appropriate feature access code. 3. Dial the digits announced by the attendant. Callback The Callback feature allows you to be notified when a busy phone becomes free or when a phone has been used after a no-answer condition was encountered. -
Page 55: Call Forward - End Chaining
5360 IP Phone – User Guide To cancel Call Forward – Remote from the station that set the remote forwarding: 1. Lift the handset. 2. Dial the appropriate feature access code. 3. Dial the extension of the remote station. 4. Hang up. -
Page 56: Call Forward - Override
Call Forward - Override To override Call Forward and ring a station: 1. Lift the handset. 2. Dial the appropriate feature access code. 3. Dial the extension number. Call Park The Call Park feature allows you to place a call in a special hold state. You, or someone else, can then retrieve the call from any extension in the system. -
Page 57: Call Pickup
5360 IP Phone – User Guide To retrieve a parked call: 1. Do one of the following: Dial the appropriate feature access code. Press the Call Park - Retrieve feature key (must be programmed). 2. Dial the directory number on which the call is parked (not required if the number is programmed to the Call Park feature key). -
Page 58: Direct Paging
Direct Paging Direct Paging allows you to page a party through their handsfree speaker. If the paged party has Off-Hook Voice Announce enabled, the page will be heard even when the party is on a handset or headset call. If the paged party has Handsfree Answerback enabled and turned on on the phone, your page automatically establishes a handsfree call with the paged party. - Page 59 5360 IP Phone – User Guide To answer a call using Handsfree Answerback: Phone state before Page arrives To answer the Direct Page 1. Check that MUTE is OFF. Phone is idle and MUTE is flashing 2. Listen for the paging party.
-
Page 60: Direct Paging - Handsfree Answerback Disabled
Direct Paging - Handsfree Answerback Disabled Your administrator enables or disables Handsfree Answerback and you can also turn it on or off on your phone. To turn Handsfree Answerback off, see "Direct Paging - Handsfree Answerback Enabled" elsewhere in this guide. When Handsfree Answerback is disabled on your phone and you receive a Direct Page, the Direct Page is indicated by a single burst of tone. -
Page 61: Direct Voice Call
5360 IP Phone – User Guide Direct Voice Call Direct Voice Call feature allows you to establish a two-way handsfree call at another extension whether or not it has Handsfree Answerback or Auto-Answer turned on. Only extensions programmed by the system administrator to receive Direct Voice Calls can be called using this feature. -
Page 62: Emergency Calls
Emergency Calls Warning for emergency number dialing: Consult your local authorities for Emergency Numbers and 911 or equivalent service availability in your area. There are two methods of dialing emergency numbers, based on the 3300 ICP programming: Emergency Call Routing NOT programmed Emergency Call Routing programmed CAUTION: Verify with your System Administrator which type of emergency number dialing you can use. -
Page 63: Float Keys
– due to the number of ringing lines at any one time, you are able to view the queue of unanswered “floated” lines, and answer them as quickly as possible. Only the following line types are supported for float keys on 5360: Single Line Key System... -
Page 64: Programming Float Keys
Programming Float Keys You program the keys to appear on Float Keys using the Settings application on the 5360 phone. Float Keys act essentially as a mirror of any of the lines programmed on the 48 programmable keys and which are programmed to float. The Float Keys reflect the state of those lines including indicators and labels, and allows you to access those lines without having to navigate to the pages where those keys may be displayed. -
Page 65: Using Float Keys
5360 IP Phone – User Guide Using Float Keys You can set up more than three lines to float. As lines ring, they get placed into a queue which will display the first three in the float key area. If there are more than three lines configured to float, as Float Key positions are freed up, the next lines in the queue get displayed. -
Page 66: Group Paging / Meet Me Answer
Group Paging / Meet Me Answer Group Paging allows you to page a group of telephones through their built-in speakers. You can belong to as many as three paging groups with one group designated as your "prime" group. When you need to respond to a Group Page but don't know the identity or directory number of the paging party, use the Meet Me Answer feature. -
Page 67: Group Presence
5360 IP Phone – User Guide Group Presence Group Presence allows members of call groups (Hunt, ACD, Ring, and Personal Ring) to make themselves absent or present in a group. Only members who are present in a group are offered calls to that group. -
Page 68: Handoff - Personal Ring Groups
To change the presence status of another Personal Ring Group member using a feature key: Press the Personal Ring Group Presence feature key. The LED associated with the key is steady lit when the member is present and off when absent. -
Page 69: Headset Operation
5360 IP Phone – User Guide Headset Operation Note: For information about the Cordless Headset, see USING YOUR PHONE WITH THE CORDLESS MODULE AND ACCESSORIES on page 85. To enable Headset Operation: Press the Headset feature key. To answer a call (when Auto Answer is disabled): Press the flashing line key or Float Key. -
Page 70: Hot Desking
Hot Desking Hot Desking allows you to log into the telephone system from any phone designated as a Hot Desk phone. When you log in at the phone using your assigned Hot Desk User Directory number, the phone assumes all your speed dials, features keys, call forwarding setup, and line appearances - even your language preference for the display. -
Page 71: Hot Desk Remote Logout
5360 IP Phone – User Guide Hot Desk Remote Logout A user who has forgotten to log out of a Hot Desking phone can be logged out from a phone that is configured to allow Hot Desk Remote Logout. Note: This feature must be allowed by your System Administrator via the Class of Service. -
Page 72: Make Busy
Make Busy You can use the Make Busy feature to have your phone appear busy to other callers. If callers dial your phone number when Make Busy is enabled a message indicating that your line is busy is displayed on their phones. To enable Make Busy: Press the key you programmed to Make Busy. -
Page 73: Messaging - Callback
5360 IP Phone – User Guide Messaging - Callback To leave a Callback Message when you hear busy or ringback tone: Press (MESSAGE) or press the Callback softkey. To respond to a message waiting condition on your phone: 1. Press (MESSAGE). -
Page 74: Messaging - Cancel Callback
6. To change or clear your password, do one of the following: To change your password, enter your new password and press the Enter softkey. To clear your password, enter 0. 7. Enter your new password again. 8. If you are setting up or changing a password, press the Enter softkey. 9. -
Page 75: Night Answer
5360 IP Phone – User Guide Night Answer The Night Answer feature allows you to route calls to an attendant or message at night. To enable Night Answer: Press the key you programmed to Night Answer. When you have enabled Night Answer, this key is highlighted. -
Page 76: Phone Lock
Phone Lock Phone Lock prevents access to the features on a phone, with the following exceptions: unlocking the set via a user PIN Hot Desk Login and Logout support, and Emergency Call Notification support. Phone Lock has no effect on incoming calls but restricts outgoing calls, with the following exceptions: calls to emergency trunk routes, and local operators. -
Page 77: User Pin
5360 IP Phone – User Guide User PIN A Personal Identification Number (PIN) allows a user to log into a set as a hot desk user or generic SIP user. It is also used to de-activate the Phone Lock feature. PINs must be from 0 to 8 digits in length. -
Page 78: Record A Call
Record a Call This feature uses your voice mail system to record your telephone conversations. Note: You may be required by law to inform the other party that you are recording the conversation. For specific instructions, consult your system administrator. To start recording while on a 2-party call: Press the Record Call key. -
Page 79: Reminder
5360 IP Phone – User Guide Reminder To program a Reminder: 1. Press Superkey (must be programmed to a key). 2. Press the No softkey until "Timed Reminder" appears. 3. Press the Reminder softkey. 4. Enter the time in 24-hour format. -
Page 80: Speak@Ease
Unified Communicator (UC) Express supports the display of contact presence information through icons located on Programmable Keys that have been programmed as speed dials. The icons will be displayed on the button. The presence icons for the 5360 are shown below: Online... -
Page 81: Tag Call
5360 IP Phone – User Guide For the 5360, when a user presses a programmable key which is in the alternate speed dial number state: The programmable key text will change to display the primary number for two seconds giving you the option to dial the primary number If you press the button again while the primary number is displayed, the primary number will be dialed;... -
Page 82: Using Your Phone With The 5310 Ip Conference Unit
USING YOUR PHONE WITH THE 5310 IP CONFERENCE UNIT Your phone uses the 5310 IP Conference Unit for conferencing . You use the Conference Controller to turn the conference unit off or on, to adjust the volume or to put the conference unit into Presentation mode. -
Page 83: Exit The Conference Controller
5360 IP Phone – User Guide Exit the Conference Controller To exit the conference controller Press Close. Mute the Conference Unit To mute the conference unit so that conversation in the meeting room cannot be heard by individuals being conferenced: Press Mute. -
Page 84: Using The Line Interface Module
USING THE LINE INTERFACE MODULE Your phone supports the Mitel Line Interface Module. The Line Interface Module allows you to make and receive calls over an analog line (Line Interface Module line) connected to your phone. The Line Interface Module operates in either of the following two modes, as... -
Page 85: Making And Answering Calls Using The Failover Mode
5360 IP Phone – User Guide To answer a waiting analog call or return to the original analog call: 1. Do one of the following: Press and release the hookswitch Press Cancel ( 2. Press the key you have programmed as Analog Line. -
Page 86: Using Your Phone With The Cordless Module And Accessories
Cordless Module before disconnecting the telephone’s power supply may damage the telephone. For information about installing the Cordless Module, see the Cordless Module and Accessories Installation Guide for Mitel 5330/5340/5360 IP Phones available at Mitel OnLine. Figure 1: Cordless Module and Accessories on 5360 IP Phone... -
Page 87: Elements Of Your Cordless Module And Accessories
5360 IP Phone – User Guide Figure 2: Rear View of 5360 IP Phone Elements of Your Cordless Module and Accessories Feature Function 1) Cordless Module Attached to the back of the phone, the module contains a Light Emitting Diode (LED) indicating that a cordless device is in use;... -
Page 88: Handset/Headset Combinations
Handset/Headset Combinations The following combinations of corded and cordless headset and handset are supported on the 5360 IP Phone: Corded handset only Corded headset only Corded handset and corded headset Cordless handset only Cordless headset only Cordless handset and cordless headset... -
Page 89: Cordless Module Led Indicators
5360 IP Phone – User Guide indicating that the accessory is charging. It could take up to 60 minutes for the green LED to start flashing. Allow the accessory to fully charge, approximately 3 hours. 4. Press Yes to confirm pairing. The Cordless Devices application confirms the pairing by displaying the paired device name and its battery level indicator. -
Page 90: Using The Cordless Handset
USING THE CORDLESS HANDSET The cordless handset provides office mobility, allowing you to make and answer calls while away from your desk. Replacing the standard corded handset, the cordless handset contains a rechargeable battery that charges in the handset cradle when not in use. To use the Cordless Handset, you must pair the handset with the phone. -
Page 91: Answer A Call
5360 IP Phone – User Guide Note: The IP Phone deactivates the cordless handset when a corded handset is plugged in. Answer a Call Do one of the following: Lift the cordless handset. If the handset is already out of the cradle, press the hookswitch button on the handset. -
Page 92: Alerting Tones And Leds
Alerting Tones and LEDs The cordless accessories provide the following alerting tones: Feature Function Mute key on cordless device 2-pitch tone occurs immediately. Reminder tone occurs 30 ON/OFF seconds after activation and then regularly until deactivated. Mute key on Phone ON/OFF No immediate tone. -
Page 93: Using The Cordless Headset
5360 IP Phone – User Guide USING THE CORDLESS HEADSET The cordless headset offers the same capability as the cordless handset to make and answer telephone calls away from your desk while adding the convenience of hands-free operation. When not in use, the cordless headset sits in the headset charging cradle. -
Page 94: Dialing - Auto Dial Disabled
Dialing – Auto Dial Disabled To dial a number with Auto Dial disabled: 1. Lift the headset or press the hookswitch. 2. Make the call using the dial pad, or press a programmed speed dial key on the phone. Dialing – Auto Dial Enabled To dial with Auto Dial enabled: To dial the predefined Auto Dial number, press the hookswitch on the cordless handset or headset. -
Page 95: Cordless Headset Leds
5360 IP Phone – User Guide Cordless Headset LEDs There are two LEDs associated with the cordless headset: A blue LED on the headset indicates the headset status A green LED in the headset charging cradle indicates battery status LED Color... -
Page 96: Viewing Cordless Module Information
Viewing Cordless Module Information You can use the Cordless Module Application to view protocol, firmware, and hardware information about the module. To view cordless module information 1. Access the Cordless Module Application. 2. Press Cordless Module Info. Device information appears on the screen. 3.